What new features you will get in the latest release of Rails4

Rails_4-300x137

Introduction:

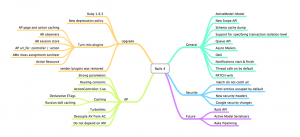
Finally, the most awaited Rails 4.0 version has been released by the Rails team on 25th of June. Rails 4 has got huge changes. There are tons of new features available, which can make your life as a Rails developer a lot easier. We will talk about the most exciting features in Rails 4 and why you should upgrade from Rails 3 version as soon as possible.

New features of Rails4

1. Ruby Versions

It is essential to note that Rails 4 would require Ruby 1.9.3 or higher, in fact Ruby 2.0.0 is recommended for your Rails 4 apps.

2. ‘Gemfile’

Rails now uses a ‘Gemfile’ in the application root to determine the gems you need for your app to start. This ‘Gemfile’ is processed by the Bundler gem, which then installs all the dependencies. It can also install all the dependencies locally to your app so that it doesn’t depend on the system gems.

Read Also: How to do tagging in Rails with gem ‘Acts_as_taggable_on’?

3. ‘Threadsafe’ by Default

Rails 4 will be thread-safe by default i.e. removing overhead and improving the performance on threaded servers, like thin and puma. You will have to ensure that your application and its dependencies are thread-safe, in other words, avoiding global state e.g. class or global variables.

4. No More vendor/plugins

Rails 4.0 will no longer support loading of plugins from vendor. You must replace any plugins by extracting them to gems and adding them to your ‘Gemfile’. If you choose not to make them gems, you can also move them into a different directory such as lib/my_plugin/* and add an appropriate initializer in config/initializers/my_plugin.rb.

5. New Testing Directories

The biggest change made to the testing of Rails 4 app is not the swapping of the testing framework, rather the testing folder structure. The test folder will now have a structure very similar to RSpec:

  • controllers:
  • fixtures
  • helpers
  • integration
  • mailers
  • models

Developers will no longer have to worry if the test is “functional” or a “unit”. The structure provides a clear separation of where the tests in your application should go.

6. Strong Parameters

In Rails 4, a new pattern has been introduced to secure your models from mass assignment. You can filter the parameters passed to your model in the controller instead of ‘whitelisting’ the attributes in your model using “attr_accessible”.

[sourcecode]class PostController < ApplicationController
def create
@post = Post.create(params[:user])
end
end[/sourcecode]

You can protect against unexpected input with declarations in the model using “attr_accessible”.

[sourcecode]attr_accessible :title, :description[/sourcecode]

In Rails 4, you don’t need to worry about unexpected input attributes in your model anymore.
Strong Parameters gem moves user input into the controller.

[sourcecode]class PostController < ApplicationController
def create
@post = Post.create(post_params)
end

private
def post_params
params.require(:post).permit(:title, :description)
end
end[/sourcecode]

The “params hash” in your controller is not a normal hash. It’s actually an instance of ActionController::Parameters, which exposes the “require” and “permit” methods.

The “require” method ensures that the specified key is available in the “params” hash, and raises an ActionController::ParameterMissing exception if the key doesn’t exist.

The “permit” method protects you from unexpected mass assignment.

7. Renamed Callbacks

Action callbacks in controllers are now renamed from *_filter to *_action

Example:

[sourcecode]before_filter :before_action
arround_filter :arround_action
after_filter :after_action[/sourcecode]

All existing *_filter methods will still work with no deprecation warnings. However, It would recommend to replace of *_filter calls to *_action

8. Rails 2 Model.find(:[all|:first:last]) syntax is now deprecated.

9. Deprecated dynamic finders

Rails 4 deprecates all dynamic finder methods (with the exception of find_by and find_by_…). Instead, you’ll use where

[sourcecode]find_all_by_… => where(…)
scoped_by_… => where(…)
find_last_by_… => where(…).last
find_or_initialize_by… => where(…).first_or_initialize
find_or_create_by… => where(…).first_or_create
find_or_create_by_…! => where(…).first_or_create![/sourcecode]

The deprecated finders gem will be included as a dependency in 4.0 and removed in 4.1. The gem, however, will be around and maintained until 5.0.

10. Queuing system

Rails4 added the support for a queue to run background jobs. The queuing API is very simple. The ActiveSupport::Queue class comes with a push method that accepts any object, as long as that object defines a run method.

Example
Let’s say that you have a job class TestJob that prints the name of an author

[sourcecode]class TestJob
def run
puts "I am running!"
end
end[/sourcecode]

You can queue a job to print “I am running!” in the background by pushing an instance of that class to Rails.queue:

[sourcecode]Rails.queue.push(TestJob.new)
"I am running!"[/sourcecode]

The job will run in a background thread and it will not block any of your operations.

11. Live Streaming

Live Streaming is a major new feature in Rails 4. It facilitates you to stream data to the browser. Enabling live streaming requires you to mix in the ActionController::Live class in your controller.

[sourcecode]class MyController < ActionController::Base
include ActionController::Live
def stream
response.headers[‘Content-Type’] = ‘text/event-stream’
100.times {
response.stream.write "hello world\n"
sleep 1
}
response.stream.close
end
end[/sourcecode]

It will stream the string “hello world” to your client 100 times.

You should take notice of following things

  • Manually close the stream after you are done streaming in the browser.
  • Headers must be written first before writing anything to the client.
  • You will need a concurrent Ruby web server, such as puma.io, Rainbow or Thin. Using the default ‘WEBrick’ server won’t work, since it buffers all the output. Also note that Unicorn won’t work either, since it kills the connection after 30 seconds.
  • All controllers that include ActionController::Live would be executed in another thread, so make sure your code is thread-safe.

12. Rails 4 and Hstore from Postgres 9.2

ActiveRecord in Rails 4 will now support the PostgreSQL hstore extension. This database extension allows a new data type for a column in PostgreSQL called ‘hstore’ which effectively represents a string-only hash. For most purposes this would be similar to serializing data in a text column, but the fact that this is now a native datatype, it would grant a huge performance boost and the capability to query against it directly. You can now have a hint of a schema-less database available to your application without needing to perform a full upgrade to MongoDB, CouchDB, Riak or other similar schema-less data store.

13. Cache Digests (Russian Doll Caching)

Make it super easy to do Russian Doll-caching through key-based expiration with automatic dependency management of nested templates

14. Turbolinks

Now you can speed-up the client-side with ‘Turbolinks’. It essentially turns your app into a single-page ‘JavaScript’ application in terms of speed, but with none of the developmental drawbacks (except, maybe, compatibility issues with some existing JavaScript packages).

15. Routing Concerns

In Rails 4, routing concerns has been added to the router. The basic idea is to define common sub-resources (like comments) as concerns and include them in other resources/routes.

16. Rails3 code

[sourcecode]resources :posts do
resources :comments
end
resources :articles do
resources :comments
resources :remarks
end[/sourcecode]

In rails4 the concern routes will only be included within a resource by passing it to the routing option :concerns. The :concerns option can accept one or more concerns.

[sourcecode]concern :commentable do
resources :comments
end
concern :remarkable do
resources :remarks
end
resources :posts, :concerns, :commentable
resources :articles, :concerns =>[:commentable, :remarkable][/sourcecode]

Why we should upgrade to rails4?

Rails4 is recommended to be used with Ruby 2.0.0. It stopped supporting Ruby 1.8.x after Rails 3.2. Ruby 1.9.2+ will be supported until Rails 5 is released!

Aware of any other not-so-obvious features? Please post it in the comments below.

How to show Captured Images dynamically in “GridView” Layout

There are numerous camera apps in the market which displays shopping items (i.e. image view). In these camera apps we need to arrange each photo items in a list view, basically a ‘Grid View’.

In such cases, ‘table layout’ would be easier to use; but it is difficult to arrange large number of items in

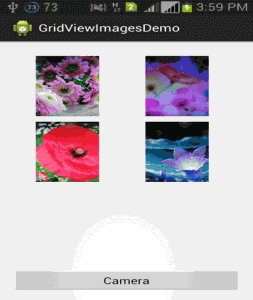
gridview_sample-253x300

side scroll view. As ‘table view’ is just a layout manager, it doesn’t allow direct interaction with each item to the users.

In order to tackle such development issues, it would be smart to implement ‘Grid View’ Layout.

What is “Grid View” Layout?

Grid View (android.widget.Grid View) is a layout that is implemented to show two-dimensional view with scrollable structure.

With the help of ‘List’ adapter, we can add images dynamically to a ‘Grid View’ layout by customizing the number of columns.

Let me tell you the process to show your Android Smartphone captured images dynamically in “Grid View” layout with some example.

Example of Layout xml

[sourcecode]<RelativeLayout xmlns:android="http://schemas.android.com/apk/res/android"
xmlns:tools="http://schemas.android.com/tools"
android:layout_width="match_parent"
android:layout_height="match_parent"
android:paddingBottom="@dimen/activity_vertical_margin"
android:paddingLeft="@dimen/activity_horizontal_margin"
android:paddingRight="@dimen/activity_horizontal_margin"
android:paddingTop="@dimen/activity_vertical_margin"
tools:context=".MainActivity" >

<RelativeLayout
android:id="@+id/RelativeGridLayout"
android:layout_width="wrap_content"
android:layout_height="fill_parent" >

<GridView
android:id="@+id/gridviewimg"
android:layout_width="wrap_content"
android:layout_height="fill_parent"
android:gravity="center"
android:numColumns="2"
android:scrollbarStyle="outsideInset"
android:smoothScrollbar="true"
android:verticalSpacing="10dp"
android:paddingBottom="50dp"
android:paddingTop="10dp"
/>
</RelativeLayout>

<RelativeLayout
android:id="@+id/RelativeLayout01"
android:layout_width="fill_parent"
android:layout_height="40dp"
android:layout_alignBottom="@+id/RelativeGridLayout"
>

<Button
android:id="@+id/capture_btn1"
android:layout_width="fill_parent"
android:layout_height="wrap_content"
android:layout_alignParentTop="true"
android:layout_centerHorizontal="true"
android:text="Camera" />
</RelativeLayout>

</RelativeLayout>[/sourcecode]

Example of Main form Activity class

1.MainActivity.java

[sourcecode]package com.example.gridviewimagesdemo;

import java.io.File;
import java.io.FileInputStream;
import java.io.FileNotFoundException;
import java.io.FileOutputStream;
import java.io.IOException;
import java.text.DateFormat;
import java.text.SimpleDateFormat;
import java.util.ArrayList;
import java.util.Arrays;
import java.util.Date;
import java.util.List;

import android.net.Uri;
import android.os.Bundle;
import android.os.Environment;
import android.provider.MediaStore;
import android.app.Activity;
import android.content.ActivityNotFoundException;
import android.content.Context;
import android.content.Intent;
import android.graphics.Bitmap;
import android.graphics.BitmapFactory;
import android.util.Log;
import android.view.Menu;
import android.view.View;
import android.view.ViewGroup;
import android.view.View.OnClickListener;
import android.widget.BaseAdapter;
import android.widget.Button;
import android.widget.GridView;
import android.widget.ImageView;
import android.widget.Toast;

public class MainActivity extends Activity implements OnClickListener {

Button captureBtn = null;
final int CAMERA_CAPTURE = 1;
private Uri picUri;
private DateFormat dateFormat = new SimpleDateFormat("yyyy-MM-dd HH:mm:ss");
private GridView grid;
private  List<String> listOfImagesPath;

public static final String GridViewDemo_ImagePath = Environment.getExternalStorageDirectory().getAbsolutePath() + "/GridViewDemo/";

@Override
protected void onCreate(Bundle savedInstanceState) {
super.onCreate(savedInstanceState);
setContentView(R.layout.activity_main);

captureBtn = (Button)findViewById(R.id.capture_btn1);
captureBtn.setOnClickListener(this);
grid = ( GridView) findViewById(R.id.gridviewimg);

listOfImagesPath = null;
listOfImagesPath = RetriveCapturedImagePath();
if(listOfImagesPath!=null){
grid.setAdapter(new ImageListAdapter(this,listOfImagesPath));
}
}

@Override
public boolean onCreateOptionsMenu(Menu menu) {
// Inflate the menu; this adds items to the action bar if it is present.
getMenuInflater().inflate(R.menu.main, menu);
return true;
}

@Override
public void onClick(View arg0) {
// TODO Auto-generated method stub
if (arg0.getId() == R.id.capture_btn1) {

try {
//use standard intent to capture an image
Intent captureIntent = new Intent(MediaStore.ACTION_IMAGE_CAPTURE);
//we will handle the returned data in onActivityResult
startActivityForResult(captureIntent, CAMERA_CAPTURE);
} catch(ActivityNotFoundException anfe){
//display an error message
String errorMessage = "Whoops – your device doesn’t support capturing images!";
Toast toast = Toast.makeText(this, errorMessage, Toast.LENGTH_SHORT);
toast.show();
}
}

}

protected void onActivityResult(int requestCode, int resultCode, Intent data) {
if (resultCode == RESULT_OK) {
//user is returning from capturing an image using the camera
if(requestCode == CAMERA_CAPTURE){
Bundle extras = data.getExtras();
Bitmap thePic = extras.getParcelable("data");
String imgcurTime = dateFormat.format(new Date());
File imageDirectory = new File(GridViewDemo_ImagePath);
imageDirectory.mkdirs();
String _path = GridViewDemo_ImagePath + imgcurTime+".jpg";
try {
FileOutputStream out = new FileOutputStream(_path);
thePic.compress(Bitmap.CompressFormat.JPEG, 90, out);
out.close();
} catch (FileNotFoundException e) {
e.getMessage();
} catch (IOException e) {
e.printStackTrace();
}
listOfImagesPath = null;
listOfImagesPath = RetriveCapturedImagePath();
if(listOfImagesPath!=null){
grid.setAdapter(new ImageListAdapter(this,listOfImagesPath));
}
}
}
}

private List<String> RetriveCapturedImagePath() {
List<String> tFileList = new ArrayList<String>();
File f = new File(GridViewDemo_ImagePath);
if (f.exists()) {
File[] files=f.listFiles();
Arrays.sort(files);

for(int i=0; i<files.length; i++){
File file = files[i];
if(file.isDirectory())
continue;
tFileList.add(file.getPath());
}
}
return tFileList;
}

public class ImageListAdapter extends BaseAdapter
{
private Context context;
private List<String> imgPic;
public ImageListAdapter(Context c, List<String> thePic)
{
context = c;
imgPic = thePic;
}
public int getCount() {
if(imgPic != null)
return imgPic.size();
else
return 0;
}

//—returns the ID of an item—
public Object getItem(int position) {
return position;
}

public long getItemId(int position) {
return position;
}

//—returns an ImageView view—
public View getView(int position, View convertView, ViewGroup parent)
{
ImageView imageView;
BitmapFactory.Options bfOptions=new BitmapFactory.Options();
bfOptions.inDither=false;                     //Disable Dithering mode
bfOptions.inPurgeable=true;                   //Tell to gc that whether it needs free memory, the Bitmap can be cleared
bfOptions.inInputShareable=true;              //Which kind of reference will be used to recover the Bitmap data after being clear, when it will be used in the future
bfOptions.inTempStorage=new byte[32 * 1024];
if (convertView == null) {
imageView = new ImageView(context);
imageView.setLayoutParams(new GridView.LayoutParams(ViewGroup.LayoutParams.MATCH_PARENT, ViewGroup.LayoutParams.MATCH_PARENT));
imageView.setPadding(0, 0, 0, 0);
} else {
imageView = (ImageView) convertView;
}
FileInputStream fs = null;
Bitmap bm;
try {
fs = new FileInputStream(new File(imgPic.get(position).toString()));

if(fs!=null) {
bm=BitmapFactory.decodeFileDescriptor(fs.getFD(), null, bfOptions);
imageView.setImageBitmap(bm);
imageView.setId(position);
imageView.setLayoutParams(new GridView.LayoutParams(200, 160));
}
} catch (IOException e) {
e.printStackTrace();
} finally{
if(fs!=null) {
try {
fs.close();
} catch (IOException e) {
e.printStackTrace();
}
}
}
return imageView;
}
}
}[/sourcecode]

Example of Manifest.xml file content:

Example of AndroidManifest.xml

[sourcecode]<?xml version="1.0" encoding="utf-8"?>
<manifest xmlns:android="http://schemas.android.com/apk/res/android"
package="com.example.gridviewimagesdemo"
android:versionCode="1"
android:versionName="1.0" >

<uses-sdk
android:minSdkVersion="8"
android:targetSdkVersion="17" />

<uses-permission android:name="android.permission.WRITE_EXTERNAL_STORAGE" />

<application
android:allowBackup="true"
android:icon="@drawable/ic_launcher"
android:label="@string/app_name"
android:theme="@style/AppTheme" >
<activity
android:name="com.example.gridviewimagesdemo.MainActivity"
android:label="@string/app_name" >
<intent-filter>
<action android:name="android.intent.action.MAIN" />

<category android:name="android.intent.category.LAUNCHER" />
</intent-filter>
</activity>
</application>

</manifest>[/sourcecode]

Conclusion:

So, a ‘Grid view’ implementation would result in following features and benefits:

  • In ‘GridView’ layout items would be listed in a static grid, defined in layout xml file.
  • ‘Gridview’ extends android.widget.Adapter, so it could be used where large amount of data is managed in a single page frame.
  • Enhanced data source binding capabilities (Direct interaction with SQLite Data Source)
  • Built-in support for sorting and paging mechanism
  • Additional Column types (ImageField)

I would like to recommend you to go through my previous article on where I have clearly narrate the process to display your iPhone captured images in Grid View layout.

I hope you find this useful. If you want to develop android or iPhone mobile app for you or for your organization, then you can hire single or group of developers from the pool of skilled and accomplished android specialists. Drop me a line below with your thoughts, thanks.

How to configure Rails application with Puma and Ngnix on CentOS

Rails__new_0912

Puma is a multi-threaded high performance web server written in Ruby. Currently it is very popular in market as a ruby application server. We can use it for any kind of ruby web application that supports rack. Here, I have mentioned detailed steps to help you configure Rails application with Puma and Nginx on CentOS.

Steps to install Puma:

We can install puma via RubyGems.

1. Append the below line to your Gemfile, if you have Rails 3.0 or above:

[sourcecode]gem ‘puma’, ‘~> 2.0′[/sourcecode]

2. Then we have to issue the below command to install puma

[sourcecode]# bundle install[/sourcecode]

3. Now you can run your application with puma using the below command

[sourcecode]# RAILS_ENV=production bundle exec puma -e production –b unix:///var/run/my_app.sock[/sourcecode]

You should see the following outcomes:

[sourcecode]Puma 2.0.1 starting…
* Min threads: 0, max threads: 16
* Environment: production
* Listening on unix:///var/run/my_app.sock
Use Ctrl-C to stop[/sourcecode]

4. Press Ctrl-C and stop the process for now. We will start the server again after installation and configuration of ‘Ngnix’.

Steps to Install Ngnix:

1. To install Nginx on CentOS type below commands

[sourcecode]# wget http://nginx.org/packages/centos/6/noarch/RPMS/nginx-release-centos-6-0.el6.ngx.noarch.rpm
# rpm -ivh nginx-release-centos-6-0.el6.ngx.noarch.rpm
# yum install nginx[/sourcecode]

Configuring Ngnix:

1. First we have to create a virtual host file

[sourcecode]#vi /etc/nginx/conf.d/my-NewProject.conf[/sourcecode]

2. Now add the below line to your config file (Change fields as your requirement)

[sourcecode]upstream my_app
{
server unix:///var/run/my_app.sock;
}
server {
listen 80
server_name www.example.com; # change to match your URL
root /var/www/html/my_app/public; # I assume your app is located at this location
location / {
proxy_pass http://my_app; # match the name of upstream directive which is defined above
proxy_set_header Host $host;
proxy_set_header X-Forwarded-For $proxy_add_x_forwarded_for;
}
}[/sourcecode]

3.Then we have to restart the Ngnix

[sourcecode]#service nginx restart[/sourcecode]

4.After restarting the Ngnix we need to again start puma

[sourcecode]# cd /var/www/html/my_app/
# RAILS_ENV=production bundle exec puma -e production -b unix:///var/run/my_app.sock
Puma 2.0.1 starting…
* Min threads: 0, max threads 16
* Environment: production
* Listening on unix:///var/run/my_app.sock
Use Ctrl-C to stop</pre>
<pre>[/sourcecode]

Now you will be able to browse your application.

Type the Server Name you mentioned on your virtual host configuration.

For example: http://www.example.com

How to run Puma as a demon:

1. If you want to run puma as a foreground process (daemon) then start puma with –d option with the following command

[sourcecode]# RAILS_ENV=production bundle exec puma -e production -d -b unix:///var/run/my_app.sock[/sourcecode]

2.To verify whether puma is running or not we have to issue the below command

[sourcecode]# ps aux | grep puma
root  19119 13.1  1.3  43276 27792 ?   Sl   21:02   0:01 ruby /usr/local/rvm/gems/ruby-1.9.3-p0@tapas1/bin/puma -e production -d -b unix:///var/run/my_app.sock[/sourcecode]

Finally-steps to stop and restart our puma server

‘pumactl’ is a command line that helps to stop and restart the application server. It takes parameter from the file where we store the puma process state.

1.Currently we have to kill the running process of puma by issuing following command.

[sourcecode]pkill –f puma[/sourcecode]

2. You can again verify the process is running or not by issuing the following command:

[sourcecode]# ps aux | grep puma[/sourcecode]

3.Then start the puma with –S option

[sourcecode]RAILS_ENV=production bundle exec puma -e production -d -b unix:///var/run/my_app.sock -S /var/run/my_app.state –control ‘unix:///var/run/my_app_ctl.sock'[/sourcecode]

4.Now puma would generate the file /var/run/my_app.state like below content:

[sourcecode]pid: 20937
config: !ruby/object:Puma::Configuration
options:
:min_threads: 0
:max_threads: 16
:quiet: true
:debug: false
:binds:- unix:///var/run/my_app.sock
:workers: 0
:daemon: true
:worker_directory: /var/www/html/my_app/
:environment: production
:state: /var/run/my_app.state
:control_url: unix:///var/run/my_app_ctl.sock
:control_auth_token: c0c3983017b972da3318a33349e8ee
[/sourcecode]

5.Now, you can restart and stop your application with ‘pumactl’ using the file /var/run/my_app.state

a) To restart puma server issue the following command

[sourcecode]bundle exec pumactl -S /var/run/my_app.state restart[/sourcecode]

b) To stop the puma server issue the following command

[sourcecode]bundle exec pumactl -S /var/run/my_app.state stop[/sourcecode]

Following the above mentioned steps would result you with a clean configuration of Rails application with ‘Puma’ and ‘Nginx’.

Recommended Reading: New features of Rails4

Mastering J2EE Design Patterns and Navigating Through the Tiers

Design pattern is in general-a repeatable solution to a commonly occurring issue in software designs. These patterns can also be considered as a finished design which can be used directly into the code or a template for how to solve a particular issue.

Object oriented design patterns typically show relationships and interactions between objects or classes, without specifying the final application classes or objects that are involved.

Whereas, algorithms do not offer any details of design patterns, since they resolve computational problems rather than design issues.

On the other hand, pattern specifies a solid solution to a recurring design issues, placing particular process on the context and the surrounding problem as well as the consequences and impact of solution.

This provides a collection of patterns which you can use in the context of designing Java 2 Platform and Enterprise Edition (J2EE) applications.

Core J2EE Patterns provides more detail on J2EE patterns and is an excellent resource that can be integrated on the website. Developing and designing patterns leverages the developer community’s collective experience by sharing issues and solutions.

A design pattern must capture a problem’s overview and context, a possible option and the solution simultaneously.
In the J2EE application architecture, we can split up design patterns into two categories: general software development patterns and those patterns that overlook specific J2EE challenges.

J2EE- design pattern verifies lesser known issues which solid application architecture should resolve.

Reasons to implement Patterns:

  • Patterns reflect the knowledge, experience and insights of developers who have smoothly used these patterns in their own work.
  •  Patterns provide a rough solution as necessary that can be adapted to different problems.
  • Patterns provide a generic vocabulary of solutions that can express heavy solutions succinctly.

Understanding J2EE Design Patterns

J2EE Design Patterns are tried-and-tested solutions to recurring design problems encountered in enterprise application development.

These patterns provide a structured approach to solving specific challenges and promote code reusability, modularity, and maintainability. Some common J2EE design patterns include:

  • MVC (Model-View-Controller):
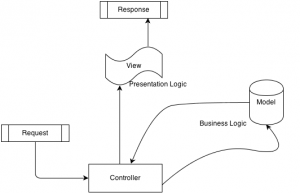
    Separates the application into three components—Model (data logic), View (user interface), and Controller (flow control)—enhancing maintainability and flexibility.
  • DAO (Data Access Object):
    Abstracts the interaction with databases, providing a centralized and consistent way to manage data access.
  • Singleton:
    Ensures that a class has only one instance and provides a global point of access to it, beneficial for managing shared resources.
  • Facade:
    Provides a unified interface to a set of interfaces in a subsystem, simplifying complex systems for clients.
  • Observer:
    Defines a dependency between objects, ensuring that when one object changes state, its dependents are notified and updated automatically.

Deciphering the Multi-Tier Architecture

Enterprise applications are often complex and require a structured architecture for effective development and management.

The multi-tier architecture, also known as n-tier architecture, divides an application into distinct layers or tiers, each responsible for a specific aspect of functionality. The common tiers include:

  • Presentation Tier:
    Also known as the client tier, this layer focuses on user interface interactions. It handles user requests, displays information, and captures user input.
  • Business Logic Tier:
    This tier contains the application’s business logic and rules. It processes user input, interacts with databases through the data access layer, and implements the core functionalities of the application.
  • Integration Tier:
    Also known as the middleware tier, this layer handles communication between the presentation tier and the business logic tier. It often involves components like Enterprise JavaBeans (EJB) for managing distributed transactions and messaging.
  • Resource Tier:
    This tier represents the data storage and management layer. It includes databases, file systems, and other resources that store and manage application data.

Benefits and Best Practices

Mastering J2EE design patterns and understanding the multi-tier architecture yields several benefits, including:

  • Scalability:
    The modular nature of tiers and the reusable solutions of design patterns make scaling applications more manageable.
  • Maintenance:
    The separation of concerns and code reuse simplify maintenance and updates.
  • Performance:
    Efficient data flow and reduced network overhead contribute to optimal application performance.
  • Team Collaboration:
    J2EE patterns and tier architecture facilitate teamwork by offering a common vocabulary and structured approach.

Common uses of Design Patterns:

  1.  Front Controller is a container to hold common processing logic that occurs within the ‘presentation’ tier and which may otherwise be inaccurately put in the ‘View’.
    A controller handles requests and manages content retrieval, view management, security, navigation, delegating to a Dispatcher component to dispatch to a View.
  2. Business Delegate reduces coupling between remote tiers and provides an entry point for accessing remote services in the ‘Model’.
    A Business Delegate might also cache details data as required to improve performance. A Business Delegate encapsulates a ‘Session Façade’ and manages to one-to-one relationship with that ‘Session Façade’. A Business Delegate invokes a ‘Session Façade’ for An Application Services.
  3.  Service Locator encapsulates the implementation mechanisms for looking up business service details. A Service Locator used by a ‘Business Delegate’ connects to a ‘Session Façade’. Other services like web services and business-tier services can use a Service Locator.
  4. Session Façade provides coarse-grained services to the clients by hiding the complexities of the business service interactions. A ‘Session Façade’ might call several Application Service implementations or Business Objects. A ‘Session Façade’ can also encapsulate a Value List Handler.
  5. Business Object implements your conceptual domain model using an object model. Business Objects differentiates business logic and data into a separate layer in the application. Business Objects programmatically represents persistent objects and can be transparently continued using Domain Store.
  6. Data Access Object enables loose coupling between the resources and business tiers. ‘Data Access Object’ covers all the data access logic into CRUD data from a persistent store. ‘Data Access Object’ does work on ‘Transfer Object’ to send and receive data.

Conclusion:

These design patterns captures potential problems when using the various J2EE-specified technologies and supports developers to construct application architecture’s requirements. For example-The locality Front Controller design pattern, transforms unstructured servlet codes into a controller of the refined graphical user interface.


Related Questions

What are J2EE Design Patterns and why are they important in enterprise application development?

J2EE Design Patterns are reusable solutions to common design problems encountered in enterprise application development.

They promote code reusability, modularity, and maintainability by offering structured approaches to solving challenges. J2EE Design Patterns ensure that developers follow best practices, resulting in more robust and scalable applications.

How do J2EE Design Patterns enhance the efficiency of different tiers in the multi-tier architecture?

J2EE Design Patterns seamlessly complement the multi-tier architecture. For example, patterns like MVC enhance user interface management in the presentation tier, while patterns like Business Delegate optimize communication between the presentation and business logic tiers. T

hese patterns ensure that each tier is well-structured, efficient, and interacts seamlessly with other tiers.

What is the significance of the multi-tier architecture in enterprise application development?

The multi-tier architecture divides an application into distinct layers, each with specific responsibilities. This structure enhances scalability, maintainability, and performance.

The presentation tier focuses on user interface, the business logic tier handles core functionalities, the integration tier manages communication, and the resource tier deals with data storage and management.

How do J2EE Design Patterns contribute to the scalability of enterprise applications?

J2EE Design Patterns promote modular and reusable code, which simplifies scaling. With patterns like Singleton and Data Access Object (DAO), developers can efficiently manage shared resources and data access, ensuring that as the application grows, it can be scaled without sacrificing performance or complexity.

Can you provide an example of how a J2EE Design Pattern enhances a specific tier in the multi-tier architecture?

Certainly. Consider the MVC pattern. In the presentation tier, the Model-View-Controller (MVC) pattern separates data (Model), user interface (View), and control flow (Controller). This separation enhances maintainability as changes in one component don’t affect the others.

The Controller manages user interactions, the Model handles data logic, and the View renders information. This clear separation simplifies development and updates in the presentation tier.

Unveiling FeedZirra: Simplifying Feed Parsing in Your Rails Application

What is a Feed?

A feed is a data format which is used to provide frequent updates and latest contents to the users. A feed has no particular type; it could be news, latest technology, game, gadgets, sports etc. These feeds can be easily parsed into your Rails application to make it more useful for the users. The feed is build up with XML and has particular format type.

What is Feedzirra?

“Feedzirra” on the other hand is a feed library built on Ruby that is designed to get and update a number of feeds as fast as possible. This includes using “libcurl-multi” through the “curb” gem for faster http gets, and “libxml” through “nokogiri” and “sax-machine” for faster parsing.

Suppose you need to add some updated information to your Rails application from other feed site like ‘feedburner’, in such cases you can easily work it out by using the gem “feedzirra”.

Here are the steps to use ‘feedzirra’ in your Rails application.

Step-1

Add the gem ‘feedzirra’ in to your gem file.

[sourcecode language=”plain”]gem ‘feedzirra'[/sourcecode]

Run ‘bundle install’ to install the gem along with its dependencies.

Step-2

Modify your controller where you are fetching the feeds.

[sourcecode language=”plain”]require ‘feedzirra'[/sourcecode]

Step-3

Now, write the following code in your method in order to parse feeds from an external site.

[sourcecode language=”plain”]feed =Feedzirra::Feed.fetch_and_parse("http://feeds.feedburner.com/TechCrunch/gaming")
@entry = feed.entries
[/sourcecode]

Note: Here we are parsing the feeds from ‘feedburne’r site with updated information on gaming news.

Step-4

Now, open your view section and write the following code snippet to display the information regarding the feeds.

[sourcecode language=”plain”]<ul>
<%@entry.each do |t|%>
<li>
<%= link_to "#{t.title}", "#{t.url}",:target => "_blank" %>
<%=t.author%>
<%=t.content%>
<%=t.published%>
<%=t.categories%>
</li>
<%end%>
</ul>
[/sourcecode]

Note: The above code will display the feed title, author name, content, published date and category type. Clicking the feed title, will launch a new tab in browser and display the detail information of that feed.

Step-5

You can also fetch multiple feeds by writing the following code.

[sourcecode language=”plain”]feed_urls = ["http://feeds.feedburner.com/PaulDixExplainsNothing", "http://feeds.feedburner.com/trottercashion"]
feeds = Feedzirra::Feed.fetch_and_parse(feed_urls)
[/sourcecode]

Conclusion:

The FeedZirra gem empowers Rails developers to seamlessly integrate feed parsing capabilities into their applications. 

Are you looking for a Ruby on Rails developer

Contact Us

Whether you’re building a news aggregator, a blog reader, or a content recommendation system, FeedZirra simplifies the process of retrieving and presenting timely content from various sources. 

By harnessing the power of FeedZirra, you can enhance user engagement, keep your app’s content fresh, and deliver a more dynamic user experience.

Related Questions

Q1: What is the FeedZirra gem, and how does it simplify feed parsing in Rails applications?

The FeedZirra gem is a powerful tool in the Ruby ecosystem that provides a user-friendly way to parse RSS and Atom feeds. It abstracts the complexities of handling different feed formats, making it easier for developers to extract and utilize the content they need within their Rails apps.

Q2: How can I integrate the FeedZirra gem into my Rails application for parsing feeds?

To integrate the FeedZirra gem into your Rails app, start by adding it to your Gemfile with the following line: gem ‘feedzirra’. After running bundle install, you can fetch and parse feeds using the Feedzirra::Feed.fetch_and_parse method. This allows you to access the feed’s entries (articles) and display them in your app.

Q3: What are some of the advanced features offered by the FeedZirra gem for feed parsing in Rails?

The FeedZirra gem provides several advanced features, including access to various properties of feed entries such as publication date, author, summary, and content. It also offers automatic HTML content sanitization to ensure safe rendering. Additionally, you can implement caching to reduce the load on feed sources and optimize performance.

Q4: How does the FeedZirra gem benefit developers when integrating feed parsing into their Rails applications?

The FeedZirra gem brings several benefits to developers, including streamlined efficiency by handling the intricacies of feed parsing. It supports multiple feed formats (RSS and Atom), making it compatible with a wide range of sources. The gem’s simple API is designed for ease of use, catering to developers of various skill levels. Moreover, it provides customization options to tailor parsed feed content to suit your app’s design and requirements.

Q5: Can the FeedZirra gem be used to enhance user engagement and content freshness in Rails apps?

Absolutely. By utilizing the FeedZirra gem to parse feeds, you can enhance user engagement by providing fresh and relevant content from various sources. Whether you’re building a news aggregator, a blog reader, or a content recommendation system, integrating feed parsing into your Rails app with FeedZirra helps create a dynamic user experience that keeps users informed and engaged.

Why Implement Fat Model And Skinny Controller in CakePHP

Fat Model and Skinny Controller in CakePHP framework encourages developers to include as much business logic into the application models and the controllers should translate the requests, instantiating classes, getting data from the domain objects and passing it to the view.

  • This development methodology is not new but rarely adopted among the developers. Developers should focus on creating model behaviors rather than creating controller components.
  • It is a simple and powerful concept to implement is offers numerous convenient features to the developers.
  • Controller is responsible for handling & executing the actions routed through the router, it should be lightweight and agile in nature.
  • It is not about counting the lines in controller, rather putting codes in the right place.

Why Fat Model and Skinny Controller:

After developing for a while, when you look back at your code you’ll realize how hard it is to keep track of all these things. When you have a Fat Controller, it can get pretty messy even with a proper formatting.
Put as much of your code that deals with data manipulation in your Model and it solve the problem.

  • When we need some actions repeatedly in different controller, we can have them in Model.
  • We can reduce the use of requestAction() in CakePHP sites with fat models.
  • It’s easier to find out what went wrong when your methods are smaller and specific. Because, model methods are more specific than controller methods.

How To use?

Code-you should put in Controllers

  1. Usually the only functions you should have in controllers are the view functions.
  2. “before” functions, Index, Login, Signup, Add, Edit, View, Delete.

Everything else can go to your model.

Code-you should put in Models

  1. You should put the code and functions in your model that relates to Model and its data.
  2. Formatting, Retrieving, Searching, Pagination are few examples.
  3. Keep all your business logic in the models (try to write generalized methods whenever possible). Call your generalized methods from controller by passing the required parameters.
  4. Using this you will end up writing self-documented code.
  5. It is absolutely fine if your view contains some PHP code which deals with the presentation logic.
  6. You can use the Model’s callback methods like: beforeFind, afterFind, beforeValidate, beforeSave, afterSave, beforeDelete, afterDelete, onError

Skinny_Controller_logic

Example with Sample Code

Below is the example of a listing page using CakePHP paginate, search, sorting with the concept of Fat Model and Skinny Controller.

Let’s get the User list,

  • In your Controller’s Action

[sourcecode]$limit = 10;
$this-&gt;paginate = $this-&gt;User-&gt;_Pagination($limit,$_GET[‘search’]);

//To write your business logic, lets call another Model method
$listdata = $this-&gt;User-&gt;formatListing($this-&gt;paginate(‘User’));

$this-&gt;set(‘listdata’, $listdata);[/sourcecode]

  • In Your corresponding Model

[sourcecode]public function _Pagination($limit = 30,$search){
$conditions = array(‘User.is_active’=&gt;1);
if(isset($search) &amp;&amp; trim($search)) {
$search = urldecode(trim($search));
$conditions[‘User.name LIKE’] = ‘%’.$search.’%’;
}
$params = array(
‘conditions’ =&gt; $conditions,
‘fields’ =&gt; array(‘id’,’name’,’email’,’created’),
‘limit’ =&gt; $limit,
‘order’ =&gt; array(‘User.name’=&gt;’asc’,’User.created’ =&gt; ‘desc’),

);

return $params;
}
public function formatListing($userList){
$listdata = array();
foreach($userList as $ukey=&gt;$data) {
$listdata[$ukey][‘id’] = $data[‘User’][‘id’];
$listdata[$ukey][’email’] = $data[‘User’][’email’];
$listdata[$ukey][‘name’] = $data[‘User’][‘name’];
$listdata[$ukey][‘created’] = date(‘M d, Y’,strtotime($data[‘User’][‘created’]));
}
return $listdata;

}[/sourcecode]

Why FAT Model and why not Components?

  • Components should have the logic that can be shared across multiple controllers.
  • Logic should be placed inside the Components to get the data for the view. If the logic includes manipulating of the data, then it should be in a model.

Note these Check points while implementing above steps:

  • When you need to call controller methods inside a model then you are obviously doing something wrong and need to re-examine your code.
  • CakePHP will create an automatic model (instance of AppModel) when there is a table but no model file. When you create a model with wrong model file name, still CakePHP will access auto-model. Hence, it results in different behaviors and all your validations and custom functions will not work.

Too much eating may cause gaining weight, once you’re overweight; it’s too hard to lose that extra weight.
If you don’t want to end up with overweight controllers which eventually will require surgical intervention, just follow the basics and that’s Fat Model and Skinny Controller

CakePHP_fat_models


Suggest me if I am somewhere wrong. Any suggestions are welcome.