SSL Authentication Using Security Component In CakePHP

We can achieve SSL authentication in CakePHP by writing own methods like ‘forceSSL’ and ‘unforceSSL’. Also there is an in-built Security Component in CakePHP to achieve SSL authentication.

  • Using Security Component we can integrate tighter security in our application.
  • Like all components it needs configurations through several parameters.
  • We can get CSRF and form tampering protection using Security Component.
  • CsrfExpires controls the form submission.

Example:

All SSL URLs will redirect to a sub-domain ‘https://app.andolacrm.com/’ and the non SSL URL will redirect to a sub-domain ‘http://www.andolacrm.com’

How To Use Security Component

  • Include the security component in you AppControler.php
  •  Like as below

[sourcecode]class AppController extends Controller {
public $components =array( ‘Acl’,’Session’,’Email’,’Security’,’Cookie’ );

}[/sourcecode]

  • There are 3 configurable variable for which you need to set the values as per the requirement of your application in the beforeFilter functions of AppController.php
  • validatePost:

This variable basically used to validate your post data. Set false if you want skip validating you post data or in case data coming from 3rd party Services. Default its true.

  • csrfCheck :

CSRF(Cross-Site_Request_Forgery)  Used for form protection   . Set to false to skip CSRF protections.

  • CsrfUseOnce :

This is used for CSRF token.If it is set as false then it will user one csrf token through out the application else it will generate new token for each form submissions.

Sample Code :

[sourcecode]function beforeFilter() {
// Codes added for SSL security
$this->Security->validatePost=false;
$this->Security->csrfCheck=false;
$this->Security->csrfUseOnce=false;
}[/sourcecode]

  • In the ‘AppController.php’ you need to define the list of URLs that doesn’t need to be checked for SSL

[sourcecode]$sslnotallowed_url=array(‘beta_user’,’terms’,’privacy’,’security’,’display’,’faq’);[/sourcecode]

  • Code to be written in your ‘beforeFilter()’ of ‘AppController.php’

[sourcecode]function beforeFilter() {
// Codes added for SSL security
$this->Security->validatePost=false;
$this->Security->csrfCheck=false;
$this->Security->csrfUseOnce=false;
$sslnotallowed_url  = array(‘beta_user’,’terms’,’privacy’,’security’);
$this->Security->blackHoleCallback = ‘forceSSL’;
if(!in_array($this->params[‘action’],$sslnotallowed_url)){
$this->Security->requireSecure(‘*’);
}
}[/sourcecode]

ForceSSL Method

[sourcecode]function forceSSL() {
$this->redirect(‘https://app.andolacrm.com’ . $this->here);
}[/sourcecode]

NOTE: Security Component can only be used for the forms create using FormHelper.

Conclusion:

Using the steps as described above would facilitate you to successfully implement the SSL in CakePHP. But you need to be more careful while using security component for your application. It may cause ‘blackhole’ error if there is any kind of security hole in your application. However, you could avoid such errors by setting above described variable to ‘false’.

How To Integrate PayPal In PHP

To accept online payments through your website you would need a payment gateway. There are numerous payment gateways that can be implemented to your website; however you will need to choose the best for your PHP application. “PayPal” is one of the most renowned payment platforms that offers the best in class services as well as secure payment transaction. One of the best features of PayPal is that it facilitates developers to check-out the integration on merchant sites.

From a developer’s point of view, PayPal API is a simple, user friendly and versatile which facilitates them to avoid the PCI burden of having credit card details to be passed through their servers. PayPal is also the most secure platform that takes care of all the money transactions for the users.

Integrating PayPal in Your Website

The first thing we need is a Sandbox Credential and API Credentials. This can be availed using the following steps:

  • Create a Business account in “https://developer.paypal.com/” in order to access the Sandbox account.
  • Log into your business account; move to the ‘Application Tab’ and create a Sandbox test account for developers to check-out the PayPal integration.
  • For PayPal payment pro services, you can use this Sandbox Credentials for logging into “https://www.sandbox.paypal.com/”
  • If you want to login to your sandbox account you have to first log into your developer account.

Steps to Implement ‘the work’ in Your Site

  • In PayPal payment pro ‘the work’ is done through API call.
  • In your code you will have to implement a function i.e. ‘PPHttpPost(methodname,str);’
  • ‘methodname’ specifies the name of the API you want to call i.e. ‘CreateRecurringPaymentsProfile’, ‘GetTransactionDetails’ etc.

There are numerous other methods for the integration which can be availed form the PayPal developer site:  https://developer.paypal.com/webapps/developer/docs/classic/api/

Under ‘Merchant’ API you would find a list of functions that can be performed by PayPal website pro.
Clicking on NVP link of each function you can view the methods and the required parameters for that method.

Second Parameter in the string; which is passed to the API, is for getting the response. It includes all the parameters that have to be passed e.g.

[sourcecode]$str = "&TOKEN = $token&AMT = $paymentAmount&CURRENCYCODE = $currencyID&PROFILESTARTDATE =
$startDate";[/sourcecode]


[sourcecode]$nvpStr  .= "&BILLINGPERIOD = $billingPeriod&BILLINGFREQUENCY = $billingFreq&CREDITCARDTYPE = $CREDITCARDTYPE&ACCT = $ACCT&EXPDATE = $EXPDATE&CVV2 = $CVV2&EMAIL = $EMAIL&STREET = $STREET&CITY = $CITY&STATE = $STATE&COUNTRYCODE = $COUNTRYCODE&ZIP = $ZIP&FIRSTNAME = $FIRSTNAME&LASTNAME = $LASTNAME&DESC = $DESC&FAILEDINITAMTACTION = $FAILEDINITAMTACTION&INITAMT = $INITAMT";[/sourcecode]

Note: This string might differ for different methods but the structure is similar.

  • This function returns an array having one key as ACK.
  • The value of this key specifies the FAILURE and SUCCESS of the function.

If ACK is a failure then the returned array contains following error message.

[sourcecode]function PPHttpPost($methodName, $nvpStr_) {

$APIUserName = urlencode(‘API USERNAME’);

$APIPassword = urlencode(‘API PASSWORD’);

$APISignature = urlencode(‘API SIGNATURE’);

$APIEndpoint = "https://api-3t.sandbox.paypal.com/nvp"; //sandbox url.

$version = urlencode(‘51.0’);

//setting the curl parameters.

$choice = curl_init();

curl_setopt($choice, CURLOPT_URL, $APIEndpoint);

curl_setopt($choice, CURLOPT_VERBOSE, 1);

//turning off the server and peer verification(TrustManager Concept).

curl_setopt($choice, CURLOPT_SSL_VERIFYPEER, FALSE);

curl_setopt($choice, CURLOPT_SSL_VERIFYHOST, FALSE);

curl_setopt($choice, CURLOPT_RETURNTRANSFER, 1);

curl_setopt($choice, CURLOPT_POST, 1);

//NVPRequest for submitting to server

$nvprequest = "METHOD=$methodName&VERSION=$version&PWD=$APIPassword&USER=$APIUserName&SIGNATURE=$APISignature";

// setting the nvprequest as POST FIELD to curl

curl_setopt($choice, CURLOPT_POSTFIELDS, $nvprequest);

//getting response from server

$httpResponse = curl_exec($choice);

if(!$httpResponse) {

exit("$methodName failed: ".curl_error($choice).'(‘.curl_errno($choice).’)’);

}

// Here Extract the RefundTransaction response details

$httpResponseArr = explode("&", $httpResponse);

$httpParsedResponseArr = array();

foreach ($httpResponseArr as $i => $value) {

$tmpAr = explode("=", $value);

if(sizeof($tmpAr) > 1) {

$httpParsedResponseArr[$tmpAr[0]] = $tmpAr[1];
}
}

if((0 == sizeof($httpParsedResponseArr)) || !array_key_exists(‘ACK’, $httpParsedResponseArr)) {
exit("Invalid HTTP Response for POST request($nvprequest) to $APIEndpoint.");
}
return $httpParsedResponseArr;
}[/sourcecode]

Setting of IPN URL

IPN stands- Instant Payment Notification

Under the Profile tab of the sandbox site there is an ‘Instant Payment Notification preference’ link. Set the IPN URL from the link.

Conclusion:

This notification is sent from server to server when any transaction is done in PayPal. To capture this transaction we can set URL in Instant Payment Notification preferences page and manage those transaction information.

How to use ‘Contextual Action’ bar in ‘ListView’ page

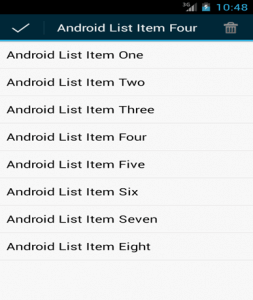
Android_list_item

Introduction:

‘Android.View.ActionMode’ is an Android API that is used to set up contextual actionbar with the help of xml. When an app enables this action mode by selecting an item, a contextual action bar is displayed at the header of the page. Here, users are enabled to perform on the currently chosen item.

The contextual action bar disappears when the user selects other action icon (in this case ‘delete’ icon), or selects the ‘Done’ action on the left side of the action bar.

Note: The contextual action bar works independently and overtakes the action bar position.

Steps to create a contextual action bar with the delete action:

1. In the main activity, implement the ‘ActionMode.Callback’ interface and override all implemented methods as per application requirements:

  • public boolean onActionItemClicked(ActionMode mode, MenuItem item)
  • public boolean onCreateActionMode(ActionMode mode, Menu menu)
  • public void onDestroyActionMode(ActionMode arg0)
  • public boolean onPrepareActionMode(ActionMode arg0, Menu arg1)

2. For selecting list item, implement the ‘setOnItemLongClickListener’ method on ‘ListView ‘object and call ‘this.startActionMode()’ to start ‘actionmode’ by passing ‘ActionMode.Callback’ object.

Example of Main-Activity:

[sourcecode]package com.example.contextualactionbardemo;

import java.util.ArrayList;

import android.os.Bundle;
import android.app.AlertDialog;
import android.app.ListActivity;
import android.content.DialogInterface;
import android.util.Log;
import android.view.ActionMode;
import android.view.Menu;
import android.view.MenuInflater;
import android.view.MenuItem;
import android.view.View;
import android.widget.AdapterView;
import android.widget.ArrayAdapter;
import android.widget.ListView;
import android.widget.AdapterView.OnItemLongClickListener;

public class MainActivity extends ListActivity {
protected Object mActionMode;
private static int selectedItem = -1;
private ArrayList list;
private String listItem = "";
private ArrayAdapter adapter;

@Override
protected void onCreate(Bundle savedInstanceState) {
super.onCreate(savedInstanceState);
ListView listView = (ListView) findViewById(R.id.listview);
String[] values = new String[] { "Android List Item One",
"Android List Item Two",
"Android List Item Three",
"Android List Item Four",
"Android List Item Five",
"Android List Item Six",
"Android List Item Seven",
"Android List Item Eight"
};

list = new ArrayList();
for (int i = 0; i < values.length; ++i) {
list.add(values[i]);
}
adapter = new ArrayAdapter(this,
android.R.layout.simple_list_item_1, android.R.id.text1, list);
setListAdapter(adapter);

listView = getListView();
listView.setOnItemLongClickListener(new OnItemLongClickListener() {

public boolean onItemLongClick(AdapterView<?> arg0, View arg1,
int pos, long id) {
Log.v("long clicked","pos"+" "+pos);
if (mActionMode != null) {
return false;
}
selectedItem = -1;
selectedItem = pos;
listItem = list.get(selectedItem);
mActionMode = MainActivity.this.startActionMode(mActionModeCallback);
arg1.setSelected(true);
return true;
}
});

}

private ActionMode.Callback mActionModeCallback = new ActionMode.Callback() {
@Override
public boolean onActionItemClicked(ActionMode mode, MenuItem item) {
switch (item.getItemId()) {
case R.id.action_delete:
AlertDialog.Builder alertDialog = new AlertDialog.Builder(MainActivity.this);
// Setting Dialog Title
alertDialog.setTitle("Confirm Delete…");
// Setting Dialog Message
alertDialog.setMessage("Are you sure you want to delete?");
alertDialog.setPositiveButton("YES", new DialogInterface.OnClickListener() {
public void onClick(DialogInterface dialog,int which) {
adapter.remove(listItem);
adapter.notifyDataSetChanged();
}
});
// Setting Negative "NO" Button
alertDialog.setNegativeButton("NO", new DialogInterface.OnClickListener() {
public void onClick(DialogInterface dialog, int which) {
dialog.cancel();
}
});
// Showing Alert Message
alertDialog.show();
mode.finish();
return true;
default:
return false;
}
}

@Override
public boolean onCreateActionMode(ActionMode mode, Menu menu) {
mode.setTitle(listItem);
MenuInflater inflater = mode.getMenuInflater();
inflater.inflate(R.menu.deletemenu, menu);
return true;
}

@Override
public void onDestroyActionMode(ActionMode arg0) {
// TODO Auto-generated method stub
mActionMode = null;
selectedItem = -1;
}

@Override
public boolean onPrepareActionMode(ActionMode arg0, Menu arg1) {
// TODO Auto-generated method stub
return false;
}
};
}[/sourcecode]

Example of /res/menu/deletemenu.xml:

Conclusion:

Contextual action mode is useful in following cases:

  • To show customize menu display with icon of edit, rename, delete
  • To display dynamic customize menu over the action bar

Have something to add to this topic? Share it in the comments.

How To Use “UIActionSheet” As A Pop-over View In Your IOS Apps

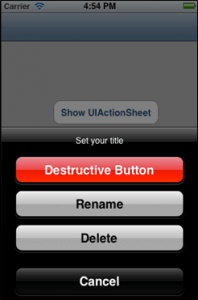
iOS-destructive_button

What is UIActionSheet

The action sheet in iOS contains a title and one or more buttons. Each of the buttons is associated with separate actions. It can be presented from a toolbar; tab bar, button bar item or from a view, however the title can be optional.

Why use UIActionSheet?

UIActionSheet is used in the following cases:

  • To show an option for a given task
  • To prompt the user to confirm an action
  • To get user input

Action sheet is dismissed by touching anywhere outside the pop-over.

How to use it?

  • Extend the UIActionSheetDeleagte in the .h header file of the ViewController
  • Then add a method named as”showActionSheet”

Example

[sourcecode]@interface MyViewController : UIViewController {

}

-(IBAction)showActionSheet:(id)sender;
@end[/sourcecode]

Initializing the UIActionSheet takes 5 following parameters

  •  initWithTitle
  • delegate
  • cancelButtonTitle
  • destructiveButtonTitle
  • otherButtonTitles

Add the following code in the .m file of viewcontroller.

Example

[sourcecode]-(IBAction)showActionSheet:(id)sender {
UIActionSheet *popupQuery = [[UIActionSheet alloc] initWithTitle:@"Set your title" delegate:self cancelButtonTitle:@"Cancel" destructiveButtonTitle:@"Destructive Button" otherButtonTitles:@"Rename",@"Delete", nil];

popupQuery.actionSheetStyle = UIActionSheetStyleBlackOpaque;
[popupQuery showInView:self.view];
[popupQuery release];
}[/sourcecode]

How to know which button was clicked by user?

There is a delegate method named as “actionSheet clickedButtonAtIndex” in which you can get the action.

[sourcecode]-(void)actionSheet:(UIActionSheet *)actionSheet clickedButtonAtIndex:(NSInteger)buttonIndex {

switch (buttonIndex) {
case 0:
NSLog(@”%@”,Destructive Button Clicked);
break;
case 1:
NSLog(@”%@”,Rename Button Clicked);
break;
case 2:
NSLog(@”%@”,Delete Button Clicked);
break;
case 3:
NSLog(@”%@”,Cancel Button Clicked);
break;
}
}[/sourcecode]

Conclusion:

UIActionSheet gives additional choices to the users for a particular action & gives a cleaner look to the app.

How to Install & Configure Redis-Server on Centos/Fedora Server

‘Redis’ is an Open source key-value data store, shared by multiple processes, multiple applications, or multiple Servers. Key values are more complex types like Hashes, Lists, Sets or Sorted Sets.

Let’s have a quick look on the installation steps of “Redis

Here we go…

Step – 1

First of all we need to switch to superuser & install dependencies:

[code language=”html”]
su
yum install make gcc wget tcl
[/code]

Step-2
Download Redis Packages & Unzip. This guide is based on installing Redis 2.8.3:

[code language=”html”]
wget http://download.redis.io/releases/redis-2.8.3.tar.gz
tar xzvf redis-2.8.3.tar.gz
[/code]

Step-3
Compiling and Installing Redis from the source:

[code language=”html”]
cd redis-2.8.3
make
make install
[/code]

Step- 4

Starting Redis server by executing the following command without any argument:

[code language=”html”]
redis-server
[/code]

Step-5

Check if Redis is working. To check, send a PING command using redis-cli. This will return ‘PONG’ if everything is fine.

[code language=”html”]
redis-cli ping
PONG
[/code]

Step-6

Add Redis-server to init script. Create a directory to store your Redis config files & data:

[code language=”html”]
mkdir -p /etc/redis
mkdir -p /var/redis
[/code]

Also we need to create a directory inside “/var/redis” that works as data &  a working directory for this Redis instance.

[code language=”html”]
mkdir /var/redis/redis
[/code]

Step-7

Copy the template configuration file you’ll find in the root directory of Redis distribution into /etc/redis/

[code language=”html”]
cp redis.conf /etc/redis/redis.conf
[/code]

Edit the configuration file, make sure to perform the following changes:

  • Set daemonize to yes (by default it’s set to ‘No’).
  • Set the pidfile to /var/run/redis.pid
  • Set your preferred loglevel
  • Set the logfile to /var/log/redis.log
  • Set the dir to /var/redis/redis
  • Save and exit from the editor

Step-8 
Add the Redis init script.

[code language=”html”]
vi /etc/init.d/redis
[/code]

And paste the following codes to it

[code language=”html”]
#!/bin/sh
#
# chkconfig: 345 20 80
# description: Redis is an open source (BSD licensed), in-memory data structure store, used as database, cache and message broker.

# Source function library.
. /etc/init.d/functions

REDISPORT=6379
EXEC=/usr/local/bin/redis-server
CLIEXEC=/usr/local/bin/redis-cli

PIDFILE=/var/run/redis.pid
CONF="/etc/redis/redis.conf"

case "$1" in
start)
if [ -f $PIDFILE ]
then
echo "$PIDFILE exists, process is already running or crashed"
else
echo "Starting Redis server…"
$EXEC $CONF
fi
;;
stop)
if [ ! -f $PIDFILE ]
then
echo "$PIDFILE does not exist, process is not running"
else
PID=$(cat $PIDFILE)
echo "Stopping …"
$CLIEXEC -p $REDISPORT shutdown
while [ -x /proc/${PID} ]
do
echo "Waiting for Redis to shutdown …"
sleep 1
done
echo "Redis stopped"
fi
;;
restart)
stop
start
;;
*)
echo "Please use start or stop as first argument"
;;
esac
exit 0
[/code]

Save the file and exit from the editor.

Step-9
Give appropriate permission to the init script

[code language=”html”]
chmod u+x /etc/init.d/redis
[/code]

Step-10
To run the Redis server at startup we need to add it to the chkconfig list.

[code language=”html”]
chkconfig –add redis
chkconfig –level 345 redis on
[/code]

Step-11
Finally we are ready to start the Redis Server.

[code language=”html”]
/etc/init.d/redis start
[/code]

The redis server will start automatically on system boot.

Conclusion:

‘Redis’ also supports datatypes such as Transitions, Publish and Subscribe. ‘Redis’ is considered more powerful than ‘Memcache’. It would be smart to bring ‘Redis’ into practice and put ‘Memcache’ down for a while.

We provide one-stop solution by utilizing Redis server with Rails , PHP applications and deploy in cloud services such as AWS to make sure that the application is fully scalable.

You can also check the compression of Memcached vs Redis, to know more information on which one to pick for Large web apps?

Do you have anything to add here? Share your thoughts with comments.

It’s always pleasure to hear from you and for5 any assistance and support on AWS you can write us at info@andolasoft.com.