Benefits of Choosing Cloud Management Service by Startups

Cloud computing is a Internet based computing that relies on sharing computing resources rather than having local servers or personal devices to handle applications.

In cloud management service, we can easily access multiple number of computers via Internet.

Cloud computing phenomenon is well suited for startups, because it will help you to give the  security and performance needs of your organization.

  • Major Benefits of Cloud Service

The main intent of the startups to grow the business. For this reason, startups are looking for strategies from where they can get maximum productivity or output within limited time frame and resources.

Cloud Computing provides powerful and flexible infrastructure, so that your staffs are able to work from anywhere, anytime from any device.

In this way you can give full attention to your business without worrying about IT infrastructure. Some of the benefits of cloud computing are as follows:

  • Reduces Operational Cost

By the help of cloud computing, one user can reduce the operational cost such as cost of data storage, software updates, management, and quality control.

Now you can get the cloud computing service at affordable price.

  • Scalability and Speed

In cloud computing service, the user does not need to install software or hardware for new application.

They can easily scale up or down the services according to the business requirement as there are many data centers are located in multiple location.

  • Innovation

With cloud computing, the user does not need to manage or own the resources.

It provides user the complete benefits like faster prototype development, testing and validation.

  • Optimal Resource Utilization

Cloud computing is environment friendly. With the help of Cloud, we can easily share servers, storage and network resources with multiple users.

  • Device Independence

Cloud computing services can be used and accessed from any device such as Desktop, Notebook, Smartphone, iPhone etc.  

SEE ALSOHow Cloud Computing will affect staffing and recruitment

How To Make Static Framework IOS Device Independent?

In our previous post, we had mentioned the steps to create a Static Library or Framework for iOS. Here, we will illustrate the steps to make it device independent, i.e. the library can be used to develop app for all iOS devices, instead of recreating the code for each device.

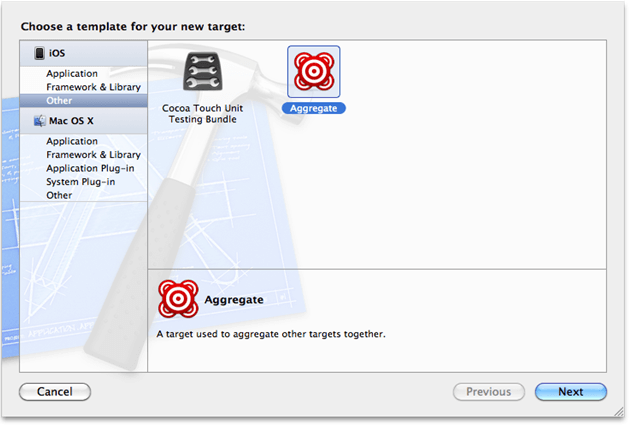
Step 1: Create an Aggregate Target

  • Click File >> New Target and create a new Aggregate target in Other menu.

  • Name your aggregate target – like ‘Framework’

xcode_image

 Step 2: Adding the Static Library as a Dependent Target

  • Add the static library target to the ‘Target Dependencies’.

framework-image

Step 3: Build the ‘Other’ Platform

  • To build the ‘Other’ platform, use a ‘Run Script’ phase.

  • Add a new ‘Run Script’ build phase to your ‘Aggregate’ target and paste the following code.
set -e
 
set -e
 
set +u
 
# Avoid recursively calling this script.
 
if [[ $SF_MASTER_SCRIPT_RUNNING ]]
 
then
 
   exit 0
 
fi
 
set -u
 
export SF_MASTER_SCRIPT_RUNNING=1


SF_TARGET_NAME=${PROJECT_NAME}
 
SF_EXECUTABLE_PATH="lib${SF_TARGET_NAME}.a"
 
SF_WRAPPER_NAME="${SF_TARGET_NAME}.framework"


# The following conditionals come from
 
# https://github.com/kstenerud/iOS-Universal-Framework


if [[ "$SDK_NAME" =~ ([A-Za-z]+) ]]
 
then
 
   SF_SDK_PLATFORM=${BASH_REMATCH[1]}
 
else
 
   echo "Could not find platform name from SDK_NAME: $SDK_NAME"
 
   exit 1
 
fi


if [[ "$SDK_NAME" =~ ([0-9]+.*$) ]] then
 
   SF_SDK_VERSION=${BASH_REMATCH[1]}
 
else
 
   echo "Could not find sdk version from SDK_NAME: $SDK_NAME"
 
   exit 1
 
fi


if [[ "$SF_SDK_PLATFORM" = "iphoneos" ]]
 
then
 
   SF_OTHER_PLATFORM=iphonesimulator
 
else
 
   SF_OTHER_PLATFORM=iphoneos
 
fi


if [[ "$BUILT_PRODUCTS_DIR" =~ (.*)$SF_SDK_PLATFORM$ ]]
 
then
 
   SF_OTHER_BUILT_PRODUCTS_DIR="${BASH_REMATCH[1]}${SF_OTHER_PLATFORM}"
 
else
 
   echo "Could not find platform name from build products directory: $BUILT_PRODUCTS_DIR"
 
   exit 1
 
fi


# Build the other platform.
 
xcodebuild -project "${PROJECT_FILE_PATH}" -target "${TARGET_NAME}" -configuration "${CONFIGURATION}" -sdk ${SF_OTHER_PLATFORM}${SF_SDK_VERSION} BUILD_DIR="${BUILD_DIR}" OBJROOT="${OBJROOT}" BUILD_ROOT="${BUILD_ROOT}" SYMROOT="${SYMROOT}" $ACTION


# Smash the two static libraries into one fat binary and store it in the .framework
 
lipo -create "${BUILT_PRODUCTS_DIR}/${SF_EXECUTABLE_PATH}" "${SF_OTHER_BUILT_PRODUCTS_DIR}/${SF_EXECUTABLE_PATH}" -output "${BUILT_PRODUCTS_DIR}/${SF_WRAPPER_NAME}/Versions/A/${SF_TARGET_NAME}"


# Copy the binary to the other architecture folder to have a complete framework in both.
 
cp -a "${BUILT_PRODUCTS_DIR}/${SF_WRAPPER_NAME}/Versions/A/${SF_TARGET

Step 4: Build to verify

  • Now  you have set up an environment to build a distributable <project_name>.framework

  • Build the ‘Aggregate’ target

  • Expand the Products group in X-Code, right click the static library and click ‘Show in Finder’

Note: If this doesn’t open Finder to show the static library, then try opening

~/Library/Developer/Xcode/DerivedData/<project name>/Build/Products/Debug-iphonesimulator/.

  • In this folder you will find your <project_name>.framework folder.

You can now share the <project_name>.framework among other iOS app developers.