How To Boost CRO With The Right Web Template

All types of business use some common metrics to measure the performance. For example, if you are having a commercial website, the traffic of your website is an important part for your performance metrics.

But as you run your online store or physical store or whether you serve consumers or to any business, there is always one metric that does matter for your business, and it’s your Conversion Rate.

What Is A Good Conversion Rate?

With a good conversion rate on the industry, goals, traffic, niche and audience demographics. For instance, the average conversion rate of the online sites globally was 2.17%  during 2020, and has increased to 2.37% from the previous year. So, the E-commerce conversion rate has increased to 2.57%.

Never miss an update from us. Join 10,000+ marketers and leaders.

The average doesn’t only vary by year and by country- it also varies by niche.

For example , the average conversion rate of various E-commerce websites for beverage and food  is 5.5%, whereas the average conversion rates for haircare sector is 3.5%.

If your conversion rate is lower than you’d like — maybe it’s below average in your industry, or lower than your top competitors, or simply underperforming against your own goals — then it’s time to optimize.

Conversion Rate Optimization is the process of increasing the percentage of visitors to a website that convert into paying customers. It would be appropriate to say that CRO is the fuel that propels modern-day marketing channels. It’s the most significant performance metric for any marketer and the major leverage point for any business. However, it’s seemingly a difficult & tricky task.

CRO is an important circle, world’s popular companies focus on the user’s experience, network effects, conversion process and the customer journeys.

You can calculate your conversion rate by following this trick , in the image given below
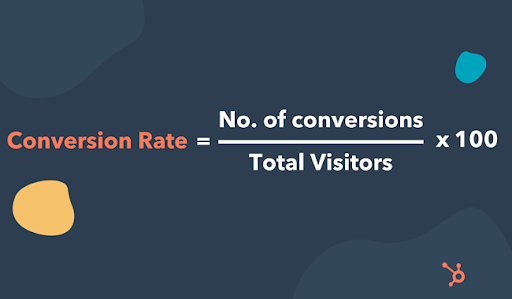
Hubspot

(Source: Hubspot)

Hence, choosing a web template wisely while developing the website is very important. In the simplest of terms, a developer has to come out of his den & visualize the website from a visitor’s point of view.

Here are a few points that should be taken into consideration:

Catching Attention Of The Potential Buyers

Always remember, the first 10-20 seconds are enough for a visitor to decide if he’s going to stay on your website or not. So make sure your above-the-fold contents are good enough, give them a reason to stay.

In order to do that, you need to choose a web template which allows you to place contents clearly in the right places and on the right pages as per your domain. The Landing Pages is extremely important as this is where most of the visitors would like to see if the services/products match their requirements.

Smooth Navigation & Appeal

After you’ve successfully convinced the visitors to stay on your site, you need to provide them with easy navigation.

Make sure the template of your choice provides easy navigation. Contents are key here. Once you have the basic idea about your website content, it’s easy to ensure the navigation design of your chosen web template matches it.

Secure And Easy Payment Options

Once you make an impression with your visitor, the crucial part starts now. Safety remains a primary concern for online shoppers and the e-commerce sites need to respond to this if they want to improve their Conversion Rate.

I’ve worked with the team at Andolasoft on multiple websites. They are professional, responsive, & easy to work with. I’ve had great experiences & would recommend their services to anyone.

Ruthie Miller, Sr. Mktg. Specialist

Salesforce, Houston, Texas

LEARN MORE

Make sure your website is SSL (Secure Sockets Layer) encrypted and all the details required by a buyer are set out clearly. A thorough study on your competitors isn’t a bad idea to start with.

Over To You

Conversion Rate Optimization is a strategic and recurring process. Despite the fact that you’re equipped with these time-proven and reliable tips, you must always be patient & strive to find a room for improvement. Keep optimizing to stay ahead of the curve. It’s like Subway-Surfers where you need to just keep running to stay in the race.

You need to choose your website template wisely while developing your website. With a developer you can visualize the website from a visitor’s point of view.

Haven’t developed your website yet, you can create one by taking help from our expert developers. Contact Andolasoft to build your website.

Have anything to share about Conversion Rate Optimization? Did I miss out on anything? I would be happy to hear from you at info@andolasoft.com.

I would also appreciate if you leave your feedback/suggestions below.

Who is good? Apple Swift or Object C

Licensed in 2014, Swift is a statically typed language using LLVM compiler; which Apple claims to be faster than Objective-C. The Targeted APIs for Swift are Cocoa and Cocoa Touch. That’s why there will always be performance differences, even if Objective C and Swift are very common utilities.

Swift handles strings easily, its tuples offer compound variables and the developers don’t need to spend time annotating variables with type info. In most cases, the compiler can also infer the type from the value a variable is set with.

Advantages of Swift

  • Swift is easy to read and write, requires less overhead and syntax and one can often achieve the same line of code using less characters.
  • Requires less line of code to get the output.
  • A much ‘safer’ option
  • Unified with memory management
  • Swift 1.0 is strong & stable
  • Easy maintenance
  • Fewer name collisions with open source projects
  • Supports dynamic libraries

Limitations of Swift

  • Solutions are hard to get, as most of them are in Objective C.
  • It’s a moving target. Every small update brings adjustments to paradigms
  • Not all the syntaxes are stable yet.

Final Verdict
Swift has a really clean and clear coding style, combining the advantages of Objective-C & features of modern scripting languages. Since faster than Objective-C & powerful debugging tools, Swift has really made people take notice.

With Swift, Apple really tries to speed up the app development process and it shows. It won’t be unfair to say that Swift will change the way people code in the near future.

Did I miss anything? Do you have anything else on Swift that we should know? Share your thoughts with me at info@andolasoft.com.

I would also appreciate, if you leave your feedback/suggestions below.

How to Upload a File in Rails using CarrierWave

Uploading files in a Rails App is no sweet job now a days. Out of all the gems available in Rails Ecosystem, “CarrierWave” is widely used for its easy integration and flexibility to upload files.

Benefits

  • File Caching: Prevents users to select the file again & re-upload if the form fails the validation process
  • Clean Code: Helps to write all the logic in uploader classes rather than in models, keeping your model clean and readable
  • Image Processing: Provides efficient way to resize & crop images to different formats
  • Storage Support: Stores files in third party storages such as AWS S3 bucket, Racksapce or Google Cloud
  • Mongodb: Has good support for mongodb with the help of “carrierwave-mongoid” gem

Setting Up CarrierWave
Step 1:
In your Rails App, add the following to your gem file & run the bundle installation.

[code language=”html”]
gem ‘carrierwave’
[/code]

Step 2:
Generate the uploader by running the following command:

[code language=”html”]
rails generate uploader Avatar
[/code]

It gives you a file in the path given below:

[code language=”html”]
app/uploaders/avatar_uploader.rb
[/code]

Here, “Avatar” is the column name.

Step 3:
Create a column to your model where you want to store the image:

[code language=”html”]
rails g migration add_avatar_to_students avatar:string
Rakedb:migrate
[/code]

Step 4:
Open up the model and mount the uploader:

[code language=”html”]
class Student < ActiveRecord::Base
mount_uploader:avatar, AvatarUploader
end
[/code]

Step 5:
In the generated uploader file you can mention different versions of an image, just like this:

[code language=”html”]
version :thumb do
process :resize_to_fill => [150, 150]
end
version :tiny_thumb do
process :resize_to_fill => [50, 50]
end
[/code]

Step 6:
Set file storage path in the uploader file. It’s the default storage path where all the files will be stored by CarrierWave.

[code language=”html”]
def store_dir
"uploads/#{model.class.to_s.underscore}/#{mounted_as}/#{model.id}"
end
[/code]

Step 7:
Navigate to config > initializers and create a file: carrier_wave.rb.
Paste the following code:

[code language=”html”]
require ‘carrierwave/orm/activerecord’
[/code]

At this point, it loads CarrierWave after loading ActiveRecord.
You can also store the files into AWS S3 bucket by configuring in this way:

[code language=”html”]
CarrierWave.configure do |config|
config.fog_credentials = {
:provider => ‘AWS’,
: aws_access_key_id => "YOUR AMAZON ACCESS KEY",
:aws_secret_access_key => "YOUR AMAZON SECRET KEY",
:region => ‘us-west-1’ # Change this for different AWS region. Default is ‘us-east-1’
}
config.fog_directory = "bucket-name"
end
[/code]

Now, you should be able to upload files on the fly after reading this article.

Wrapping Up!

Faced any hiccups while uploading a file using CarrierWave? Write to me at info@andolasoft.com and I’ll try to find a way.

Also, I would appreciate if you leave your feedback/suggestions below.

Apple WWDC 2016: Key Announcements

Apple Worldwide Developers Conference this year was full of incremental updates to the much loved Operating Systems for the Mac, iPhone, Watch and TV.

A lot of the changes were geared towards moving in-between the Apple ecosystem easily — Siri is now on desktop and Apple Pay will now work on Safari, for starters; There were also a bunch of redesigns.

Here’s a list of all the Big Announcements made at this year’s WWDC.

WWDC


I can’t really wait till Fall to arrive. Tell me about the features/updates you’re most excited about. I would love to hear from you at “info@andolasoft.com“.

Interested in knowing the Advancements with iOS10? Read my earlier article https://www.andolasoft.com/blog/2016/06/ios-10-advancements.html

I would also appreciate if you leave your feedback/suggestions below.

How to Play HLS Videos on Android

Playing videos/audios is a popular activity on Android devices. Its framework provides MediaPlayer API as a quick integration to play media files with minimal effort.

What is HLS

HTTP Live Streaming (HLS) is an HTTP-based media streaming communications protocol implemented by Apple Inc. It’s just like MPEG-DASH which works by splitting the whole stream into a sequence of small HTTP-based file downloads, with each download loading one short block of an overall potentially unbounded transport stream.

How HLS Works

HLS works just like all robust streaming technologies. You can create multiple files for distribution to the player, which can adaptively change streams to enhance the playback experience. No streaming server is required for it, as it is an HTTP-based technology. Hence, all the switching logic resides on the player.

To distribute a video to the clients, the source needs to be encoded into multiple files at different data rates and then divided into short chunks (usually between 5-10 seconds long). Then, the files are loaded onto an HTTP server along with a text-based manifest file with an “.M3U8” extension.

Introduction to ExoPlayer

ExoPlayer is an app level media player API for Android, providing an alternative to Android’s default Media Player API from both Local Devices and the internet streams. Compared to Android’s Media Player, it’s easier to personalize; Supports features not compatible with Android Media Player API, such as HLS, DASH & Smooth Streaming Adaptive Playbacks.

To integrate the ExoPlayer into the Android app, you need to add the following dependency in your project’s build.gradle file.


[code language=”php”]
compile ‘com.google.android.exoplayer:exoplayer:rX.X.X’
[/code]

Here’s the code for Streaming the HLS video in Exoplayer

XML

[code language=”html”]
<com.google.android.exoplayer.AspectRatioFrameLayout android:id="@+id/exoplayer_frame" android:layout_width="match_parent" android:layout_height="match_parent" android:layout_gravity="center">

<SurfaceView android:id="@+id/surface_view_exoplayer" android:layout_width="match_parent" android:layout_height="match_parent" android:layout_gravity="center"/>

<View android:id="@+id/view_temp" android:layout_width="match_parent" android:layout_height="match_parent" android:background="@android:color/black"/>

<com.google.android.exoplayer.text.SubtitleLayout android:id="@+id/subtitles_exoplayer" android:layout_width="match_parent" android:layout_height="match_parent"/>

</com.google.android.exoplayer.AspectRatioFrameLayout>
[/code]

Java

[code language=”php”]
if (player == null) {

exoplayer_player = new DemoPlayer(getRendererBuilder(THE HLS VIDEO URL));

exoplayer_player .addListener(this);

exoplayer_player .setCaptionListener(this);

exoplayer_player .setMetadataListener(this);

exoplayer_player .seekTo(playerPosition);

playerNeedsPrepare = true;

mediaController.setMediaPlayer(exoplayer_player .getPlayerControl());

mediaController.setEnabled(true);

exoplayer_eventLogger = new EventLogger();

exoplayer_eventLogger .startSession();

exoplayer_player .addListener(eventLogger);

exoplayer_player .setInfoListener(eventLogger);

exoplayer_player .setInternalErrorListener(eventLogger);

exoplayer_debugViewHelper = new DebugTextViewHelper(player, debugTextView);

exoplayer_debugViewHelper .start();

}

exoplayer_player .setSurface(surfaceView.getHolder().getSurface());

exoplayer_player .setPlayWhenReady(playWhenReady);
[/code]

This is a Override method which handles the video resizing while streaming video in the player. It also handles the video size while the user changing the orientation of the device.

[code language=”html”]
@Override
public void onVideoSizeChanged(int video_width, int video_height, int video_unappliedRotationDegrees,float video_pixelWidthHeightRatio)

{
surfaceView_exoplayer.setVideoWidthHeightRatio(
video_height == 0 ? 1 : (video_width * video_pixelWidthAspectRatio) / video_height);
}
[/code]

Conclusion

●     ExoPlayer supports Dynamic Adaptive Streaming over HTTP (DASH) and Smooth Streaming which              aren’t supported by the default Android Media Player.
●     It supports advanced HLS features, such as correct handling of #EXT-X-DISCONTINUITY tags.
●     It’s highly customizable, which will suit your case.
●     It easily updates the player along with your application.

References: Github, Android Developers 

Are you having problems in HLS in Android devices? Share your pain points with me at info@andolasoft.com, we would love to help!

How To Develop A Custom WordPress Plugin “Hello World!”

Plugins act as add-ons & additional functionalities to a website without touching the core files, facilitating to install future updates without losing any of the customization.

During the development phase, you may not find appropriate functionalities matching your requirements and you can opt for Custom Plugins.

Let’s start with the basics first.

Points To Note:

    • Some knowledge in basic installation & setup of WordPress, to develop custom Plugins is necessary.
    • Always use the latest WordPress version available.
    • Coding knowledge for PHP is required.
    • The Plugin needs to be tested in a clean WordPress setup.
    • An Editor of your choice might be required.

Never miss an update from us. Join 10,000+ marketers and leaders.

Steps:

  • Enable debug mode for bug tracking. You can do so by adding ‘define(‘WP_DEBUG’, true)’ to the ‘wp-config.php’ file.
  • Use wp_enqueue_style() and wp_enqueue_script() to add style sheets and scripts to a Plugin; This prevents scripts   from being loaded multiple times.
  • All the Plugins will be there in the wp-content > plugins folder.
  • Create a folder andola-hello-world inside the plugins folder.
  • Note: Keep the name unique, so that it doesn’t conflict with other Plugins used in the website.
  • Create a readme.txt file, add the Plugin documentation details and any other version-changes list.

Hello World

=== Andola Hello World ===

Contributors: Jyo

Website: andolasoft.com

Tags: hello world

Requires at least: 2.7

Stable tag: 1.0

Plugin guide:

  • Next step is to create a file named andolasoft-hello-world.php where we can write our Plugin functionality code. For example:

[code language=”html”]
/*
Plugin Name: Andola-Hello-World
Plugin URI: http://andolasoft..com/
Description: A hello world plugin used for training purpose.
Version: 1.0
Author: Ashish Mohapatra
Author URI: https://www.andolasoft.com
License: GPL
*/
//Hooks a function to a filter action, ‘the_content’ being the action, ‘hello_world’ the function.
add_filter(‘the_content’,’hello_world’);
//Callback function
functionhello_world($content)
{
//Return the content
return$content . "<b> Hello World </b>";
}
?>
[/code]

  • The comments section inside the PHP tags is mandatory.
  • The code above will append ‘Hello World’ in the body using the magic of WordPress hooks.

Almost There.

Your Plugin is now ready. You should see “Hello World” appended to the end of the content, when you open a post page in your browser.

Have you created any Custom Plugins before? I would love to hear your ideas & experiences at “info@andolasoft.com“.

Also, appreciate if you can leave your suggestions/feedback below.