10 Powerful Features Of Android 7.0 Nougat Update

After months of previews and beta testing, Android 7.0 Nougat is finally here. However, the big news is most of the upgrades are done with an objective to boost the performance and battery life of your smart phone.

Here are some of the noteworthy upgrades:

  • Split-Screen Mode :

Multitasking is now easier. Two apps can be run side by side in a split-screen mode.

  • Picture-in-Picture Mode :

On Android TV, you can continue to watch video while browsing or changing the settings.

  • Quick Switch :

Double tap the overview button to toggle between your two most recently used apps.

  • Vulkan API :

It’s a real game changer with high-performance 3D graphics.

  • Bundled Notifications :

See what’s new at a glance with bundled notifications from individual apps. Simply tap to view each alert.

  • Direct Reply :

Android catches up to Apple’s iOS here. Now you can either reply to a message straight from the alerts when it pops up at the top of the screen or from the bundled notifications.

  • Low Power Mode on-the-Go :

Your android device will now go into lower power usage mode when you’re on the move, conserving battery.

  • Improved Settings Navigation :

Find the right settings faster with an updated navigation menu with customizable quick settings, suggestions and ‘Clear all’ in overview.

  • Emergency Information :

Android Nougat facilitates to add emergency information to your lock screen. Go to Settings > Users > Emergency information to add the information can be accessed in case of any emergency such as your blood type, name and address and allergies, if any. In addition to this, the above information will also be visible to anyone who happens to pick up or steal your phone.

  • Emoji :

It’s great news that Android 7.0 adds 72 new/updated emojis to its 1500+ strong library.

Takeaway

Android Nougat is undoubtedly faster and smoother, and your battery should last longer. But with the interface same as before, it falls short of being revolutionary. And it’s going to be a while till it’s available for an OTA (over-the-air) upgrade across all the android devices. Would be interesting to see how it matches up to the promising and widely released iOS10.

Do you wish to add anything here ? Your feedback is highly appreciated.

How to Measure MVP Success for Mobile App Start-ups

Apple reported that more than 100 billion apps have been downloaded from the App Store as of June 2016. Incredible stats!

Mobile is the way forward for all kinds of businesses. To achieve success, the main aim should always be to introduce actionable user responses into the development process as early as possible; MVP (Minimum Viable Product) is the right step. However, in addition to that you need to measure the right metrics, optimize and iterate your applications as per your target audiences.

Measuring MVP success

The nature of your application decides the metrics to be used to calculate its MVP success. For example,

  • Preferential User ratings and store placement : User ratings are excellent source of feedback.
  • App Download & Launch rate : Download and launch rates depict users’ preferences on trying out your offering. The lighter your app is, higher the number of downloads.
  • Customer Acquisition Cost (CAC) : What does it cost to get a new paying user? This metrics helps you to learn whether your marketing efforts are up to the mark or require improvement.
    CAC = Money spent on traction channel / Number of customers acquired through the channel.
  • Active Users’ Percentage : 77% of app users never use an application again, mostly 72 hours after installing it. Hence, download and launch rates are not enough to measure MVP success. You need to study users’ behaviors closely.
  • Percentage of Paying Users : Who are the actually paying users? You need to track all the info. How exactly are they using your app? How much time elapsed between the first launch and first purchase?
  • Average Revenue per User (ARPU) : It’s wise to know what your average transaction size. Also don’t forget to observe which items bring the most purchases.
    ARPU= Total revenue for the time period / Number of active users
  • Customer Lifetime Value (CLV) : This shows how much an average time a user spends before he stops using your mobile app.
    CLV= (Profit from a user *App usage duration) – Acquisition cost
  • Churn: It’s the percentage of people who uninstall your app or stop using it.
    Churn = Number of churn per week (month) / Number of users at the beginning of week (month)

Just the ‘Typical’ is never good enough for a startup, so your goal is to always iterate.

Points to Consider:

  • If your one time users don’t convert into moderate users over time, your MVP is complicated. It’s time to improve your UI.
  • Make sure at least 10% of registered users open your application once a day.
  • Review rate for free applications usually is significantly less than 1%.
  • Customer acquisition cost should be 1/3rd or less than the total value a user brings you over a lifetime.
  • If about 1.5% of users buy something from your app, it’s typical. You should aim for more.

Have an idea? Get a MVP done as fast as possible…

Read my previous article MVP vs POC to get a better idea on a Minimum Viable Product. I’d appreciate if can you drop your comments below.

Tips To Use ButterKnife – Dependency Injection In Android

What Is Dependency Injection?

It’s a design pattern in Android that allows writing codes for low coupling and also makes it possible to change them any time.

Benefits:

  • Promotes loose coupling between classes and subsystems
  • Easy to use and modify the components
  • Testing the functionalities is easy too

Libraries Available In Android:

  • ButterKnife
  • Roboguice
  • Android Annotations
  • Dagger 2

Dependency Injection With ButterKnife :

ButterKnife helps to represent the views from an activity or fragment and also helps in handling various events like onClick(), onLongClick() etc. through annotations.

How To Use ButterKnife Library?

Step 1: Add Dependency

Add the following dependency to our build.gradle.

compile ‘com.jakewharton:butterknife:6.1.0’

Step 2 : Use Annotations

Instead of using findViewById() method, add @InjectView annotation before the declaration of a variable.

For example:

[code language=”html”]@bindView(R.id._view)
TextView _view;
[/code]

Step 3 : Implementation

Resource Binding

Bind pre-defined resources with @BindBool, @BindColor, @BindDimen, @BindDrawable, @BindInt, @BindString, which binds an R.bool ID (or your specified type) to its corresponding field.

[code language=”php”]
class TestActivity extends Activity {
@BindString(R.string.name) String name;
@BindDrawable(R.drawable.user_img) Drawableuser_img;
@BindColor(R.color.green) int green; // int or ColorStateList field
@BindDimen(R.dimen.latitude) Float latitude;
}
[/code]

Views Binding

Multiple views can be grouped into a list or array.

[code language=”php”]
class TestActivity extends Activity {
@BindView(R.id.name) TextView name;
@BindView(R.id.address) TextView address;
@BindView(R.id.email) TextView email;

@Override public void onCreate(Bundle savedInstanceState) {
super.onCreate(savedInstanceState);
setContentView(R.layout.test_activity);
ButterKnife.bind(this);

}
}
[/code]

Non-Activity Binding

Binding can be done on arbitrary objects by supplying the view root.

[code language=”php”]
public class MyFragment extends Fragment {
@BindView(R.id.button) Button button1;
@BindView(R.id.image) ImageView image;

@Override public View onCreateView(LayoutInflaterinflater, ViewGroup container, Bundle savedInstanceState) {
View view = inflater.inflate(R.layout.my_fragment, container, false);
ButterKnife.bind(this, view);
return view;
}
}
[/code]

Listener Binding

Listeners can also automatically be configured onto methods.

[code language=”php”]
@OnClick(R.id.done)
public void done(View view) {
// TODO perform your action… }
@OnClick(R.id.display_data)
public void DisplayData() {
// TODO perform your action…
}
[/code]

Conclusion:

The dependency injection (DI) has become an increasingly popular tool in Android App development, and for good reasons. Injections reduce the amount of coding you perform and hence, debugging too, facilitating smoother development process and creation of better apps.

While it may be tempting to toss in dependencies to a variety of libraries, it’s also important to keep in mind the potential toll that dependency injections can have on your app’s performance.

Anything missing here? I’d appreciate if you can share your thoughts below…

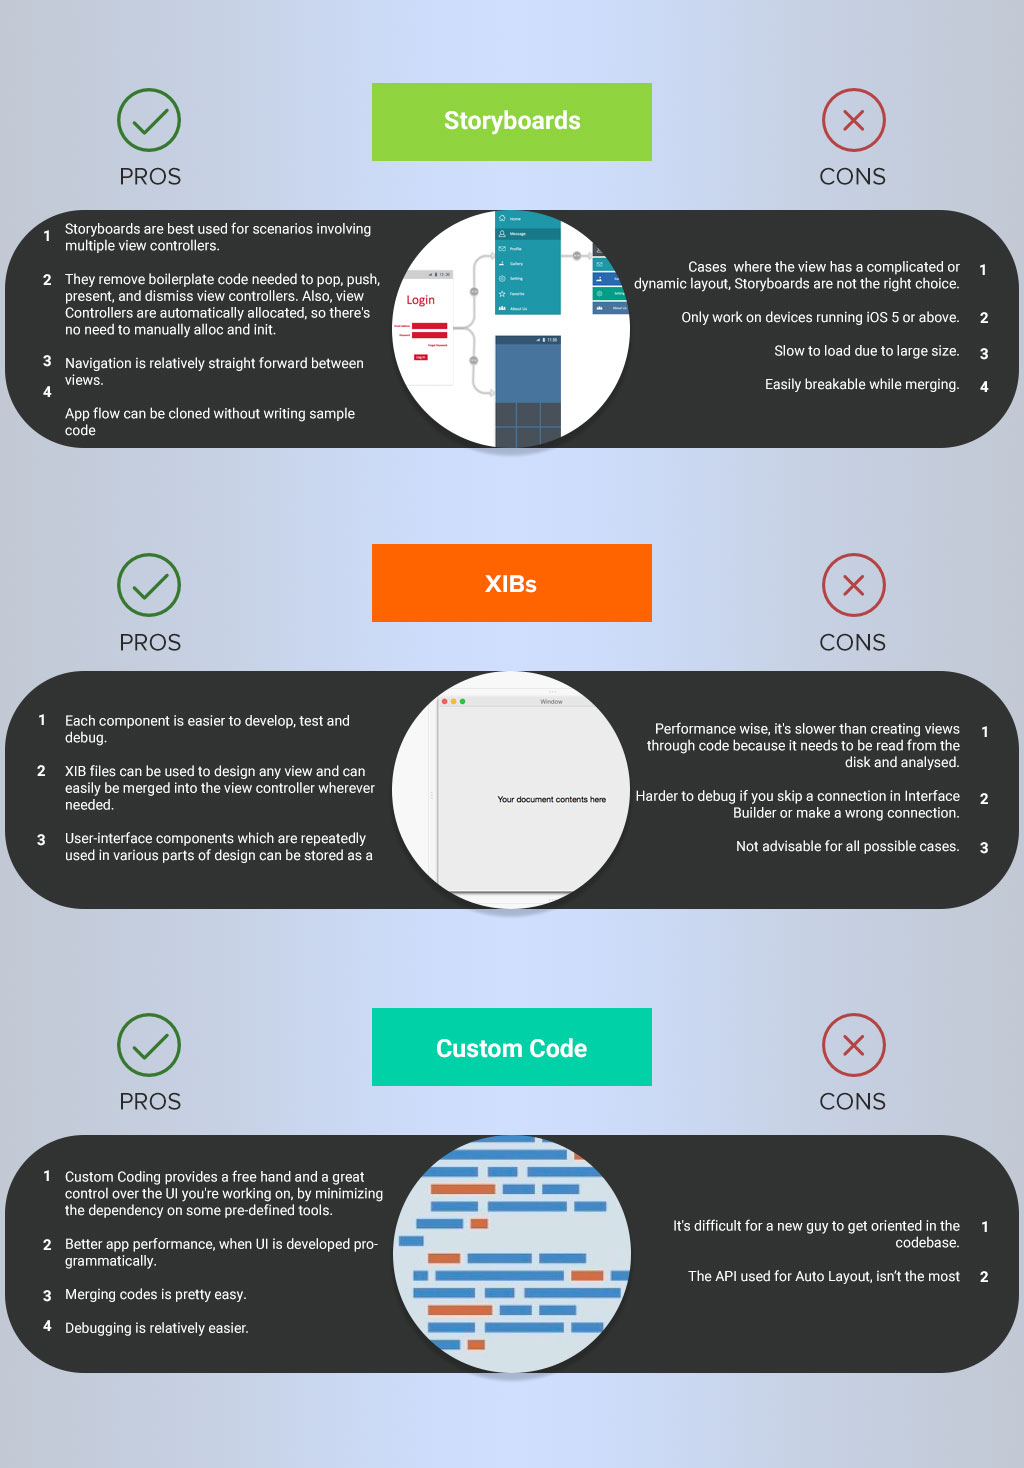
Top 3 iOS UI Design Tools –Storyboards/XIBs/Custom Code

Very often iOS developers consider about, What’s the best tool to develop a User Interface in iOS: using Storyboards or XIBs or Custom Code?. Answers to this question, assumed that a mutually exclusive choice to be made. The developer needs to address upfront anyhow, before beginning the development process.

Here I discuss the above citing the advantages and drawbacks of each of the design approaches.

ios-ui-design

Conclusion:

Considering all the suggestions… it’s not easy to pick out a clear winner. Hence, the usage of these tools is completely based on the context of the UI design. We may take one approach or the other, depending on how the app is to be developed.

What’s your experience? Share your thoughts and comments below.

8 Popular Mobile Technology Trends

Now a days, mobile phones have become an essential part of our lives.

The entire mobile industry aims on creating more innovative personalized experiences that too with immediate effect and seamlessly.

So, during the coming years brands would engage and interact with users on the latter’s choice.

In my opinion, the future of The devise is the future of everything.  – Matt Galligan, Co-founder of Circa

Here are a few mobile technology trends to watch out:

Wearable Tech

Wearable gadgets technology has seen a steady rise over the last year. With the predicted growth rate of about 800% during 2014-2020 and the major big tech companies working on wearable gadgets, the market is surely something to watch out for.

Cross-Platform Mobile App Development

There will be more demand for cross-platform mobile solutions that help the developers’ ability to transit back and forth between devices of multiple platforms. The expectations will be true for same power, look-n-feel, to perform their tasks, manage and visualize massive amounts of data in any screen size.

Mobile CRM

Mobile and Social Network can be integrated seamlessly into CRM platforms like never before.  More than 40% of the organizations are expected to rely on the digital technologies for their sales automation, given the unforeseen adoption rate and focus on this technology.

Ad Targeting

The Technology is likely to account for almost 50% of the digital ad budget in the next year (worth more than $100B). As businesses improve their ability to create data-driven experiences for the customers, targeting of ads will greatly improve and consequently become much more effective.

Mobile Video

A recent study by IAB (Interactive Advertising Bureau), suggests that 58% of people watch videos on a daily basis on their mobile devices. No wonder, companies like Netflix, Hulu and Hotstar are going places.

More Security

This has to be one of the most significant areas under the technologies. What started from pass codes/patterns has now gone to fingerprint and retina scanners. Because this is the new wallet, the need for security is higher.

Mobile Payments

Working in tandem with the previous trends, the technology today allows for payments to be made on-the-go. Nobody likes to carry a bulky wallet or remember all the pass codes anymore. Hence,it’s essential that the payment process through this devices has to be seamless.

Mobile Commerce

More than half of the world’s e-commerce traffic now comes from this devices. That’s a big change in dynamics from a few years back. Banks are going paperless with their mobile apps too. Hence, it’s easy to say that mobile commerce will grow at a high rate in the coming years.

Whether or not all the above predictions come true, we’re convinced that customers will be the winners.

Do you wish to add anything here? I’d appreciate if you can share your thoughts below…

Rails Interactor- How to Organize your Business Logic

An interactor presents components in a system to complete a specific business use-case. It knows how to delegate & get the desired results without carrying out any of the work itself.

Rails interactor is like an object with a single purpose, where every interactor represents one particular task. Prior to interactors, complex business logic was written in Active Record class having multiple responsibilities.

Understanding the Rails Interactor Pattern

The Rails Interactor pattern is a design pattern that encourages the encapsulation of complex business logic into standalone service objects called interactors. 

Interactors are responsible for orchestrating the flow of operations related to a specific use case or action within your application. 

They help keep your controllers slim by moving business logic out of them and into separate, reusable classes.

Implementing Rails Interactor

To implement the Rails Interactor pattern in your application, follow these steps:

  • Install the ‘interactor’ Gem: Start by adding the ‘interactor’ gem to your Gemfields and running bundle install.
  • Create Interactor Classes: Define your Rail interactors as Ruby classes that include Interactor. Each interactor should implement a call method, which represents the entry point for executing the business logic.
  • Define Business Logic: Move your existing business logic from controllers or models into separate interactor classes. Each interactor should encapsulate a specific operation, such as creating a new user, processing a payment, or updating a record.
  • Use Interactors in Controllers: Invoke interactors from your controllers to trigger the associated business logic. Pass input parameters to the interactor via the context object.

Handle Success and Failure: Interactors can return success or failure outcomes via the context. Use this mechanism to handle different scenarios (e.g., rendering different views based on success or failure).

Benefits :

  • Easy to Read/Understand : A developer looking at the code base even for the first time would be able to make out what exactly is happening including how to find each of the use-cases.
  • Testing is easier : Because every interaction has its own specific task, it is easy to test.
  • Low ‘learning’ curve : Just the objects need to be passed into the interactor, that’s it.

Drawbacks :

  • More files : You end up dealing with so many files, however not tough to search.
  • More prep-time : No default Rails Way of doing things

Installation

Add this line to your application’s Gemfile :
gem “interactor-rails”
Note: Compatible with Ruby > 1.9.3 & > 3 on Rails.

Benefits of Using Rails Interactors

  • Separation of Concerns: Interactors promote a clear separation of concerns by isolating business logic into distinct units, making your codebase more modular and easier to understand.
  • Reusability: Interactors are designed to be reusable across different parts of your application. Once defined, an Interactor can be invoked from multiple controllers or services without duplicating code.
  • Testability: Interactors encourage test-driven development (TDD) by providing a clear and isolated context for testing specific use cases independently of other parts of the application.
  • Flexibility: Interactors allow you to compose complex workflows by chaining multiple interactors together, promoting a flexible and composable architecture.

Usage

There are two kinds of interactors built into the Interactor library : basic interactors and organizers.

1. Basic Interactors

A basic interactor is a class that defines the call. They are the building blocks ensuring the app/interactors are included in your autoload paths, providing generators for your convenience.

The following command creates an interactors folder under your app directory and a authenticate_user.rb file in the folder.

[code language=”php”]rails generate interactor authenticate_user[/code]

[code language=”php”]
classAuthenticateUser
include Interactor
def call
if user = User.login(context.email, context.password)
context.user = user
else
context.fail!(message: "Invalid Credentials")
end
end
end
[/code]

rails generate interactor authenticate_user

2. Organizers

An organizer is an important variation on the basic interactor. It’s single purpose is to run other interactors. It passes its context to the interactors, one at a time where every interactor may change the context before it’s passed along to the next one.

Run this command to generate organizers.

[code language=”php”]

rails generate interactor:organizerplace_ordercharge_cardsend_thank_youfulfill_order

[/code]

[code language=”php”]
classPlaceOrder
include Interactor::Organizer
Organize PlaceOrder, ChargeCard, SendThankYou, FulfillOrder
end
[/code]

Note: The context assigned to an interactor contains everything it needs to do.

Take away…

Interactors are a nice way to reuse operations and explicitly specify a sequence of actions in order to execute business logic. They also provide a way to bubble back errors in any of the operation. In case the error needs to rollback an operations , a rollback method can be specified in the Interactor.

All in all, Interactors are a great way to start cleaning up your code, giving your application a good structure and architecture.

Rails Interactor is a valuable pattern for organizing and managing business logic in Ruby on Rails applications

By encapsulating complex operations into standalone interactors, you can achieve cleaner, more maintainable code that adheres to best practices such as separation of concerns and the single responsibility principle. 

Incorporate Rails Interactor into your development workflow to improve code quality, testability, and overall developer productivity.

Ever struggled with organizing your Rails app logic ? Let’s help you find a solution.