How To Make Static Framework IOS Device Independent?

In our previous post, we had mentioned the steps to create a Static Library or Framework for iOS. Here, we will illustrate the steps to make it device independent, i.e. the library can be used to develop app for all iOS devices, instead of recreating the code for each device.

Step 1: Create an Aggregate Target

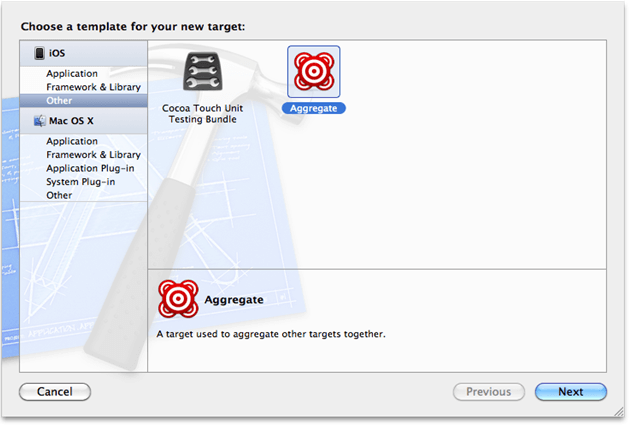
  • Click File >> New Target and create a new Aggregate target in Other menu.

  • Name your aggregate target – like ‘Framework’

xcode_image

 Step 2: Adding the Static Library as a Dependent Target

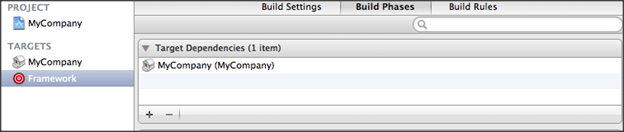
  • Add the static library target to the ‘Target Dependencies’.

framework-image

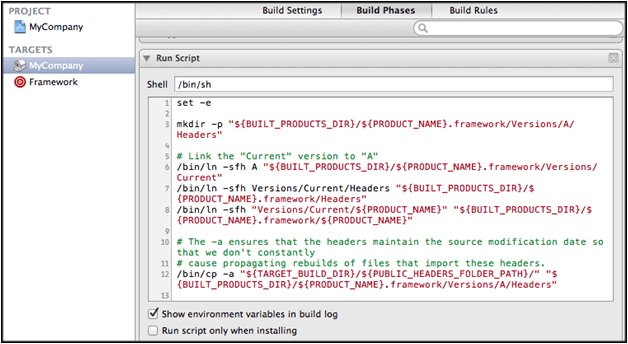
Step 3: Build the ‘Other’ Platform

  • To build the ‘Other’ platform, use a ‘Run Script’ phase.

  • Add a new ‘Run Script’ build phase to your ‘Aggregate’ target and paste the following code.
set -e
 
set -e
 
set +u
 
# Avoid recursively calling this script.
 
if [[ $SF_MASTER_SCRIPT_RUNNING ]]
 
then
 
   exit 0
 
fi
 
set -u
 
export SF_MASTER_SCRIPT_RUNNING=1


SF_TARGET_NAME=${PROJECT_NAME}
 
SF_EXECUTABLE_PATH="lib${SF_TARGET_NAME}.a"
 
SF_WRAPPER_NAME="${SF_TARGET_NAME}.framework"


# The following conditionals come from
 
# https://github.com/kstenerud/iOS-Universal-Framework


if [[ "$SDK_NAME" =~ ([A-Za-z]+) ]]
 
then
 
   SF_SDK_PLATFORM=${BASH_REMATCH[1]}
 
else
 
   echo "Could not find platform name from SDK_NAME: $SDK_NAME"
 
   exit 1
 
fi


if [[ "$SDK_NAME" =~ ([0-9]+.*$) ]] then
 
   SF_SDK_VERSION=${BASH_REMATCH[1]}
 
else
 
   echo "Could not find sdk version from SDK_NAME: $SDK_NAME"
 
   exit 1
 
fi


if [[ "$SF_SDK_PLATFORM" = "iphoneos" ]]
 
then
 
   SF_OTHER_PLATFORM=iphonesimulator
 
else
 
   SF_OTHER_PLATFORM=iphoneos
 
fi


if [[ "$BUILT_PRODUCTS_DIR" =~ (.*)$SF_SDK_PLATFORM$ ]]
 
then
 
   SF_OTHER_BUILT_PRODUCTS_DIR="${BASH_REMATCH[1]}${SF_OTHER_PLATFORM}"
 
else
 
   echo "Could not find platform name from build products directory: $BUILT_PRODUCTS_DIR"
 
   exit 1
 
fi


# Build the other platform.
 
xcodebuild -project "${PROJECT_FILE_PATH}" -target "${TARGET_NAME}" -configuration "${CONFIGURATION}" -sdk ${SF_OTHER_PLATFORM}${SF_SDK_VERSION} BUILD_DIR="${BUILD_DIR}" OBJROOT="${OBJROOT}" BUILD_ROOT="${BUILD_ROOT}" SYMROOT="${SYMROOT}" $ACTION


# Smash the two static libraries into one fat binary and store it in the .framework
 
lipo -create "${BUILT_PRODUCTS_DIR}/${SF_EXECUTABLE_PATH}" "${SF_OTHER_BUILT_PRODUCTS_DIR}/${SF_EXECUTABLE_PATH}" -output "${BUILT_PRODUCTS_DIR}/${SF_WRAPPER_NAME}/Versions/A/${SF_TARGET_NAME}"


# Copy the binary to the other architecture folder to have a complete framework in both.
 
cp -a "${BUILT_PRODUCTS_DIR}/${SF_WRAPPER_NAME}/Versions/A/${SF_TARGET

Step 4: Build to verify

  • Now  you have set up an environment to build a distributable <project_name>.framework

  • Build the ‘Aggregate’ target

  • Expand the Products group in X-Code, right click the static library and click ‘Show in Finder’

Note: If this doesn’t open Finder to show the static library, then try opening

~/Library/Developer/Xcode/DerivedData/<project name>/Build/Products/Debug-iphonesimulator/.

  • In this folder you will find your <project_name>.framework folder.

You can now share the <project_name>.framework among other iOS app developers.

We are ranked TOP #1 for iPad Development

Hooray! We are the TOP #1 company in world, this time for iPad development

We are elated to declare that just we are ranked #1 by the bestwebdesignagencies.com

We dedicate this honor to our patrons without whom it would not have possible to be here.

as_top_ipad-1024x585

The credit goes to the good job done by our top-notch iOS app developers, who have been providing excellent services to our valued clientele.

How We Can Help

If you have an idea for an iPad/iPhone app, Andolasoft’s expert staff can help you turn that concept into a reality. We also have experience in rescuing troubled projects or improving

existing apps. No matter what stage your app is at, Andolasoft can help you bring it to market.

What You Get:

  • Easy-to-use iPad app with rich and engaging user experience
  • Step-by-step guidance and suggestions to you from building an app till publishing to App-Store
  • We provide perfect technical resources, support for your  needs
  • We follow the  Industry Best Practices
  • Timely delivery matching your budget
  • We follow Agile methodology and Scrum to facilitate rapid iPad app development
  • Quick turnaround service

The bestwebdesignagencies.com is an autonomous body that identifies and lists out best design and development companies in the world. The purpose is to help customers to pick the best ones from the lot. They adopt a stringent evaluation process to determine the quality of work delivered by a company to their customer satisfaction.

How To Create A Static Library Or Framework For IOS?

A static library is a package of classes, functions, definitions and resources, which can be packed together and easily shared among projects. This facilitates reuse of code easier as you will have your own set of classes and utility functions.

Here are the steps to create your static library or framework

Step 1 : Create A New ‘Cocoa Touch Static Library’ Project

  • Choose template as Cocoa Touch Static Library.
  • Start with create new project >> iOS >> Framework & Library >> Cocoa Touch Static Library

choose_template_for_project

Note: The name you entered in product field will be the name of your framework.
Example:  ‘MyCompany’ will generate ‘MyCompany.framework’

Step 2: Create The Primary Framework Header (Recommended)

Usually, framework header is imported this way – <MyCompany/MyCompany.h>

  • Create an ‘.h’ file – ‘MyCompany.h
  • If X-Code creates it for you, just delete the ‘.m’ file and import the inner classes used in ‘.h’ file
  • If you import only ‘MyCompany.h’ (#import <MyCompany/MyCompany.h>) then the rest of the files need not be imported
#import <Foundation/Foundation.h>
  • Now, add your new sources
  • Make the header ‘Public’

Public headers are copied to the .framework and can be imported using the framework

  • Select the header in the project explorer, then expand the Utilities pane (Cmd+Option+0) to modify the scope of header.
  • In the ‘Target Membership’ group select the checkbox next to the ‘.h’ file.
  • Then, change the scope of the header from ‘Project’ to ‘Public’.

You might have to uncheck and check the box to get the dropdown list. This will ensure that the header is copied to the correct location in the copy headers phase.

Step 3: Update The Public Headers Location

  • To avoid copying private headers to the framework check that the public headers are copied to a separate directory, e.g. $(PROJECT_NAME)Headers.
  • Select the project in the file explorer >> select the targets >> ‘Build Settings’ tab.
  • Set ‘Public Headers Folder Path’ to ‘$(PROJECT_NAME)Headers’ for all configurations by searching the ‘Public Headers Folder Path’. This folder must be unique if you are working with multiple Frameworks.

headers_xcode


Step 4: Setup ‘Build Settings’

"Dead Code Stripping" => No (for all settings)
"Strip Debug Symbols During Copy" => No (for all settings)
"Strip Style" => Non-Global Symbols (for all settings)

Step 5: Make Sure That Framework Is Used As Dependent Target

  • Generate the basic skeleton of the framework in the static library target. Also include a simple post-build script.
  • Select your target in the file navigator and click the ‘Build Phases’ tab
  • Then, click ‘Add Build Phase’ >> ‘Add Run Script’ and paste the following script in the source portion of the run script build phase.
set–e
mkdir -p "${BUILT_PRODUCTS_DIR}/${PRODUCT_NAME}.framework/Versions/A/Headers"
# Link the "Current" version to "A"
/bin/ln -sfh A "${BUILT_PRODUCTS_DIR}/${PRODUCT_NAME}.framework/Versions/Current"
/bin/ln -sfh Versions/Current/Headers "${BUILT_PRODUCTS_DIR}/${PRODUCT_NAME}.framework/Headers"
/bin/ln -sfh "Versions/Current/${PRODUCT_NAME}" "${BUILT_PRODUCTS_DIR}/${PRODUCT_NAME}.framework/${PRODUCT_NAME}"
# The -a ensures that the headers maintain the source modification date so that we don't constantly
# cause propagating rebuilds of files that import these headers.
/bin/cp -a "${TARGET_BUILD_DIR}/${PUBLIC_HEADERS_FOLDER_PATH}/" "${BUILT_PRODUCTS_DIR}/${PRODUCT_NAME}.framework/Versions/A/Headers"
mycompany_xcode
  • Build your project

The build products directory is usually in-
(~/Library/Developer/Xcode/DerivedData/<ProjectName>-<gibberish>/Build/Products/…)

You will find the ‘libMyCompany.a’ static library, a headers folder, and a ‘MyComapny.framework’ folder which contains the basic skeleton of your framework.

build_product_directory

SEE ALSO: How to make Static Framework iOS device independent?

I hope you enjoyed this topic, if you have any questions or comments please share below!

CakePHP: How To Use ‘neighbors’ With ‘find’ Method

CakePHP ‘find’ method makes it easier to retrieve data from database. The ‘find’ method can be used to construct anything from extremely simple queries to more complex ones without writing much code. This method can handle most SQL type requests and can be extended for more specific SQL queries.  I will walk you through the below example about the basics of working with the ‘find’  method

Here Are Some Inbuilt Types in CakePHP

  1. $this->Model->find(‘all’,$condition);
  2. $this->Model->find(‘first’,$condition);
  3. $this->Model->find(‘count’,$condition);
  4. $this->Model->find(‘list’,$condition);
  5. $this->Model->find(‘neighbors’,$condition);
  6. $this->Model->find(‘threaded’,$condition);

First four types are the most commonly used in CakePHP
Now, let’s take a look at an example of ‘neighbors’ type

Example

Let’s assume QuizQuestion is your model and you want to fetch the previous and next entries

Your Controller/action will look like,

public function getNeighbors($id){
 
$this->QuizQuestion->id = $id;
 
$neighbors = $this->QuizQuestion->find('neighbors',array('fields'=>array('id','question_no','description')));
}

A couple of queries will be generated in SQL as,

Query: SELECT 'QuizQuestion'.'id', 'QuizQuestion'.'question_no', 'QuizQuestion'.'description',
'QuizQuestion'.'id' FROM 'quiz_questions' WHERE 'QuizQuestion'.'id' < 38   ORDER BY
'QuizQuestion'.'id' DESC  LIMIT 1
Query: SELECT 'QuizQuestion'.'id', 'QuizQuestion'.'question_no', 'QuizQuestion'.'description',
'QuizQuestion'.'id' FROM 'quiz_questions' WHERE 'QuizQuestion'.'id' > 38   ORDER BY
'QuizQuestion'.'id' ASC  LIMIT 1

Here’s the output

Array
(
[prev] => Array
(
[QuizQuestion] => Array
(
[id] => 37
[question_no] => 1
[description] => Mathematics
)
 
)
[next] => Array
(
[QuizQuestion] => Array
(
[id] => 39
[question_no] => 3
[description] => Mathematics
)
 
)
 
)

Voila! Using the result keys ‘prev’ and ‘next’ you can view the results the way you want.

Sweet Journey | New IOS App From Andolasoft

We are excited to announce that ‘Sweet Journey’ – a diary app is now in App Store. Deployed last week, got overwhelming responses with over 100 downloads around the world. It is a personal diary on the go. You could use it as a journal or photo album to keep your memories safe. Capture photos, videos and take notes, all in one app.

Download ‘Sweet Journey’ from App-Store

sweetjourney_logo

Journals and diaries are great to use, but it is vulnerable to threats like damage, lost. So, we came-up with an unique app idea to make note taking easier. If you like to carry around a journal and scribble notes, why not capture that on your iPhone or iPad. It would be easier, faster and insightful. You could do more than just writing notes and taking photos.

What You Can Do With Sweet Journey

  • Create notes with date and time
  • Capture snaps and videos with tags and timestamp
  • Record voices with tags and timestamp
  • Save photos with Geo-tag to see in map view, based on location
  • Store memories in one gallery and sort as per day, month and year

Here’s What We Did:

  • Designed the application logo, user interfaces (UI/UX) and animation effects
  • Developed the app in native language i.e. Objective-C and Cocoa Touch framework
  • Devised the application process and flow from navigation to monetization
  • Implemented Tapku SDK
  • Used iCarousel library for paged and scroll view
  • Deployed the app to App Store within 3 weeks since the initiation of project

So, go ahead; download the app and see how ‘SweetJourney’ can help memories last forever. Feel free to write reviews in iTunes.

Auditnet_appstore1


SJ_sc_small


How To Create A Gridview With ‘UICollectionView’ In IOS6 & Above

What Is ‘UICollectionView’?

‘UICollectionView’ is a class introduced in iOS 6 SDK. It helps developers in creating grid view to handle ordered collection of data items using customizable layouts. ‘Collection view’, available in this class is like ‘UItableview’ which supports multiple column layouts.

Getting Started:

Create new ‘.h‘ and ‘.m‘ files to display the images.

In ‘ShowImagesViewController.h

#import <UIKit/UIKit.h>
@interface ShowImagesViewController :UICollectionViewController
{
NSArray *allImages;
}
@property (nonatomic, retain) NSArray *allImages;
@end

In ‘ShowImagesViewController.m

#import "ShowImagesViewController.h"
@implementation ShowImagesViewController
@synthesize allImages;
- (void)viewDidLoad
{
[superviewDidLoad];
allImages = [NSArrayarrayWithObjects:@"pizza.jpeg",
@"sides_img.png", @"sandwich_img.png", @"pizza_img.png",
@"pasta_img.png", @"drinks_img.png", @"pizza.jpeg",
@"sides_img.png", @"sandwich_img.png", @"pizza_img.png",
@"pasta_img.png", @"drinks_img.png", nil];
}
 
- (void)didReceiveMemoryWarning
{
[superdidReceiveMemoryWarning];
// Dispose of any resources that can be recreated.
}
- (BOOL)shouldAutorotateToInterfaceOrientation:
(UIInterfaceOrientation)interfaceOrientation
{
return YES;
}
- (NSInteger)collectionView:(UICollectionView *)collectionViewnumberOfItemsInSection:(NSInteger)section
{
returnrecipeImages.count;
}
- (UICollectionViewCell *)collectionView:(UICollectionView *)collectionViewcellForItemAtIndexPath:(NSIndexPath *)indexPath
{
staticNSString *identifier = @"Cell";
UICollectionViewCell *cell = [collectionView
dequeueReusableCellWithReuseIdentifier:identifier
forIndexPath:indexPath];
 
UIImageView *allImageView = (UIImageView *)[cell viewWithTag:100];
allImageView.image = [UIImageimageNamed:[allImagesobjectAtIndex:indexPath.row]];
return cell;
}
- (void)collectionView:(UICollectionView *)collectionViewdidSelectItemAtIndexPath:(NSIndexPath *)indexPath{
}
@end

Example of Grid layout using ‘UICollectionViewController

uicollectionview

Conclusion:

‘UICollectionViewController’ creates ‘Grid’/’Tile’ layout much faster and offers intuitive user interface in iOS 6 devices.