How to use ‘Contextual Action’ bar in ‘ListView’ page

Android_list_item

Introduction:

‘Android.View.ActionMode’ is an Android API that is used to set up contextual actionbar with the help of xml. When an app enables this action mode by selecting an item, a contextual action bar is displayed at the header of the page. Here, users are enabled to perform on the currently chosen item.

The contextual action bar disappears when the user selects other action icon (in this case ‘delete’ icon), or selects the ‘Done’ action on the left side of the action bar.

Note: The contextual action bar works independently and overtakes the action bar position.

Steps to create a contextual action bar with the delete action:

1. In the main activity, implement the ‘ActionMode.Callback’ interface and override all implemented methods as per application requirements:

  • public boolean onActionItemClicked(ActionMode mode, MenuItem item)
  • public boolean onCreateActionMode(ActionMode mode, Menu menu)
  • public void onDestroyActionMode(ActionMode arg0)
  • public boolean onPrepareActionMode(ActionMode arg0, Menu arg1)

2. For selecting list item, implement the ‘setOnItemLongClickListener’ method on ‘ListView ‘object and call ‘this.startActionMode()’ to start ‘actionmode’ by passing ‘ActionMode.Callback’ object.

Example of Main-Activity:

[sourcecode]package com.example.contextualactionbardemo;

import java.util.ArrayList;

import android.os.Bundle;
import android.app.AlertDialog;
import android.app.ListActivity;
import android.content.DialogInterface;
import android.util.Log;
import android.view.ActionMode;
import android.view.Menu;
import android.view.MenuInflater;
import android.view.MenuItem;
import android.view.View;
import android.widget.AdapterView;
import android.widget.ArrayAdapter;
import android.widget.ListView;
import android.widget.AdapterView.OnItemLongClickListener;

public class MainActivity extends ListActivity {
protected Object mActionMode;
private static int selectedItem = -1;
private ArrayList list;
private String listItem = "";
private ArrayAdapter adapter;

@Override
protected void onCreate(Bundle savedInstanceState) {
super.onCreate(savedInstanceState);
ListView listView = (ListView) findViewById(R.id.listview);
String[] values = new String[] { "Android List Item One",
"Android List Item Two",
"Android List Item Three",
"Android List Item Four",
"Android List Item Five",
"Android List Item Six",
"Android List Item Seven",
"Android List Item Eight"
};

list = new ArrayList();
for (int i = 0; i < values.length; ++i) {
list.add(values[i]);
}
adapter = new ArrayAdapter(this,
android.R.layout.simple_list_item_1, android.R.id.text1, list);
setListAdapter(adapter);

listView = getListView();
listView.setOnItemLongClickListener(new OnItemLongClickListener() {

public boolean onItemLongClick(AdapterView<?> arg0, View arg1,
int pos, long id) {
Log.v("long clicked","pos"+" "+pos);
if (mActionMode != null) {
return false;
}
selectedItem = -1;
selectedItem = pos;
listItem = list.get(selectedItem);
mActionMode = MainActivity.this.startActionMode(mActionModeCallback);
arg1.setSelected(true);
return true;
}
});

}

private ActionMode.Callback mActionModeCallback = new ActionMode.Callback() {
@Override
public boolean onActionItemClicked(ActionMode mode, MenuItem item) {
switch (item.getItemId()) {
case R.id.action_delete:
AlertDialog.Builder alertDialog = new AlertDialog.Builder(MainActivity.this);
// Setting Dialog Title
alertDialog.setTitle("Confirm Delete…");
// Setting Dialog Message
alertDialog.setMessage("Are you sure you want to delete?");
alertDialog.setPositiveButton("YES", new DialogInterface.OnClickListener() {
public void onClick(DialogInterface dialog,int which) {
adapter.remove(listItem);
adapter.notifyDataSetChanged();
}
});
// Setting Negative "NO" Button
alertDialog.setNegativeButton("NO", new DialogInterface.OnClickListener() {
public void onClick(DialogInterface dialog, int which) {
dialog.cancel();
}
});
// Showing Alert Message
alertDialog.show();
mode.finish();
return true;
default:
return false;
}
}

@Override
public boolean onCreateActionMode(ActionMode mode, Menu menu) {
mode.setTitle(listItem);
MenuInflater inflater = mode.getMenuInflater();
inflater.inflate(R.menu.deletemenu, menu);
return true;
}

@Override
public void onDestroyActionMode(ActionMode arg0) {
// TODO Auto-generated method stub
mActionMode = null;
selectedItem = -1;
}

@Override
public boolean onPrepareActionMode(ActionMode arg0, Menu arg1) {
// TODO Auto-generated method stub
return false;
}
};
}[/sourcecode]

Example of /res/menu/deletemenu.xml:

Conclusion:

Contextual action mode is useful in following cases:

  • To show customize menu display with icon of edit, rename, delete
  • To display dynamic customize menu over the action bar

Have something to add to this topic? Share it in the comments.

How To Use “UIActionSheet” As A Pop-over View In Your IOS Apps

iOS-destructive_button

What is UIActionSheet

The action sheet in iOS contains a title and one or more buttons. Each of the buttons is associated with separate actions. It can be presented from a toolbar; tab bar, button bar item or from a view, however the title can be optional.

Why use UIActionSheet?

UIActionSheet is used in the following cases:

  • To show an option for a given task
  • To prompt the user to confirm an action
  • To get user input

Action sheet is dismissed by touching anywhere outside the pop-over.

How to use it?

  • Extend the UIActionSheetDeleagte in the .h header file of the ViewController
  • Then add a method named as”showActionSheet”

Example

[sourcecode]@interface MyViewController : UIViewController {

}

-(IBAction)showActionSheet:(id)sender;
@end[/sourcecode]

Initializing the UIActionSheet takes 5 following parameters

  •  initWithTitle
  • delegate
  • cancelButtonTitle
  • destructiveButtonTitle
  • otherButtonTitles

Add the following code in the .m file of viewcontroller.

Example

[sourcecode]-(IBAction)showActionSheet:(id)sender {
UIActionSheet *popupQuery = [[UIActionSheet alloc] initWithTitle:@"Set your title" delegate:self cancelButtonTitle:@"Cancel" destructiveButtonTitle:@"Destructive Button" otherButtonTitles:@"Rename",@"Delete", nil];

popupQuery.actionSheetStyle = UIActionSheetStyleBlackOpaque;
[popupQuery showInView:self.view];
[popupQuery release];
}[/sourcecode]

How to know which button was clicked by user?

There is a delegate method named as “actionSheet clickedButtonAtIndex” in which you can get the action.

[sourcecode]-(void)actionSheet:(UIActionSheet *)actionSheet clickedButtonAtIndex:(NSInteger)buttonIndex {

switch (buttonIndex) {
case 0:
NSLog(@”%@”,Destructive Button Clicked);
break;
case 1:
NSLog(@”%@”,Rename Button Clicked);
break;
case 2:
NSLog(@”%@”,Delete Button Clicked);
break;
case 3:
NSLog(@”%@”,Cancel Button Clicked);
break;
}
}[/sourcecode]

Conclusion:

UIActionSheet gives additional choices to the users for a particular action & gives a cleaner look to the app.

How to Install & Configure Redis-Server on Centos/Fedora Server

‘Redis’ is an Open source key-value data store, shared by multiple processes, multiple applications, or multiple Servers. Key values are more complex types like Hashes, Lists, Sets or Sorted Sets.

Let’s have a quick look on the installation steps of “Redis

Here we go…

Step – 1

First of all we need to switch to superuser & install dependencies:

[code language=”html”]
su
yum install make gcc wget tcl
[/code]

Step-2
Download Redis Packages & Unzip. This guide is based on installing Redis 2.8.3:

[code language=”html”]
wget http://download.redis.io/releases/redis-2.8.3.tar.gz
tar xzvf redis-2.8.3.tar.gz
[/code]

Step-3
Compiling and Installing Redis from the source:

[code language=”html”]
cd redis-2.8.3
make
make install
[/code]

Step- 4

Starting Redis server by executing the following command without any argument:

[code language=”html”]
redis-server
[/code]

Step-5

Check if Redis is working. To check, send a PING command using redis-cli. This will return ‘PONG’ if everything is fine.

[code language=”html”]
redis-cli ping
PONG
[/code]

Step-6

Add Redis-server to init script. Create a directory to store your Redis config files & data:

[code language=”html”]
mkdir -p /etc/redis
mkdir -p /var/redis
[/code]

Also we need to create a directory inside “/var/redis” that works as data &  a working directory for this Redis instance.

[code language=”html”]
mkdir /var/redis/redis
[/code]

Step-7

Copy the template configuration file you’ll find in the root directory of Redis distribution into /etc/redis/

[code language=”html”]
cp redis.conf /etc/redis/redis.conf
[/code]

Edit the configuration file, make sure to perform the following changes:

  • Set daemonize to yes (by default it’s set to ‘No’).
  • Set the pidfile to /var/run/redis.pid
  • Set your preferred loglevel
  • Set the logfile to /var/log/redis.log
  • Set the dir to /var/redis/redis
  • Save and exit from the editor

Step-8 
Add the Redis init script.

[code language=”html”]
vi /etc/init.d/redis
[/code]

And paste the following codes to it

[code language=”html”]
#!/bin/sh
#
# chkconfig: 345 20 80
# description: Redis is an open source (BSD licensed), in-memory data structure store, used as database, cache and message broker.

# Source function library.
. /etc/init.d/functions

REDISPORT=6379
EXEC=/usr/local/bin/redis-server
CLIEXEC=/usr/local/bin/redis-cli

PIDFILE=/var/run/redis.pid
CONF="/etc/redis/redis.conf"

case "$1" in
start)
if [ -f $PIDFILE ]
then
echo "$PIDFILE exists, process is already running or crashed"
else
echo "Starting Redis server…"
$EXEC $CONF
fi
;;
stop)
if [ ! -f $PIDFILE ]
then
echo "$PIDFILE does not exist, process is not running"
else
PID=$(cat $PIDFILE)
echo "Stopping …"
$CLIEXEC -p $REDISPORT shutdown
while [ -x /proc/${PID} ]
do
echo "Waiting for Redis to shutdown …"
sleep 1
done
echo "Redis stopped"
fi
;;
restart)
stop
start
;;
*)
echo "Please use start or stop as first argument"
;;
esac
exit 0
[/code]

Save the file and exit from the editor.

Step-9
Give appropriate permission to the init script

[code language=”html”]
chmod u+x /etc/init.d/redis
[/code]

Step-10
To run the Redis server at startup we need to add it to the chkconfig list.

[code language=”html”]
chkconfig –add redis
chkconfig –level 345 redis on
[/code]

Step-11
Finally we are ready to start the Redis Server.

[code language=”html”]
/etc/init.d/redis start
[/code]

The redis server will start automatically on system boot.

Conclusion:

‘Redis’ also supports datatypes such as Transitions, Publish and Subscribe. ‘Redis’ is considered more powerful than ‘Memcache’. It would be smart to bring ‘Redis’ into practice and put ‘Memcache’ down for a while.

We provide one-stop solution by utilizing Redis server with Rails , PHP applications and deploy in cloud services such as AWS to make sure that the application is fully scalable.

You can also check the compression of Memcached vs Redis, to know more information on which one to pick for Large web apps?

Do you have anything to add here? Share your thoughts with comments.

It’s always pleasure to hear from you and for5 any assistance and support on AWS you can write us at info@andolasoft.com.

How to show Captured Images dynamically in “GridView” Layout

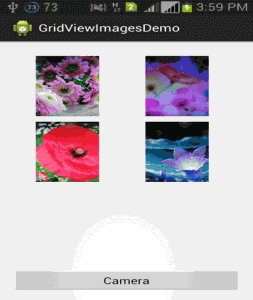
There are numerous camera apps in the market which displays shopping items (i.e. image view). In these camera apps we need to arrange each photo items in a list view, basically a ‘Grid View’.

In such cases, ‘table layout’ would be easier to use; but it is difficult to arrange large number of items in

gridview_sample-253x300

side scroll view. As ‘table view’ is just a layout manager, it doesn’t allow direct interaction with each item to the users.

In order to tackle such development issues, it would be smart to implement ‘Grid View’ Layout.

What is “Grid View” Layout?

Grid View (android.widget.Grid View) is a layout that is implemented to show two-dimensional view with scrollable structure.

With the help of ‘List’ adapter, we can add images dynamically to a ‘Grid View’ layout by customizing the number of columns.

Let me tell you the process to show your Android Smartphone captured images dynamically in “Grid View” layout with some example.

Example of Layout xml

[sourcecode]<RelativeLayout xmlns:android="http://schemas.android.com/apk/res/android"
xmlns:tools="http://schemas.android.com/tools"
android:layout_width="match_parent"
android:layout_height="match_parent"
android:paddingBottom="@dimen/activity_vertical_margin"
android:paddingLeft="@dimen/activity_horizontal_margin"
android:paddingRight="@dimen/activity_horizontal_margin"
android:paddingTop="@dimen/activity_vertical_margin"
tools:context=".MainActivity" >

<RelativeLayout
android:id="@+id/RelativeGridLayout"
android:layout_width="wrap_content"
android:layout_height="fill_parent" >

<GridView
android:id="@+id/gridviewimg"
android:layout_width="wrap_content"
android:layout_height="fill_parent"
android:gravity="center"
android:numColumns="2"
android:scrollbarStyle="outsideInset"
android:smoothScrollbar="true"
android:verticalSpacing="10dp"
android:paddingBottom="50dp"
android:paddingTop="10dp"
/>
</RelativeLayout>

<RelativeLayout
android:id="@+id/RelativeLayout01"
android:layout_width="fill_parent"
android:layout_height="40dp"
android:layout_alignBottom="@+id/RelativeGridLayout"
>

<Button
android:id="@+id/capture_btn1"
android:layout_width="fill_parent"
android:layout_height="wrap_content"
android:layout_alignParentTop="true"
android:layout_centerHorizontal="true"
android:text="Camera" />
</RelativeLayout>

</RelativeLayout>[/sourcecode]

Example of Main form Activity class

1.MainActivity.java

[sourcecode]package com.example.gridviewimagesdemo;

import java.io.File;
import java.io.FileInputStream;
import java.io.FileNotFoundException;
import java.io.FileOutputStream;
import java.io.IOException;
import java.text.DateFormat;
import java.text.SimpleDateFormat;
import java.util.ArrayList;
import java.util.Arrays;
import java.util.Date;
import java.util.List;

import android.net.Uri;
import android.os.Bundle;
import android.os.Environment;
import android.provider.MediaStore;
import android.app.Activity;
import android.content.ActivityNotFoundException;
import android.content.Context;
import android.content.Intent;
import android.graphics.Bitmap;
import android.graphics.BitmapFactory;
import android.util.Log;
import android.view.Menu;
import android.view.View;
import android.view.ViewGroup;
import android.view.View.OnClickListener;
import android.widget.BaseAdapter;
import android.widget.Button;
import android.widget.GridView;
import android.widget.ImageView;
import android.widget.Toast;

public class MainActivity extends Activity implements OnClickListener {

Button captureBtn = null;
final int CAMERA_CAPTURE = 1;
private Uri picUri;
private DateFormat dateFormat = new SimpleDateFormat("yyyy-MM-dd HH:mm:ss");
private GridView grid;
private  List<String> listOfImagesPath;

public static final String GridViewDemo_ImagePath = Environment.getExternalStorageDirectory().getAbsolutePath() + "/GridViewDemo/";

@Override
protected void onCreate(Bundle savedInstanceState) {
super.onCreate(savedInstanceState);
setContentView(R.layout.activity_main);

captureBtn = (Button)findViewById(R.id.capture_btn1);
captureBtn.setOnClickListener(this);
grid = ( GridView) findViewById(R.id.gridviewimg);

listOfImagesPath = null;
listOfImagesPath = RetriveCapturedImagePath();
if(listOfImagesPath!=null){
grid.setAdapter(new ImageListAdapter(this,listOfImagesPath));
}
}

@Override
public boolean onCreateOptionsMenu(Menu menu) {
// Inflate the menu; this adds items to the action bar if it is present.
getMenuInflater().inflate(R.menu.main, menu);
return true;
}

@Override
public void onClick(View arg0) {
// TODO Auto-generated method stub
if (arg0.getId() == R.id.capture_btn1) {

try {
//use standard intent to capture an image
Intent captureIntent = new Intent(MediaStore.ACTION_IMAGE_CAPTURE);
//we will handle the returned data in onActivityResult
startActivityForResult(captureIntent, CAMERA_CAPTURE);
} catch(ActivityNotFoundException anfe){
//display an error message
String errorMessage = "Whoops – your device doesn’t support capturing images!";
Toast toast = Toast.makeText(this, errorMessage, Toast.LENGTH_SHORT);
toast.show();
}
}

}

protected void onActivityResult(int requestCode, int resultCode, Intent data) {
if (resultCode == RESULT_OK) {
//user is returning from capturing an image using the camera
if(requestCode == CAMERA_CAPTURE){
Bundle extras = data.getExtras();
Bitmap thePic = extras.getParcelable("data");
String imgcurTime = dateFormat.format(new Date());
File imageDirectory = new File(GridViewDemo_ImagePath);
imageDirectory.mkdirs();
String _path = GridViewDemo_ImagePath + imgcurTime+".jpg";
try {
FileOutputStream out = new FileOutputStream(_path);
thePic.compress(Bitmap.CompressFormat.JPEG, 90, out);
out.close();
} catch (FileNotFoundException e) {
e.getMessage();
} catch (IOException e) {
e.printStackTrace();
}
listOfImagesPath = null;
listOfImagesPath = RetriveCapturedImagePath();
if(listOfImagesPath!=null){
grid.setAdapter(new ImageListAdapter(this,listOfImagesPath));
}
}
}
}

private List<String> RetriveCapturedImagePath() {
List<String> tFileList = new ArrayList<String>();
File f = new File(GridViewDemo_ImagePath);
if (f.exists()) {
File[] files=f.listFiles();
Arrays.sort(files);

for(int i=0; i<files.length; i++){
File file = files[i];
if(file.isDirectory())
continue;
tFileList.add(file.getPath());
}
}
return tFileList;
}

public class ImageListAdapter extends BaseAdapter
{
private Context context;
private List<String> imgPic;
public ImageListAdapter(Context c, List<String> thePic)
{
context = c;
imgPic = thePic;
}
public int getCount() {
if(imgPic != null)
return imgPic.size();
else
return 0;
}

//—returns the ID of an item—
public Object getItem(int position) {
return position;
}

public long getItemId(int position) {
return position;
}

//—returns an ImageView view—
public View getView(int position, View convertView, ViewGroup parent)
{
ImageView imageView;
BitmapFactory.Options bfOptions=new BitmapFactory.Options();
bfOptions.inDither=false;                     //Disable Dithering mode
bfOptions.inPurgeable=true;                   //Tell to gc that whether it needs free memory, the Bitmap can be cleared
bfOptions.inInputShareable=true;              //Which kind of reference will be used to recover the Bitmap data after being clear, when it will be used in the future
bfOptions.inTempStorage=new byte[32 * 1024];
if (convertView == null) {
imageView = new ImageView(context);
imageView.setLayoutParams(new GridView.LayoutParams(ViewGroup.LayoutParams.MATCH_PARENT, ViewGroup.LayoutParams.MATCH_PARENT));
imageView.setPadding(0, 0, 0, 0);
} else {
imageView = (ImageView) convertView;
}
FileInputStream fs = null;
Bitmap bm;
try {
fs = new FileInputStream(new File(imgPic.get(position).toString()));

if(fs!=null) {
bm=BitmapFactory.decodeFileDescriptor(fs.getFD(), null, bfOptions);
imageView.setImageBitmap(bm);
imageView.setId(position);
imageView.setLayoutParams(new GridView.LayoutParams(200, 160));
}
} catch (IOException e) {
e.printStackTrace();
} finally{
if(fs!=null) {
try {
fs.close();
} catch (IOException e) {
e.printStackTrace();
}
}
}
return imageView;
}
}
}[/sourcecode]

Example of Manifest.xml file content:

Example of AndroidManifest.xml

[sourcecode]<?xml version="1.0" encoding="utf-8"?>
<manifest xmlns:android="http://schemas.android.com/apk/res/android"
package="com.example.gridviewimagesdemo"
android:versionCode="1"
android:versionName="1.0" >

<uses-sdk
android:minSdkVersion="8"
android:targetSdkVersion="17" />

<uses-permission android:name="android.permission.WRITE_EXTERNAL_STORAGE" />

<application
android:allowBackup="true"
android:icon="@drawable/ic_launcher"
android:label="@string/app_name"
android:theme="@style/AppTheme" >
<activity
android:name="com.example.gridviewimagesdemo.MainActivity"
android:label="@string/app_name" >
<intent-filter>
<action android:name="android.intent.action.MAIN" />

<category android:name="android.intent.category.LAUNCHER" />
</intent-filter>
</activity>
</application>

</manifest>[/sourcecode]

Conclusion:

So, a ‘Grid view’ implementation would result in following features and benefits:

  • In ‘GridView’ layout items would be listed in a static grid, defined in layout xml file.
  • ‘Gridview’ extends android.widget.Adapter, so it could be used where large amount of data is managed in a single page frame.
  • Enhanced data source binding capabilities (Direct interaction with SQLite Data Source)
  • Built-in support for sorting and paging mechanism
  • Additional Column types (ImageField)

I would like to recommend you to go through my previous article on where I have clearly narrate the process to display your iPhone captured images in Grid View layout.

I hope you find this useful. If you want to develop android or iPhone mobile app for you or for your organization, then you can hire single or group of developers from the pool of skilled and accomplished android specialists. Drop me a line below with your thoughts, thanks.

Mastering J2EE Design Patterns and Navigating Through the Tiers

Design pattern is in general-a repeatable solution to a commonly occurring issue in software designs. These patterns can also be considered as a finished design which can be used directly into the code or a template for how to solve a particular issue.

Object oriented design patterns typically show relationships and interactions between objects or classes, without specifying the final application classes or objects that are involved.

Whereas, algorithms do not offer any details of design patterns, since they resolve computational problems rather than design issues.

On the other hand, pattern specifies a solid solution to a recurring design issues, placing particular process on the context and the surrounding problem as well as the consequences and impact of solution.

This provides a collection of patterns which you can use in the context of designing Java 2 Platform and Enterprise Edition (J2EE) applications.

Core J2EE Patterns provides more detail on J2EE patterns and is an excellent resource that can be integrated on the website. Developing and designing patterns leverages the developer community’s collective experience by sharing issues and solutions.

A design pattern must capture a problem’s overview and context, a possible option and the solution simultaneously.
In the J2EE application architecture, we can split up design patterns into two categories: general software development patterns and those patterns that overlook specific J2EE challenges.

J2EE- design pattern verifies lesser known issues which solid application architecture should resolve.

Reasons to implement Patterns:

  • Patterns reflect the knowledge, experience and insights of developers who have smoothly used these patterns in their own work.
  •  Patterns provide a rough solution as necessary that can be adapted to different problems.
  • Patterns provide a generic vocabulary of solutions that can express heavy solutions succinctly.

Understanding J2EE Design Patterns

J2EE Design Patterns are tried-and-tested solutions to recurring design problems encountered in enterprise application development.

These patterns provide a structured approach to solving specific challenges and promote code reusability, modularity, and maintainability. Some common J2EE design patterns include:

  • MVC (Model-View-Controller):
    Separates the application into three components—Model (data logic), View (user interface), and Controller (flow control)—enhancing maintainability and flexibility.
  • DAO (Data Access Object):
    Abstracts the interaction with databases, providing a centralized and consistent way to manage data access.
  • Singleton:
    Ensures that a class has only one instance and provides a global point of access to it, beneficial for managing shared resources.
  • Facade:
    Provides a unified interface to a set of interfaces in a subsystem, simplifying complex systems for clients.
  • Observer:
    Defines a dependency between objects, ensuring that when one object changes state, its dependents are notified and updated automatically.

Deciphering the Multi-Tier Architecture

Enterprise applications are often complex and require a structured architecture for effective development and management.

The multi-tier architecture, also known as n-tier architecture, divides an application into distinct layers or tiers, each responsible for a specific aspect of functionality. The common tiers include:

  • Presentation Tier:
    Also known as the client tier, this layer focuses on user interface interactions. It handles user requests, displays information, and captures user input.
  • Business Logic Tier:
    This tier contains the application’s business logic and rules. It processes user input, interacts with databases through the data access layer, and implements the core functionalities of the application.
  • Integration Tier:
    Also known as the middleware tier, this layer handles communication between the presentation tier and the business logic tier. It often involves components like Enterprise JavaBeans (EJB) for managing distributed transactions and messaging.
  • Resource Tier:
    This tier represents the data storage and management layer. It includes databases, file systems, and other resources that store and manage application data.

Benefits and Best Practices

Mastering J2EE design patterns and understanding the multi-tier architecture yields several benefits, including:

  • Scalability:
    The modular nature of tiers and the reusable solutions of design patterns make scaling applications more manageable.
  • Maintenance:
    The separation of concerns and code reuse simplify maintenance and updates.
  • Performance:
    Efficient data flow and reduced network overhead contribute to optimal application performance.
  • Team Collaboration:
    J2EE patterns and tier architecture facilitate teamwork by offering a common vocabulary and structured approach.

Common uses of Design Patterns:

  1.  Front Controller is a container to hold common processing logic that occurs within the ‘presentation’ tier and which may otherwise be inaccurately put in the ‘View’.
    A controller handles requests and manages content retrieval, view management, security, navigation, delegating to a Dispatcher component to dispatch to a View.
  2. Business Delegate reduces coupling between remote tiers and provides an entry point for accessing remote services in the ‘Model’.
    A Business Delegate might also cache details data as required to improve performance. A Business Delegate encapsulates a ‘Session Façade’ and manages to one-to-one relationship with that ‘Session Façade’. A Business Delegate invokes a ‘Session Façade’ for An Application Services.
  3.  Service Locator encapsulates the implementation mechanisms for looking up business service details. A Service Locator used by a ‘Business Delegate’ connects to a ‘Session Façade’. Other services like web services and business-tier services can use a Service Locator.
  4. Session Façade provides coarse-grained services to the clients by hiding the complexities of the business service interactions. A ‘Session Façade’ might call several Application Service implementations or Business Objects. A ‘Session Façade’ can also encapsulate a Value List Handler.
  5. Business Object implements your conceptual domain model using an object model. Business Objects differentiates business logic and data into a separate layer in the application. Business Objects programmatically represents persistent objects and can be transparently continued using Domain Store.
  6. Data Access Object enables loose coupling between the resources and business tiers. ‘Data Access Object’ covers all the data access logic into CRUD data from a persistent store. ‘Data Access Object’ does work on ‘Transfer Object’ to send and receive data.

Conclusion:

These design patterns captures potential problems when using the various J2EE-specified technologies and supports developers to construct application architecture’s requirements. For example-The locality Front Controller design pattern, transforms unstructured servlet codes into a controller of the refined graphical user interface.


Related Questions

What are J2EE Design Patterns and why are they important in enterprise application development?

J2EE Design Patterns are reusable solutions to common design problems encountered in enterprise application development.

They promote code reusability, modularity, and maintainability by offering structured approaches to solving challenges. J2EE Design Patterns ensure that developers follow best practices, resulting in more robust and scalable applications.

How do J2EE Design Patterns enhance the efficiency of different tiers in the multi-tier architecture?

J2EE Design Patterns seamlessly complement the multi-tier architecture. For example, patterns like MVC enhance user interface management in the presentation tier, while patterns like Business Delegate optimize communication between the presentation and business logic tiers. T

hese patterns ensure that each tier is well-structured, efficient, and interacts seamlessly with other tiers.

What is the significance of the multi-tier architecture in enterprise application development?

The multi-tier architecture divides an application into distinct layers, each with specific responsibilities. This structure enhances scalability, maintainability, and performance.

The presentation tier focuses on user interface, the business logic tier handles core functionalities, the integration tier manages communication, and the resource tier deals with data storage and management.

How do J2EE Design Patterns contribute to the scalability of enterprise applications?

J2EE Design Patterns promote modular and reusable code, which simplifies scaling. With patterns like Singleton and Data Access Object (DAO), developers can efficiently manage shared resources and data access, ensuring that as the application grows, it can be scaled without sacrificing performance or complexity.

Can you provide an example of how a J2EE Design Pattern enhances a specific tier in the multi-tier architecture?

Certainly. Consider the MVC pattern. In the presentation tier, the Model-View-Controller (MVC) pattern separates data (Model), user interface (View), and control flow (Controller). This separation enhances maintainability as changes in one component don’t affect the others.

The Controller manages user interactions, the Model handles data logic, and the View renders information. This clear separation simplifies development and updates in the presentation tier.