Creation of a New Rails App using Refinery CMS

Refinery CMSRefineryCMS is a powerful Ruby on Rails CMS. Here I have created a blog-cms application using Ruby 1.9.3 and Rails 3.2.8

Step#1
Install the RefineryCms gem version 2.0.8 from the terminal

gem install refinerycms

Create a new rails application with ‘MySQL’ database using the command line in the terminal

refinerycms myblog -d mysql

It will automatically run the following commands

bundle install</div>
<div>rake  db:create db:migrate</div>
<div>rake  db:seed

Step#2
Go to the app on the terminal

cd myblog

Step#3
Start the rails server in the terminal

rails s

Step#4
Open a browser window and navigate to “http://localhost:3000/”
The signup window pops up to prompt you to create your first Refinery user. This is the Superuser of Refinery, which has the ability to create other users.
That’s it!
The application runs now.
Other useful information to customize Refinery CMS application

  • You can change the “Site Name” to a name of your choice currently displaying in the home page

In “config/initializers/refinery/core.rb”
config.site_name = “Company Name”

  • You can customize the design or functionality

To override files from refinerycms to the existing app we have to use the below commands

rake refinery:override view=file_name

Here are some examples:

rake refinery:override view=pages/home</div>
<div>rake refinery:override view=refinery/pages/home</div>
<div>rake refinery:override view=**/*menu</div>
<div>rake refinery:override view=_menu_branch</div>
<div>rake refinery:override javascript=admin</div>
<div>rake refinery:override javascript=refinery/site_bar</div>
<div>rake refinery:override stylesheet=home</div>
<div>rake refinery:override stylesheet=refinery/site_bar</div>
<div>rake refinery:override controller=pages</div>
<div>rake refinery:override model=page</div>
<div>rake refinery:override model=refinery/page</div>
<div>rake refinery:override presenter=refinery/page_presenter

Implementation of other refinerycms engines are also available

For example:

Add the gem to your applications Gemfile

  • gem ‘refinerycms-page-images’, ‘~> 2.0.0′
  • Execute bundle install
  • rails generate refinery:engine name

Example:

  • rails generate refinery:page_images
  • rake db:migrate

Facebook Integration in Rails3 using ‘omniauth’ gem

feature11. Create a Facebook Application by using your ‘Facebook Developer account’
2. Get the ‘App ID’ and ‘App Secret’ of your created application

Add following gems to your Gemfile

  • gem ‘omniauth’
  • gem ‘omniauth-facebook’

Run ‘bundle install’

Create a middleware file named ‘omniauth.rb’ in ‘config/initializers’ path

Rails.application.config.middleware.use OmniAuth::Builder do
provider :facebook, ENV['FACEBOOK_KEY'], ENV['FACEBOOK_SECRET'],
{:scope ≥ 'email, read_stream, read_friendlists, friends_likes, friends_status, offline_access, publish_stream'}
end

This will hold the facebook_app_key and facebook_secret_key with permissions

Set your custom callback url in routes

match '/auth/:provider/callback', :to ≥ 'sessions#create' match '/auth/failure', :to ≥ 'sessions#failure'

Write the following codes in the Sessions Controller

def create
auth_hash = request.env['omniauth.auth'] # Got The precise information from facebook
if  !auth_hash.nil?
@user = User.find_or_create_from_auth_hash(auth_hash)
self.current_user = @user
redirect_to '/'
end
end
def failure
flash[:notice] = "Sorry, but you didn't allow access to our app!"
redirect_to '/'
end

Write the following code in your view page. You can use a custom image for the Facebook like ‘facebook.png’.

<%=link_to image_tag('/images/facebook.png'),
"/auth/facebook" %>

How to customize OCSNG and GLPI

Using work through customized scripts or applications is smart approach by System Administrators. For a busy system administrator to collect all the h/w and s/w information from the network is really tedious. For this work there fantastic open source tool named “OCS Inventory NG” which would collect all the h/w and s/w information from the network. But the web interface of OCS (where all the information about networked machines are visualized) is not much user friendly, rather confusing.

However, there is another open source application called GLPI, having a cool interface with capability to import & synchronize records from OCS.

For importing records from OCS to GLPI you have to use a plug-in in GLPI named OCS import and this plug-in manages the whole OCS synchronization process. To use OCS Import effectively, one need to make sure that the OCS mode is operational.

Here are the simple steps for the synchronization process:

Activate OCSNG mode in GLPI:

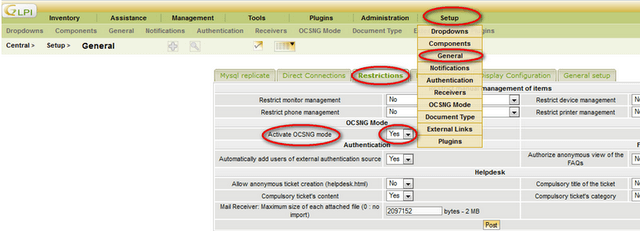
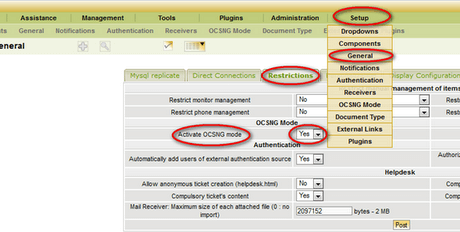
  • Click on Setup; then select General-Restrictions [Tab]-Activate OCSNG mode – Set to YES and then click on Post.

100-11-460x232

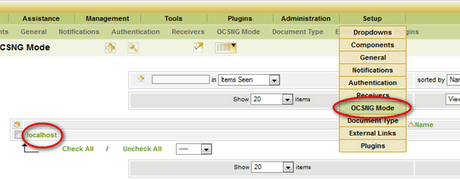
  • Next, OCSNG mode, again go to the Setup tab and Click on OCSNG Mode

101-1-460x180

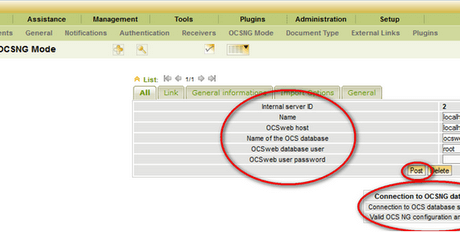
Now you will able to see one connection named localhost as pointed in the above image. Click on that localhost. Now you’ll see a simple form to enter DB credentials for the OCSNG application.

  • Once providing all valid DB information about OCSNG application, click on Post and it pops-up message ‘Connection to OCS database successfully’.

102-1-460x232

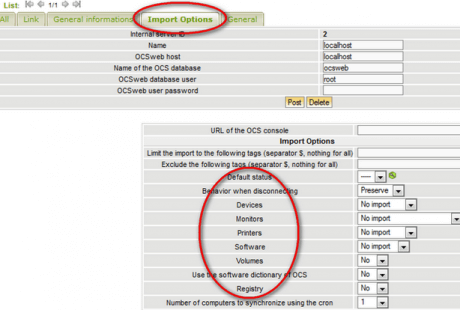
  • There is another tab named Import Option in the same window. Here you can set up which information needs to be imported from OCSNG like monitor, printer, devices, registry and software. Choose those information and Click on Post to update the info.

103-1-460x310

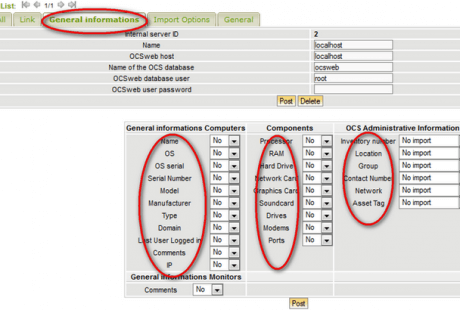
  • Beside the Import Options tab, there is a General Information tab where you can define which elements you want to import from OCS like OS, Serial Number, Model etc. You can choose those elements and click on Post to update it in GLPI.

104-1-460x310After completing the above steps you will able to see the data on the GLPI.

105-1-460x127Now we’ll see the steps on how to add custom fields into the Inventory List in GLPI.

How to add a custom field in GLPI:

To add custom fields to GLPI we need another plug-in named Custom Fields. It can be found in the Plug-in folder of GLPI archive.

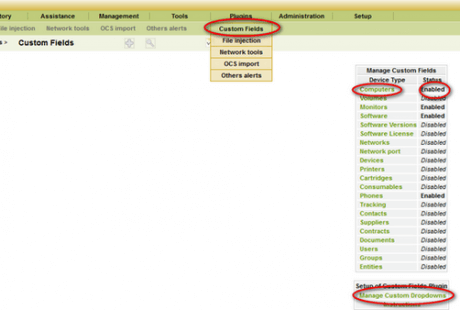
  • After installing this plug-in you can see a Custom Fields option in the drop down menu of Plug-ins Tab as indicated below.

[Note: To check what other plug-ins are installed you can check the drop down menu of Plug-in tab.]

106-1-460x310

  • By clicking on Custom Fields you can find a list of many device types like in the above image. Just click on the device name(s) on which you want the custom fields, to make it Enabled. You can also disable them in the same way when needed.

[Note: The device types that are enabled in the Manage Custom Fields section will be viewed in the Inventory List to which user can add various custom fields later]

  • Now to add fields click on the ‘Manage Custom Dropdowns‘ below the device list.

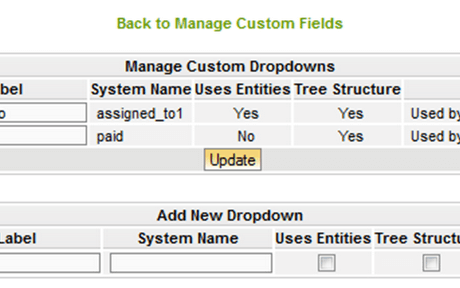
Suppose you want to add a custom filed named ‘Assigned to’ in the device Computers. Then first you need to enable the device Computers in Manage Custom Fields. After that go to Manage custom Dropdowns and add a label named ‘Assigned to’. You also need to add a System Name e.g.assigned_to1.You can check the Use Entities or Tree Structure boxes if you want to use them. Please find these steps indicated in the below image.

[Note: Later you can add more drop downs in the same way and click on the Update button to update the list.]

107-1-460x288

  • Now you’ve to add these custom fields to you inventory. For that you need to go to the Inventory tab in the GLPI main menu and Click on Computers and then click on the + sign.

[Note: In the Inventory apart from Computers, other devices will show up if they’re enabled in the Manage Custom Fields section]

108-1-460x116

  • You will get another pop-up window showing the column headers and here you can see that your custom field has been added to the list.

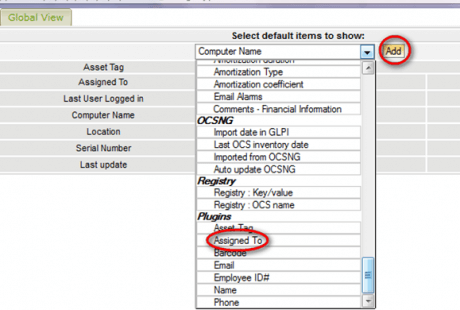
109-1-460x310

  • Select the custom field name from the Dropdown menu and the Click on Add.
  • Click on the arrow image like in the above image to arrange the order of the various fields on the list.

[Note: Repeat the same steps when you add more custom fields to your Inventory.]

Do you have anything to add? Just leave a comment below.

Implementing Sortable Columns in Rails through Helper

Use of a sortable column in a listing view. For an example there is a list of “Programs”

Step# 1

  • Here our controller is named as “Programs” and the model is named as “Program”
  • Add the following helper methods to the controller
class ProgramsController < ApplicationController
helper_method :sort_column, :sort_direction
protected
def sort_column
Program.column_names.include?(params[:sort]) ? params[:sort] : "position"
end
def sort_direction
%w[asc desc].include?(params[:direction]) ? params[:direction] : "asc"
end
def your_custom_action
end
end

Step# 2

  • In Helper class of “Program” add the following codes
module ProgramsHelper
def sortable(column, title = nil)
title ||= column.titleize
active = column == sort_column
ascending = active && sort_direction == 'asc'
direction_html = ascending ? ' ▲ ' : ' ▼ ' if active
css_class = active ? "current #{sort_direction}" : nil
direction = ascending ? "desc" : "asc"
link_to(title, { :sort => column, :direction => direction }, :remote => true, :class => css_class) << raw(direction_html)
end
end


Step# 3

  • In the view (index.html.slim) file add the helper method “sortable” in the columns you want to sort
  • Please note: Here slim is used for the view pages
#main
table style="text-align:left;"
tr
th align="left" = sortable "name"
th align="left" = sortable "created_at", "Added"
th align="left" = sortable "subscription_level_id", "Subscription"
th align="left" = sortable "rating_average", "Rating"
- programs.each do |program|
= content_tag_for :tr, program, 'row_for' do
td= link_to program.name, program_url(program)
td.attribute= program.created_at.strftime("%B %Y")
td.attribute= program.subscription_level.name.capitalize if program.subscription_level
td.attribute= ratings_for program
.pagination_container style="padding-bottom:20px;"
= will_paginate programs

How to use Nested Attributes in Rails 3 Forms

For example, say we want to add multiple addresses(attributes) having many fields inside a create/edit employee form

Step# 1

  •         Create a model named Employee
  •         Create another model named Address
  •         Add the following relationship in Employee model
class Employee < ActiveRecord::Base
has_many :addresses, :dependent => :destroy
accepts_nested_attributes_for :addresses, :reject_if => lambda { |a| a[:city].blank? }
end
  •    Nested attribute form rejects if the city field of the address is blank

Step# 2

  •        In Employees controller add the following in the “new” action
def new
@employee = Employee.new
@employee.addresses << Address.new
end

Step# 3

  •         In the view file add the following inside the form attribute
<%= form_for @employee, :html => { :multipart => true, :id => 'new-employee' } do |f|
<%= f.label :name, 'Name' %>
<%= f.text_field :name %>
 
<% end %>

Samsung Galaxy S3 or iPhone 5 – Which one to pick?

Now iPhone 5 has been launched and available for sale, people swarm to the Apple Stores all over to buy this new iPhone. There is also Samsung Galaxy S3 which was launched recently in May 2012 and available at most of the Smartphone vendors. So which one are you choosing? Apple has witnessed doubled pre-orders for its new iPhone after the launch although critics don’t think Apple came up with a revolutionary iPhone as expected. Rather they praise the Galaxy S3 which has some improved features as compared to iPhone 5. So let’s make a comparison between the two and you judge.

Here you go:

Processor And Memory:

Galaxy S3:

1.4 GHz Quad core Exynos processor; 16/32 GB, extendible to 64GB

iPhone 5:

A6 dual-core processor- clocked with 1GHz;  16/32/64 GB

OS:

Galaxy S3:

Android Ice Cream Sandwich, soon to be updated to Jelly Bean

iPhone 5:

iOS 6; expected to be the best platform for iPhone developers

Screen:

Galaxy S3:

4.8 inch HD Super AMOLED screen with max resolution of 720 x 1280

iPhone 5:

4 inchHD LCD display screen with 640 x 1136 maximum resolution

P.S: iPhone 5 screens looks pretty big with quality media playback and gaming. Apple once stated that its iPhone size is the standard size for a Smartphone. But later proved wrong by companies like Samsung and HTC, Apple itself increased the size of its iPhone.

Size and Weight:

Galaxy S3:

4.69 ounces(133 grams); 8.6 mm thick

iPhone 5:

20 grams lighter weighing 3.95 ounces (112 grams); 7.6 mm thick

Camera:

Galaxy S3:

8MP Rear Face Camera; 1.9 MP Front Facing Camera

iPhone 5:

8MP Rear Face Camera; 0.9 MP Front Facing Camera

NFC(Near Field Communication): A technology to enable fast radio communication between two devices.
Galaxy S3: YES;           iPhone 5: NO

In summary, both the devices are competitive and possess different advantages.  Users need to match their needs and pick accordingly. At the same time, iPhone application development and Android application development both are improving day by day.