What are the Challenges in React Native Development?

In the field of mobile app development, React Native stands as a beacon of cross-platform efficiency and developer-friendly app development.

It helps in building applications for multiple platforms with a single codebase and has propelled it to the forefront of the development world.

Yet, even in the midst of this brilliance, the reality remains crystal clear: React Native, though considered as one of the best frameworks, is not without its challenges.

Imagine a sophisticated toolkit that empowers developers to build stunning applications for both iOS and Android, harmonizing the art of coding with the poetry of seamless user experiences.

It’s time to dive into the nuanced world where excellence meets challenges, and developers emerge as skilled navigators steering their way to success in the realm of hybrid mobile app development.

In this blog, we’ll explore the common hurdles faced during React Native app development and unveil effective strategies to mitigate them, ensuring a smoother voyage for developers.

Performance Optimization:

  • Challenge: Achieving optimal performance can be challenging, especially when dealing with complex applications.
  • Mitigation Strategy: Implement performance monitoring tools, conduct regular profiling, and optimize code using techniques like code splitting and lazy loading to enhance app responsiveness.

Native Modules Integration:

  • Challenge: Integrating native modules can be tricky, and developers may encounter compatibility issues.
  • Mitigation Strategy: Thoroughly research and choose well-maintained libraries for native module integration. Stay updated with React Native releases and community contributions to ensure compatibility with the latest versions.

Limited Access to Native APIs:

  • Challenge: React Native may not provide direct access to certain native APIs, necessitating workarounds.
  • Mitigation Strategy: Explore third-party libraries or create custom native modules to bridge the gap. Keep a keen eye on updates from the React Native community, as new solutions and improvements are frequently introduced.

Learning Curve:

  • Challenge: Developers transitioning from other frameworks or native app development may face a learning curve.
  • Mitigation Strategy: Invest time in comprehensive training programs, online courses, and documentation. Encourage collaboration within development teams to share knowledge and experiences. Gradually introduce React Native in small projects to build proficiency.

Debugging and Troubleshooting:

  • Challenge: Identifying and resolving issues can be challenging, particularly when debugging across multiple platforms.
  • Mitigation Strategy: Leverage debugging tools provided by React Native and use platform-specific tools for deeper insights. Regularly check the official documentation and community forums for troubleshooting tips and solutions.

Version Compatibility Issues:

  • Challenge: Keeping up with the rapidly evolving React Native ecosystem can lead to version compatibility issues.
  • Mitigation Strategy: Establish a versioning strategy for your project, carefully evaluating the impact of upgrading. Monitor community discussions, and plan updates during periods of low development activity to minimize disruptions.

Security Concerns:

  • Challenge: Security is a paramount concern, especially when integrating third-party modules or dealing with sensitive data.
  • Mitigation Strategy: Regularly audit dependencies, adhere to secure coding practices, and stay informed about security updates in both React Native and related libraries. Implement encryption and other security measures to protect user data.

5 Reasons to Choose React Native For Mobile App Development?

5 Reasons to Choose React Native For Mobile App Development

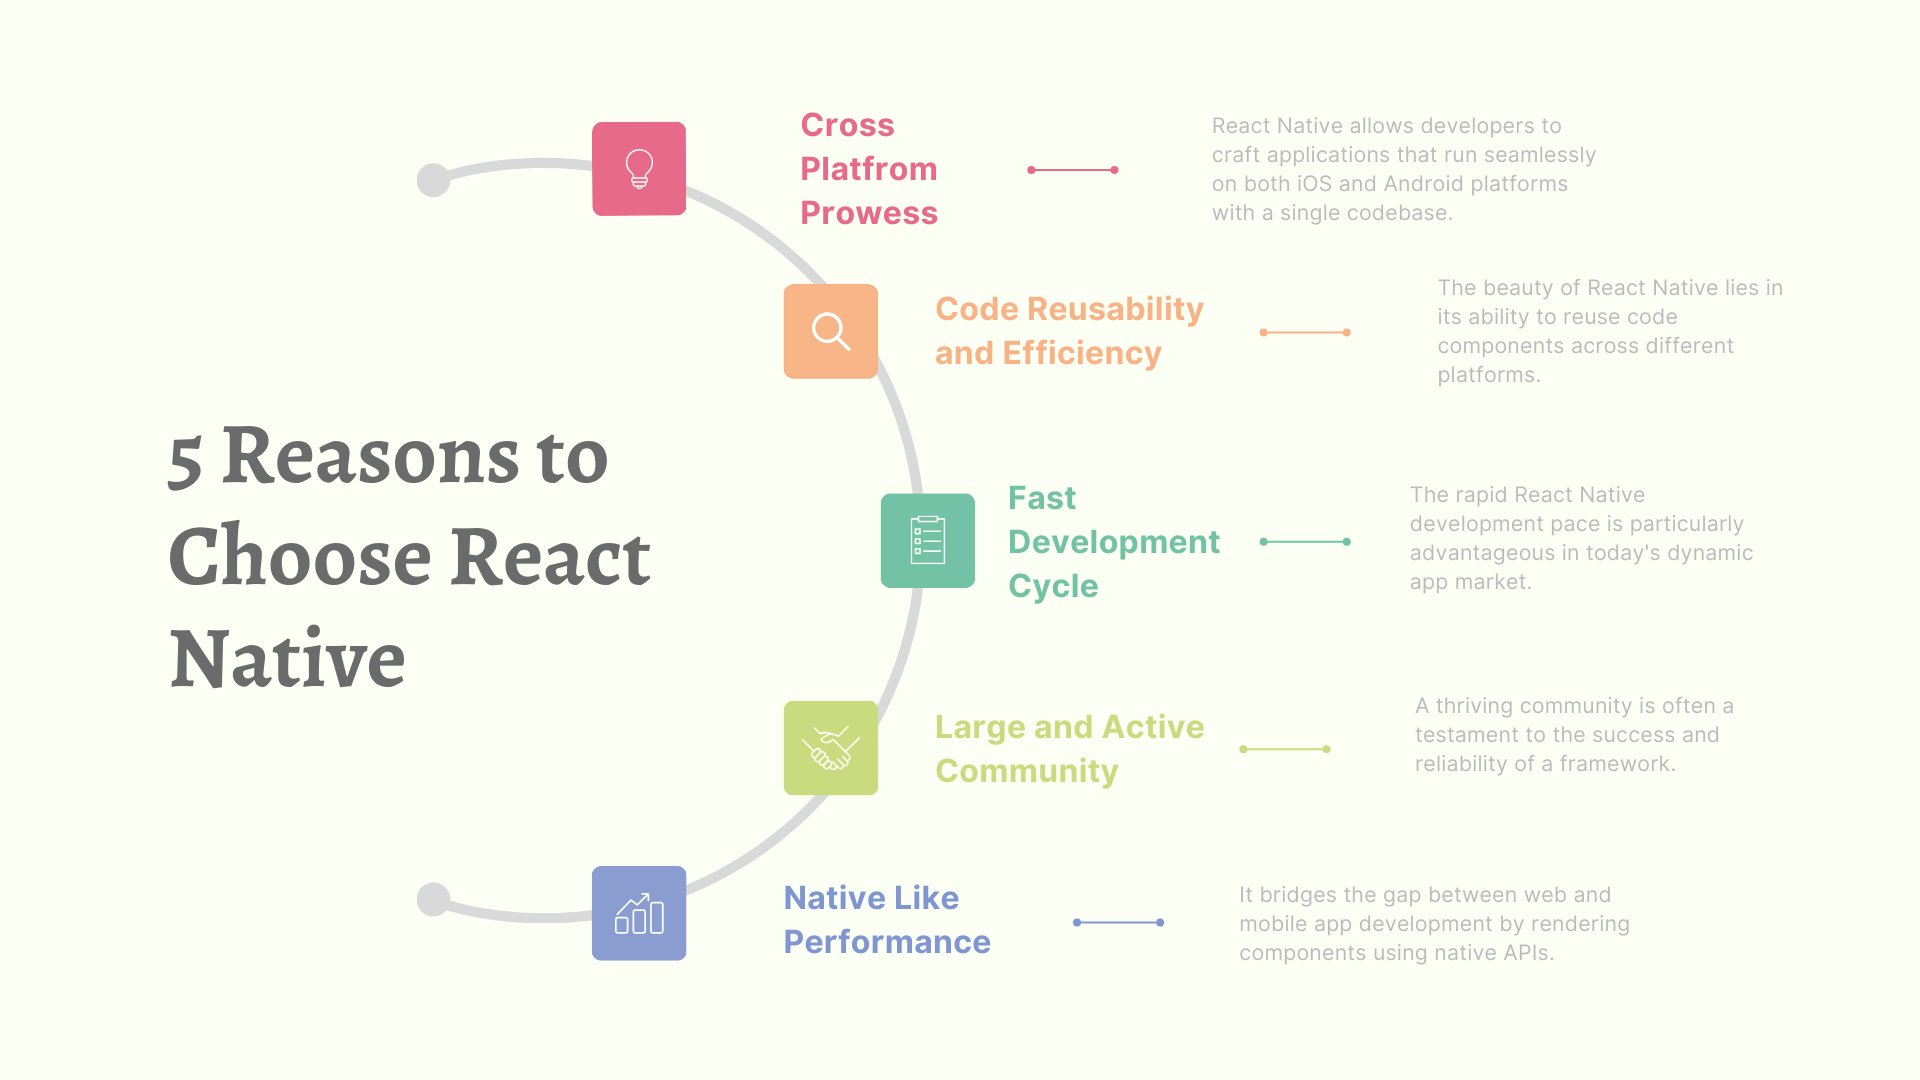
1. Cross-Platform Prowess:

React Native allows developers to craft applications that run seamlessly on both iOS and Android platforms with a single codebase.

This cross-platform capability significantly reduces development time and costs, making it an attractive choice for businesses aiming to reach a wider audience.

2. Code Reusability and Efficiency:

The beauty of React Native lies in its ability to reuse code components across different platforms.

Developers can write code once and deploy it on multiple devices, eliminating the need to build separate codebases for iOS and Android.

This not only accelerates development but also ensures consistency and easier maintenance.

3. Fast Development Cycle:

It comes equipped with a “Hot Reloading” feature, enabling developers to instantly see the results of the latest code changes without restarting the application.

This accelerates the development cycle, allowing for quick iterations and efficient debugging.

The rapid React Native development pace is particularly advantageous in today’s dynamic app market.

4. Large and Active Community:

A thriving community is often a testament to the success and reliability of a framework.

It boasts a large and active community of developers who contribute to its growth.

This means access to a wealth of resources, third-party libraries, and solutions to common challenges.

The community support ensures that developers are not alone in their journey with React Native.

5. Native-Like Performance:

It bridges the gap between web and mobile app development by rendering components using native APIs.

This results in a native-like performance, ensuring that the apps not only look but also feel like native applications.

Users get a smooth and responsive experience, while developers benefit from the efficiency of a single codebase.

Top 6 Mistakes to Avoid During React Native App Development

Top 6 Mistakes to Avoid During React Native App Development

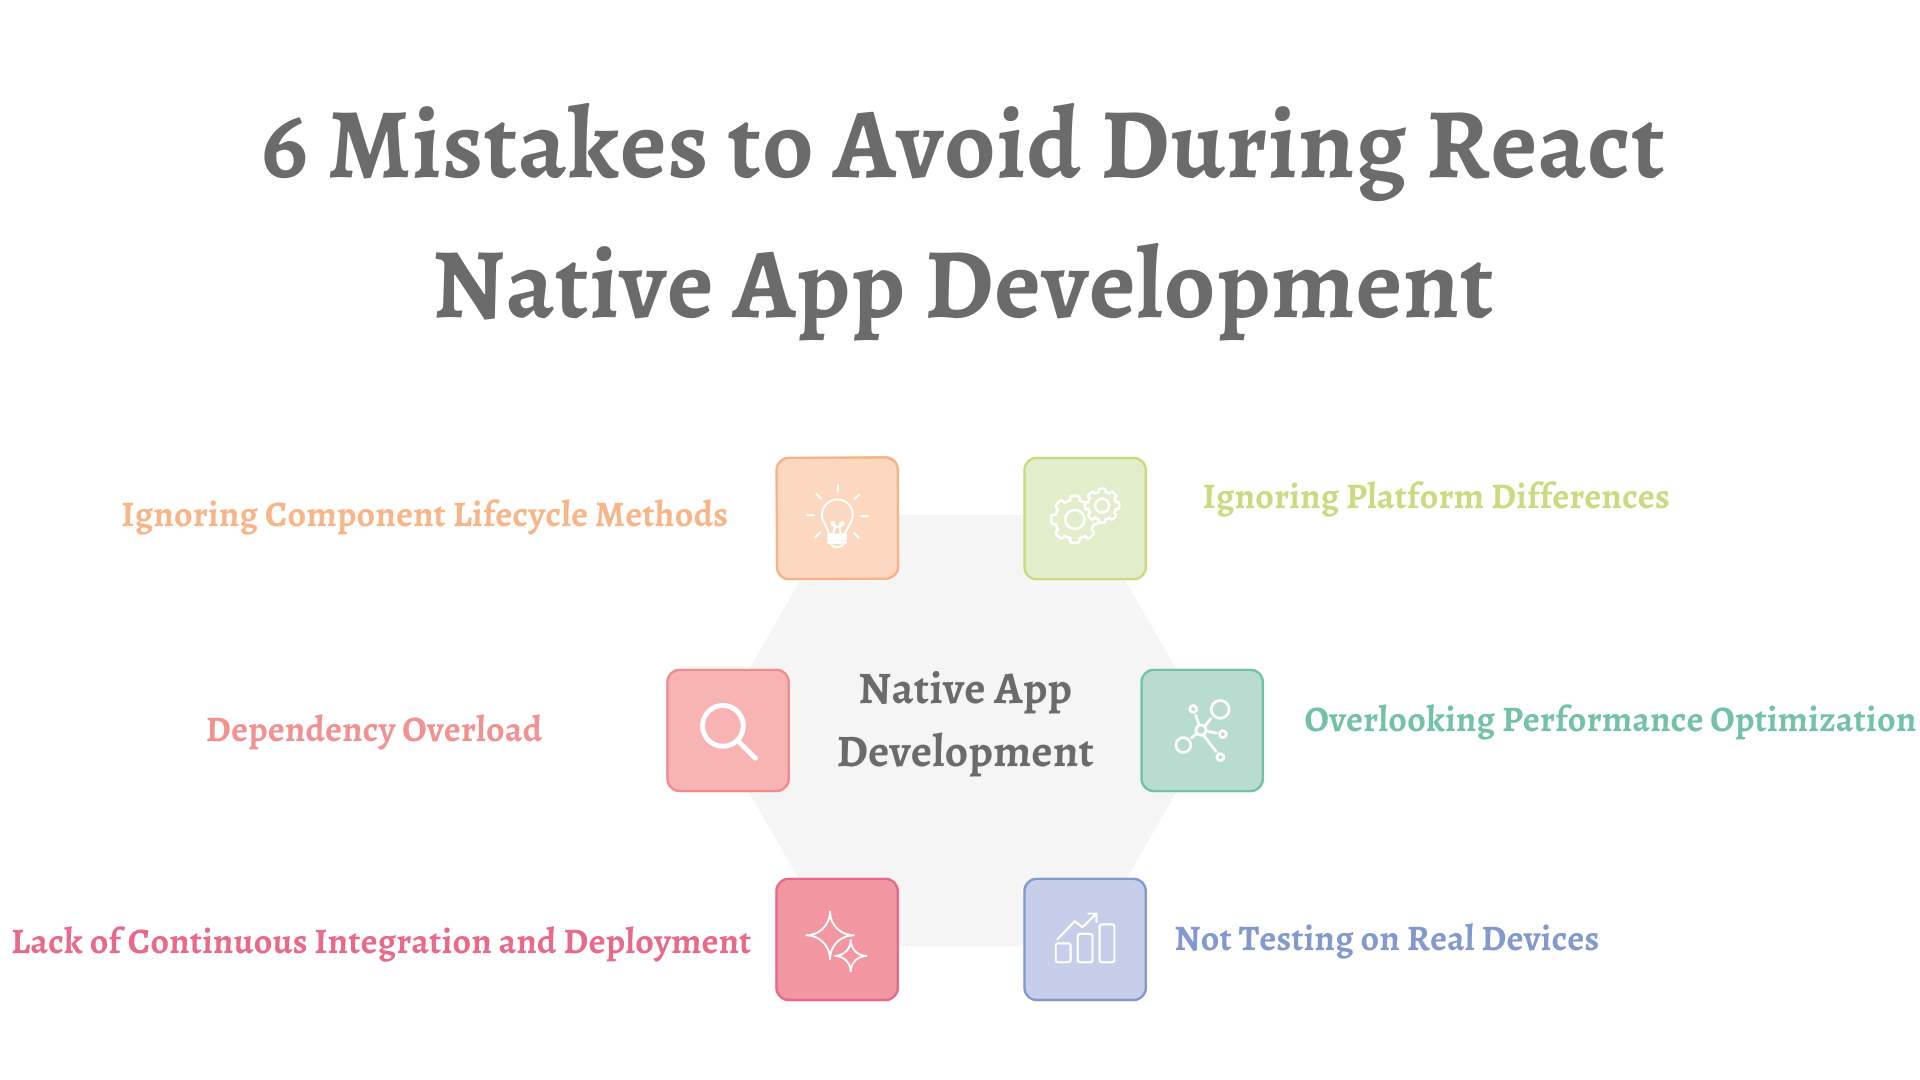
1. Ignoring Platform Differences:

It is celebrated for its cross-platform capabilities, but that doesn’t mean developers can ignore platform nuances.

Neglecting the differences between iOS and Android can lead to unexpected issues.

Always be aware of platform-specific guidelines and ensure your code adapts gracefully to each environment.

2. Overlooking Performance Optimization:

Performance is key in the world of mobile apps. Failing to optimize your React Native application can result in sluggish performance and frustrated users.

Keep an eye on memory usage, utilize performance monitoring tools, and implement best practices to ensure your app runs smoothly across various devices.

3. Not Testing on Real Devices:

While emulators are handy during development, relying solely on them can be a mistake.

Real devices may behave differently, and testing on a variety of actual devices is crucial to catch platform-specific issues, screen size variations, and performance disparities that might be overlooked in emulation.

4. Ignoring Component Lifecycle Methods:

It provides a set of lifecycle methods that are vital for managing component state and handling updates.

Neglecting to understand and leverage these methods properly can lead to memory leaks, unnecessary re-renders, and other performance bottlenecks.

Familiarize yourself with component lifecycles and use them judiciously.

5. Dependency Overload:

Third-party libraries can be a lifesaver, but an excess of dependencies can quickly turn into a nightmare.

It’s essential to evaluate the necessity and reliability of each library before integrating it into your project.

Too many dependencies can bloat your app, increase the likelihood of conflicts, and hinder maintainability.

6. Lack of Continuous Integration and Deployment (CI/CD):

Failing to implement a robust CI/CD pipeline is a common mistake in React Native development.

Continuous integration and deployment practices help catch errors early, ensure code consistency, and streamline the release process.

Set up automated testing and deployment pipelines to enhance the reliability and efficiency of your development workflow.

Conclusion:

React Native’s challenges are not insurmountable, and with the right strategies, developers can navigate through them effectively.

By staying informed, embracing best practices, and actively participating in the community, developers can ensure a successful and secure app development journey.

As the framework evolves, these mitigation strategies will continue to play a crucial role in fostering a robust and efficient React Native development environment.

14 Tips On How To Improve Android App Performance

Users expect apps that respond quickly and consume minimal system resources. Slow, resource-intensive apps can lead to poor user experiences and high uninstall rates. To keep your users engaged and satisfied, it’s crucial to optimize your Android app performance.

In this blog post, we’ll explore the top tips and techniques to help you achieve just that.

  1. Profile Your App

Profile Your App

Before you dive into optimization, it’s essential to understand your app’s performance bottlenecks.

Use profiling tools like Android Profiler and third-party tools like Firebase Performance Monitoring to identify areas of concern.

Profiling can reveal CPU and memory usage, network latency, and more, helping you pinpoint performance issues.

  1. Minimize Network Requests

Minimize Network Requests

Excessive network requests can slow down your app and drain the user’s data plan.

Reduce API calls by implementing effective caching strategies, combining multiple requests into one, and optimizing the payload size by removing redundant data.

  1. Optimize Image Loading

Optimize Image Loading

Images are often the heaviest assets in an app. To optimize image loading, use tools like Picasso, Glide, or Fresco, which handle image caching, scaling, and decoding efficiently.

Compress images to reduce file size without sacrificing quality.

  1. Lazy Loading and Pagination

For content-heavy apps, implement lazy loading and pagination.

Load data only when it’s needed, and load it in smaller chunks to reduce the initial load time.

This technique can significantly improve the perceived app performance.

  1. Background Tasks and Threading

Offload resource-intensive tasks to background threads or worker queues to prevent the main UI thread from becoming unresponsive.

Use AsyncTask, Threads, or Kotlin Coroutines to handle background operations efficiently.

  1. Reduce Overdraw

Overdraw occurs when the Android system has to redraw the same pixel multiple times in a single frame.

Minimize overdraw by using the Hierarchy Viewer tool to inspect your app’s view hierarchy and reduce unnecessary layers.

  1. Optimize Memory Usage

Memory leaks can lead to app crashes and degraded performance. Use tools like Leak Canary to detect and fix memory leaks.

Additionally, release resources (e.g., bitmaps, cursors) when they are no longer needed and implement a smart caching strategy.

  1. Proguard and Code Shrinking

Use Proguard to obfuscate and shrink your app’s code. This reduces the APK size and improves startup performance.

Code shrinking tools like R8 further optimize your app’s bytecode.

  1. Enable Hardware Acceleration

Leverage hardware acceleration for graphics-intensive tasks by setting the android:hardwareAccelerated attribute to “true” in your app’s manifest.

This offloads rendering tasks to the GPU, improving performance.

  1. Keep Up with Android Updates

Stay up-to-date with the latest Android SDK versions and platform updates.

Google continuously optimizes the OS, and using the latest tools and features can improve your app’s performance and compatibility.

  1. Test on Real Devices

Don’t rely solely on emulators for testing. Real devices can behave differently due to variations in hardware and software.

Regularly test your app on a range of devices to ensure optimal performance across the board.

  1. Optimize UI Rendering

Minimize the number of views and layouts in your UI hierarchy. Use Constraint Layout to create efficient and flexible layouts.

Avoid nested layouts whenever possible, as they can lead to slower rendering times.

  1. Implement App Bundles

Migrate to the App Bundle format for publishing your app.

This format allows Google Play to deliver optimized APKs tailored to each user’s device configuration, reducing unnecessary bloat.

  1. Monitor and Iterate

After implementing these performance optimizations, continue monitoring your app’s performance using profiling tools and user feedback.

Be ready to iterate and make further improvements as necessary to keep your app running smoothly.

Top 10 Technologies For Android App Development

Android app development has evolved significantly over the years, and developers now have access to a wide range of technologies and tools to create powerful and feature-rich apps.

Here are the top 10 technologies for Android app development:

Java:

Java has been a traditional and widely used programming language for app development.

It provides a robust, versatile, and mature platform for building Android apps.

Kotlin:

Kotlin is the official programming language for app development recommended by Google.

It offers concise syntax, enhanced safety features, and excellent interoperability with Java.

Android Studio:

Android Studio is the official integrated development environment (IDE) for Android app development.

It provides a comprehensive set of tools, including code editors, debugging, testing, and performance profiling.

XML:

XML (Extensible Markup Language) is used extensively for defining layouts and UI elements in Android app development.

It allows developers to create user interfaces that adapt to different screen sizes and orientations.

Gradle:

Gradle is the build automation tool used in Android Studio. It simplifies the build process, manages dependencies, and allows for customizations through build.gradle files.

Android Jetpack:

Android Jetpack is a collection of libraries, tools, and architectural guidance provided by Google to simplify app development.

Are you looking for a Android developer

Contact Us

It includes components for navigation, UI, database management, and more.

Retrofit:

Retrofit is a popular HTTP client library for Android that simplifies network requests.

It supports various data formats, such as JSON and XML, and provides an easy-to-use API for making RESTful API calls.

Room Database:

Room is an Android architecture component that provides an abstraction layer over SQLite databases.

It simplifies database operations and ensures data consistency and security.

Firebase:

Firebase is a comprehensive mobile and web application development platform by Google.

It offers various services, including real-time database, authentication, cloud storage, and analytics, which can be integrated into Android apps.

Flutter:

While primarily associated with iOS app development, Flutter is gaining popularity in the Android app development world.

It’s a UI toolkit from Google for building natively compiled applications for mobile, web, and desktop from a single codebase.

Conclusion

Optimizing Android app performance is an ongoing process that requires vigilance and dedication.

By following these tips and techniques, you can create a snappy and responsive app that delights users and keeps them engaged for the long term.

Remember that a fast and efficient app is more likely to garner positive reviews and high user retention rates.

FAQs

What is Material Design in Android app development?

Material Design is a design language developed by Google that emphasizes visual and motion design principles. It provides a consistent and visually pleasing user experience across Android apps, focusing on responsive layouts, smooth animations, and intuitive navigation.

What is the Android API level, and why is it important?

The Android API level represents the version of the Android operating system that an app is compatible with. It’s essential to set the minimum API level in your app’s manifest file to ensure compatibility with a wide range of devices.

How can I publish my Android app on the Google Play Store?

To publish your Android app on the Google Play Store, you need to create a Google Play Developer account, prepare your app for release, generate a signed APK, and complete the submission process by providing app details, screenshots, and pricing information.

What is the difference between Android Studio and Eclipse for app development?

Android Studio is the official integrated development environment (IDE) recommended by Google for Android app development. Eclipse was previously used but is no longer officially supported.

Android Studio offers a more robust and feature-rich development environment.

What is the Android SDK?

The Android Software Development Kit (SDK) is a collection of software tools and libraries provided by Google to facilitate Android app development. It includes APIs, debugging tools, and emulator images for various Android versions.
How to Choose Best Mobile Game Development Company

With the rapid growth in the use of smartphones, the mobile market is shooting up. Many companies are coming up with new ideas to develop gaming mobile applications in android and iOS. So companies are searching for a well-experienced app development company to convert their ideas into an engaging game app to blast in the market.

I understand, you have awesome ideas to develop mobile games but don’t know how to make them successful.

In this article, I will share the best tips to select the right mobile game app development company and the list of top mobile app development companies.

Before that let’s have a quick look at the below information,

Number of smartphone users on a global basis –

Smartphones Users In million Global(Source – mordorintelligence.com)

Gaming market growth by regions –

Global gaming market Gaming Market(Source – mordorintelligence.com)

Worldwide consumers spending on games –

World wide mobile game consumers(Source- sea.mashable.com)

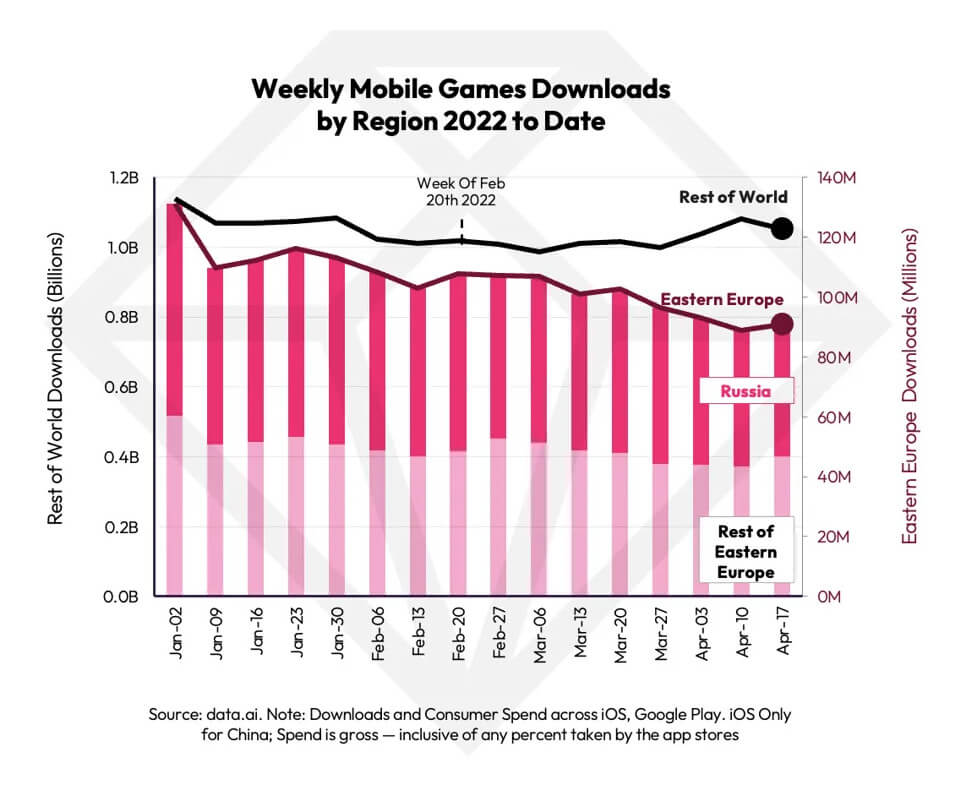
Weekly mobile games downloads by regions –

(Source – sea.mashable.com)Weekly Mobile Game Download(Source – sea.mashable.com)

Here are the tips to choose the right mobile game app development company,

1. Experienced Company with a dedicated mobile app developer

It’s always important to consider the industry experience of a company’s in-game mobile app development. Developing innovative, engaging, and fun games is not a small task for mobile app developers. Technology expertise and creative thinking are much needed for the desired output. One experienced company with dedicated mobile app developers can deliver quality solutions on time. Also, you need to check and consider the market reputation and customer reviews of that company.

2. Mobile Game Development Portfolio

Before going for consultation or hiring a mobile app development company you need to check the services they are offering and what they have done in the near past on game mobile app development.

Typically, a good game development company offers a wide range of services for android, iOS, and hybrid platforms. They must be familiar with developing various types of games like playing, adventure, family, puzzle games, action educational games, and many more.

Andolasoft has developed a Christmas tree puzzle game by our android developers. Your kids would like it for sure!

3. Comprehensive Mobile App Development Process

A smooth and comprehensive development process is another point of consideration when choosing the right game mobile app development company. You need to check each and every step of your development and app developers must include you in every stage so that your idea can be implemented in the right way. The app development company or the developer must be comfortable discussing each and every step of your app development from scratch to the app launch.

4. Quick Turnaround and Development Cost

We understood every good thing needs time to shape up but mobile app development should be a faster and quick turnaround to avoid market competition. The faster you complete and launch the app in the market the more there is a chance of generating more revenue. So you should discuss the same at the beginning and they should commit to going with a fast turnaround, without compromising on quality.

 Andolasoft is a leading web and mobile app development company offering custom app development services at a cost-effective price. It has long experience in developing and delivering world-class mobile application development solutions that empower your business, and enhance your business growth. Its dedicated mobile app developers are familiar with developing mobile apps using AI and ML technologies. They develop user-friendly and custom mobile applications on iOS and Android platforms and also have expertise in developing cross-platform mobile applications in platforms like Flutter, Xamarin, PhoneGap, etc.

Andolasoft has developed so many gaming apps and the Christmas tree puzzle is one of them

Conclusion:

Mobile games have higher market value but the development is a little challenging. The game industry has changed a lot to bring innovative, engaging, and unique games to the market to generate more revenue. So developing a game mobile application needs unique and high-tech skills to develop the app according to the market demand and satisfy the customers. At Andolasoft we have highly skilled dedicated mobile app developers to develop your game mobile application in different categories. Hire Us now

Android Architecture Patterns and Their Differences

Android Architecture Patterns can help you create mobile apps with fewer bugs, better maintainability and testable code. These include Layered Architecture, Model-View-Controller, Data-Table-Fragment, Single-Page Applications, and Microscope. They focus on different areas of an app, from how to structure your app to how you should handle user interactions with it.

What is Architecture?

If you are building an application in an organized manner with some set of rules, describe proper functionalities and implement it with proper protocols, then it is called an Architecture.

Role of Architecture

Let us say if we are not using any architecture and we are writing our code in a class/activity/ fragment in an unorganized manner then the problems we will face are-

  • The number of lines of code will increase that it will become complex to understand.
  • It decreases readability and increases the number of bugs. Thus, it is difficult to test and reduces the quality of the product.

So, to provide clear data flow which will increase robustness, scalability, bug resistant, increase readability, easy to modify and increase productivity and provide a quality app. Thus, we should use proper architecture, suitable to work in a team.

But why does your app need good architecture?

A simple answer is that everything should be organized in a proper way. So does your Android project. If not, the following problems sound familiar to you: All of your codes are not covered by Unit Tests.

  • It is difficult to debug a class because it contains a huge number of functions.
  • You are unable to keep track of the logic inside that huge class.
  • Another developer finds it so difficult to maintain and add new features to your work.

So, if you are going to build a high-quality app, you should care about architecture.

Never miss an update from us. Join 10,000+ marketers and leaders.

What does your app get from a proper architecture?

  • Simplicity: Separate and define a clear single role for each component in your app. A class is not going to be a multi-tasking component. You will find it easy to know what it does and what is inside it. It advocates the Keep It Stupid Simple (KISS).
  • Testability: Before we can apply Unit Tests, we have to write testable codes.
  • Low-cost maintenance: It is easy to add, and remove features. Especially, it helps us to keep track of important logic parts.

The When & How?

Several upcoming questions maybe appear in your head.

  1. So, what is the best architecture pattern for my Android apps?
  2. And how can I apply that pattern in the most effective way?
    • There is no single candidate that suits all of your Android projects because the design pattern is abstract and its implementation depends on specific requirements.
    • Fortunately, the more we understand about it, the more effectively and properly we apply them.
    • You can use different architectures across different apps. Even, in one complex project, each module has its own structure.

Another question?

So, if I have never used any architecture in my Android apps yet. So, what should I do?

Just pick up one of them. Read about it, try to apply it. After that, you will become familiar with it and have your own best practices.

Developers out there are talking about these following popular patterns:

  • MVC ( Model — View — Controller)
  • MVP ( Model — View — Presenter)
  • MVVM (Model — View — View Model)

Some principles for good Architecture in Android

To get good architecture there are some basic concepts we should follow. They are:-

  • Separation of concern: Component should do what it is required. Shown in the diagram.

Architecture Pattern

This we can achieve by Architecture pattern.

  • No Hard dependency: It should be fixed if every component should work on some limited amount of dependency. All dependencies should be provided from outside. Tips: Use Dependency Injections.
  • Manage lifecycle and data persistence: It can be achieved by Architecture Component.

MVC:

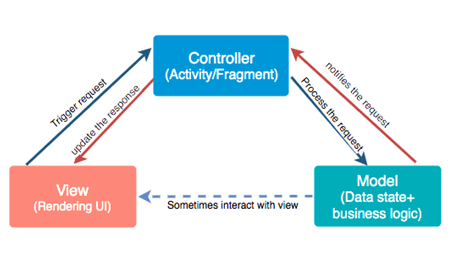
It is a Model-View-Controller. The most commonly used architecture. These are the three components used in MVC.

  • Model– It is business logic and Data State. Getting and manipulating the data, communicates with the controller, interacts with the database, sometimes update the views.
  • View– What we see. User Interface consists of HTML/CSS/XML. It communicates with the controller and sometimes interacts with the model. It passed some dynamic views through the controller.
  • Controller– It is Activity/Fragment. It communicates with view and model. It takes the user input from view/REST services. Process request Get data from the model and passes to the view.

Advantages

  • It keeps business logic separate in the model.
  • Support asynchronous techniques
  • The modification does not affect the entire model
  • Faster development process

Disadvantages

  • Due to large code controller is unmanageable.
  • Hinders the Unit testing
  • Increased Complexity

MVC

MVP:

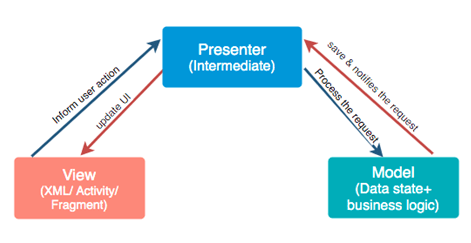
It as Model-View-Presenter. For the phase of developing time or for the phase of developers it is vital to divide the architecture into layers. It breaks the dependency on what we have on view.

  • Model– It is business logic and Data State. Getting and manipulating the data, communicates with the presenter, interacts with the database. It doesn’t interact with the view.
  • View – Consists of UI, activity, and fragment. It interacts with the presenter.
  • Presenter– It presents the data from the model. Control all the behavior that want to display from the app. It drives the view. It tells view what to do. Any interaction between the model and the view is handled by the presenter. Saves the data back to the model.

Advantages

  • It makes view dumb so that you can swap the view easily.
  • Reusable of View and Presenter
  • Code is more readable and maintainable
  • Easy testing as business logic separated from UI

Disadvantages

  • Tight coupling between View and Presenter
  • Huge amount of interfaces for interaction between layers.
  • The code size is quite excessive.

MVP

MVVM:

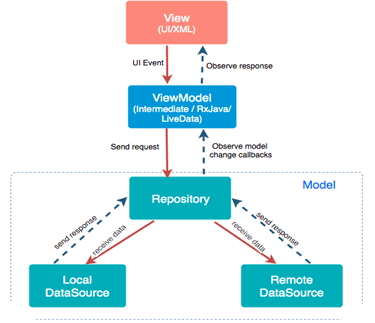
It is a Model-View-View Model. It losses the tight coupling between each component and reduces the glue classes. Works on the concept of observables. Children don’t have reference to the parent, they only have reference by observables.

  • Model– It has business logic, local and remote data source and repository. Repository: communicate with local or remote data sources according to the request from View Model.
  • View– Only user interaction i.e.XML, no business logic. Direct send user action to view model but does not directly get a response. To get a response view observes some data which View Model exposes.
  • View Model– Most of the user interface logic center it here. It is a bridge between a view and a business logic. It does not have any clue which view has to use it. As it does not have a direct reference to the view. Thus, good in testing and has loose coupling. But still, it needs to update the UI this interaction done by observables. When data changes observable notifies.

Advantages

  • No tight coupling between the view and view model
  • No interfaces between view and model.
  • Easy to unit testing and code is event-driven.

Disadvantages

  • You have to create observables for each UI component.
  • The code size is quite excessive.

MVVM

Difference between MVC, MVP & MVVM Design patterns

MVC (Model View Controller)

  • One of the oldest software architecture
  • UI (View) and data-access mechanism (Model) are tightly coupled.
  • Controller and View exist with the one-to-many relationship. One Controller can select a different View based upon required operation.
  • The View has no knowledge about the Controller.
  • Difficult to make changes and modify the app features as the code layers are tightly coupled.
  • User Inputs are handled by the Controller.
  • Ideal for small scale projects only.
  • Limited support to Unit testing.
  • This architecture has a high dependency on Android APIs.
  • It does not follow the modular and single responsibility principle.

MVP (Model View Presenter)

  • Developed as the second iteration of software architecture which is advance from MVC.
  • It resolves the problem of having a dependent View by using Presenter as a communication channel between Model and View.
  • The one-to-one relationship exists between Presenter and View as one Presenter class manages one View at a time.
  • The View has references to the Presenter.
  • Code layers are loosely coupled and thus it is easy to carry out modifications/changes in the application code.
  • The View is the entry point to the Application
  • Ideal for simple and complex applications.
  • Easy to carry out Unit testing but a tight bond of View and Presenter can make it slightly difficult.
  • It has a low dependency on the Android APIs.
  • Follows modular and single responsibility principle

MVVM (Model View View Model)

  • Industry-recognized architecture pattern for applications.
  • This architecture pattern is more event-driven as it uses data binding and thus makes easy separation of core business logic from the View.
  • Multiple View can be mapped with a single View Model and thus, the one-to-many relationship exists between View and View Model.
  • The View has references to the View Model
  • Easy to make changes in the application. However, if data binding logic is too complex, it will be a little harder to debug the application.
  • The View takes the input from the user and acts as the entry point of the application.
  • Not ideal for small scale projects.
  • Unit testability is highest in this architecture.
  • Has low or no dependency on the Android APIs.
  • Follows modular and single responsibility principle.

Never miss an update from us. Join 10,000+ marketers and leaders.

Conclusion

When it comes to Android, both MVP and MVVM offer better modular architecture than MVC. Though, they also tend to add more complexity to your app.

In simpler applications which involves two or more screens, MVC can work fine in Android. Whereas in more complex cases where your application needs to be developed considering to add more features in future, MVVM with data binding will make you write lesser code.

Android architecture describes how a mobile app should be structured internally. By understanding the pros and cons of different patterns, you can make your app more maintainable and scalable.

Although the app market is still in its infancy, the number of successful mobile apps is growing exponentially. It’s no surprise then that the number of new mobile app development patterns are emerging at an equally rapid rate.

So, which architectural design pattern are you going to consider for your mobile application?

An Introduction To BuildContext In Flutter and It’s Importance?

BuildContext is the object that stores information about the current build. It provides information such as the minimum and maximum supported Flutter version, the device’s screen size and pixel density, the currently active theme, and more.

The BuildContext is the set of inputs that Flutter uses to create an instance of a widget. It includes properties on the Android and iOS platforms, as well as properties related to the current device and environment.

It can be used to customize the behavior and appearance of your widget, but it’s important to understand how it works in order to avoid any issues.

For instance, you can use BuildContext.host () to get a string that specifies the current app’s host name. You can also use BuildContext.local (context).emulator so you can set up an emulator for testing your app on different devices without needing to change settings in Android Studio every time you want to switch emulators.

Flutter is one of the hottest technologies for cross-platform mobile development. It has been described as a new contender in the app development industry, competing with traditional frameworks like React Native and Xamarin.

Flutter builds on Google’s own Dart programming language and provides a library of scalable, customizable UI widgets to help developers build beautiful native interfaces that run across all platforms. It has been designed to help developers build high-quality, natively compiled apps that run on both Android and iOS from one codebase.

Never miss an update from us. Join 10,000+ marketers and leaders.

What is a BuildContext?

The BuildContext is a locator that is used to point the location of the widget in the widget tree.

In Flutter we have to create widgets through the build method & we have to pass the BuildContext as an argument to the build method.

Each BuildContext is different for every widget. Each widget you create has its own BuildContext and they can locate themselves in the widget tree or reach out to the nearest widget.

This is how we create a widget

[code language=”css”]
Widget build (BuildContext context)=> MyAwesomeWidget();
[/code]

Flutter widget tree

Everything in Flutter is a widget. Whether it is a container, providers, text, button, image etc. everything is a widget, whether it reflects the UI in the app or not.

The UI or display in Flutter comprises stacks of widgets popularly called a widget tree. Each component is responsible for a small unit of the entire UI.

Flutter widget tree

The above image is an example of a widget tree in Flutter. We can observe that every widget has its own place in the widget tree i.e. the Button widget is under column widget.

Widgets are only visible to its BuildContext or to its parent’s BuildContext. That means we can locate the parent widget from the child widget. For the above image tree structure we can get Scaffold from Container by going up:

[code language=”css”]
context.ancestorWidgetOfExactType(Scaffold)
[/code]

You can also locate a child widget from a parent widget and for that, we use Inherited Widgets.

There are three main trees in Flutter:

  1. Widget
  2. Element
  3. Render

Widget

Widgets are immutable, they represent the structure for RenderObjects Fluorescence is optimized, which can easily create and destroy widgets without any significant performance implications.

The same can’t be said for RenderObjects.

Element

In the middle of Widgets and RenderObjects sits elements. These act as the glue between the immutable widget layer and the mutable render layer.

As the configuration of a widget changes (for example, the user calls the set state that triggers a rebuild), the element notices incoming changes and says to the corresponding render object,

“Hey! Please update. ”

Render

RenderObjects are what the visual pieces on the screen correspond to. Their purpose is to define areas on the screen regarding their spatial dimensions. They are referenced by the element. As a consequence we are dealing with another (third) tree here: the RenderObjects together form a tree which is called Render Tree whose root node is a RenderView (being a variant of a RenderObject). The RenderObject, on the other hand, are mutable objects that do the heavy lifting of turning the configuration supplied from widgets into pixels users can see and interact with on the screen.

Unlike widgets that are cheap and can safely be created and destroyed without any significant performance implications, the same cannot be said for RenderObjects.

For this reason, whenever the configuration of a widget changes, the framework looks at the change and updates the associated RenderObject instead of creating a new one each time.

Conclusion

Understanding BuildContext is very crucial to develop applications in Flutter. This improves our knowledge on how Flutter works and helps to build apps confidently.

BuildContext is a facade that provides a consistent API for implementing custom layouts and animations. The code is platform-specific, but the abstraction weaves some of the underlying platform-specific logic out of sight. BuildContext also helps reduce the need to know about the underlying platform details when implementing custom layouts and animations.

I’ve worked with the team at Andolasoft on multiple websites. They are professional, responsive, & easy to work with. I’ve had great experiences & would recommend their services to anyone.

Ruthie Miller, Sr. Mktg. Specialist

Salesforce, Houston, Texas

LEARN MORE

Flutter is an open-source mobile app SDK that is used to make a high-quality app with a beautiful and consistent user experience. Unlike native mobile development, Flutter does not require that an app has a single, complete codebase but instead lets you mix and match code for different platforms. It also provides a rich set of pre-built widgets and allows for shared state.

The BuildContext is the context in which the Flutter app is running and is used for determining where to find resources and strings. It can be thought of as the environment in which the app is being used. Flutter provides an abstract class called BuildContext that handles the loading of resources, without requiring the developer to use hardcoded paths. This abstraction is one of the things that makes flutter so easy to use.

Flutter provides a set of high-level classes to help flutter developers build reactive user interfaces. Are you looking to develop an application in flutter framework? Let’s discuss