Reasons You Need Custom Android App For Your Business

Technologies are always on the racecourse – this is a simple known truth fact. The deposition of 2018 creates an amusing expectation, and we want to go beyond it.

Are you thinking of creating a strong foothold of your business, in the emerging market? If yes , then how are you planning to do it?

By developing mobile application for your business is what you should focus on. It will help to achieve more productivity and efficiency. 

Never miss an update from us. Join 10,000+ marketers and leaders.

However, if you will settle on a particular app category, it provides no benefit to your business neither it helps in achieving the desired result.

Therefore, you need work with Andolasoft, for developing a custom android application that will fulfil all your business needs.

So, building or making your own custom solution having more benefits to your business. Let discuss custom android app development and its benefits.

“Android app development has gradually become the big cheese in today’s tech-savvy era, and there is no denying the fact that android application development has turned into an integral part of the technological world and is the backbone of every business.- Potenza”

Why Android:

Apps with the Android platform have a wide range of features and categories. Due to the easier interface, it is pretty much popular among the users and the Open-source platform has an enormous user base.

IDC – Smartphone Market Share shows “Android having the 84.5% of market share in the smartphone market in 2018 and it may jump to 85% next year.”

Smartphone Market Share

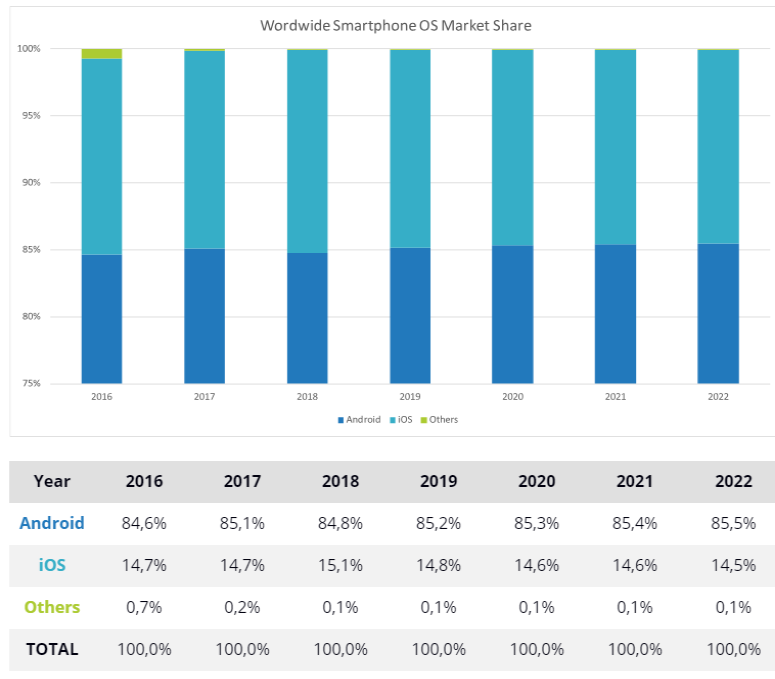
(Source: www.idc.com)

What Is Custom App Development?

This is the most familiar question for an investor before choosing it. The Custom app development is all about creating a new service product that would meet some specific requirements of the investor.

This particular custom app would deliver services of your business, would help to solve some of your specific problems, and help to satisfy the needs.

So, your workflow would be easier, more efficient, and faster.

Let’s have a deep dive into the topmost benefits of custom android app development. Here you go,

Save Money & Time:

A customised app means you would only have your own features and own products on the app structure. And your own custom product will have all the functionality that you need.

Certainly, you choose what to include and what to pay for. The second thought you may skip some time spending which is not included in the price of a ready-made application.

When you buy or order to deliver a custom Android app, you know that you’re fully outfitted in the long term.

Catch The Customer’s Expectations:

As a business owner, you must be aware of your user’s or customer’s needs. And developing the customised app would help a lot in this situation.

A customized app would always have the multi-features of your necessary functions in a single bundle. So, by customizing your app it would push your products closer to your board users.

There are many advantages of android apps, they’re flexible, easy to customise, and as such the platform is more popular worldwide.

Android Has Better Audience:

As I have just mentioned above, Android has been dominating the mobile app market with 88% of users from total mobile users worldwide.

As a result, the business owners are simply choosing the Android platform above the other.

Certainly, your customized Android app would appear in a big marketplace where the niche economic groups are involved.

Higher Security:

The customized apps are being developed for the purpose of one specific business.

So, it means that no one out in attendance should have knowledge of architecture for your products and service.  On the other hand, android has his own high-security forms to make your app secure.

High ROI In Lower Cost:

This is the most prominent part to choose android. Android is still an open-source platform.

The SDK (Software Development Kit) can be shared between Android developers and could modify throughout the development cycle.

So, the app development company and its investors would never have to worry about cost and license or loyalty.

And, the complexity and time fetching years have passed the way for custom app development.

Nowadays, the demand for the mobile app is increasing rapidly and various business owners very keen to develop the customized Android app to engage & retain their customers.

I’ve worked with the team at Andolasoft on multiple websites. They are professional, responsive, & easy to work with. I’ve had great experiences & would recommend their services to anyone.

Ruthie Miller, Sr. Mktg. Specialist

Salesforce, Houston, Texas

LEARN MORE

Now it has become one of the best probabilities to reach your global audience and the most proficient way to expand your business in the competitive market.

Conclusion:

As now you understand the importance of a Customised Android Mobile application, for your business. With a personalised Android application your business becomes quite essential and is important for a digital era 

It’s always challenging for every business to develop a custom mobile app according to the requirement.

You need to choose the right app development company to get things done to your need. Andolasoft has long experience & expertise in custom mobile apps with skilled developers.

Are you looking to develop a native Android mobile app? Let’s Discuss!

What’s New In Android L, Windows 8.1 And IOS 8

As all the three major mobile players in smartphone categories  i.e. Apple, Google and Microsoft come up with their latest version of Operating Systems i.e. iOS 8, Android L & Windows 8.1 respectively. Let’s have a look how it is worthy for users to switch over the most-recent OS version based upon the new features.

Android L:-

  • Personalized unlocking features, which make your smartphone or tablet search for familiar Bluetooth’s gadgets, Wi-Fi networks, locations and even voice imprints to deactivate any lock screen protections, letting you jump straight into your phone when it knows you’re nearby. If the device can’t detect any of this metrics, anyone trying to use it will be presented with the standard lock screen.
  • Google is focusing on its stock android keyboard for Android 5.0 Lollipop for adding more personalized and scrapping the individual tiled keys.
  • There is one more exciting feature i.e. “Do Not Disturb mode”, which automatically deactivates all notifications and audio during set times, support for Bluetooth 4.1 and a completely redesigned audio back end with support for USB audio devices.
  • Also Android L is going to introduce 64-bit processor support and  improving battery life with Project Volta. Project Volta includes a new battery historian which will help users work out what a device was doing at any given point in a battery cycle to find out which apps are draining the most power.

Windows 8.1 :–

Microsoft has already rolled out windows 8.1 few months back. Some of the features that were added windows phone 8.1:

  • Cortana, which is very much similar to Siri in iOS device, act as your personal assistant. Cortana notebook features store things that you tell her about yourself and also keep tracks what you like and what you’d like done. It can access apps, set alarms, send messages to specific persons, post a Facebook status, add a tweet, search for something and a lot more.
  • The action center which is finally added, and here you can get all your notifications and other controls such as setting Bluetooth, and Wi-Fi.
  • Another interesting feature that added to windows 8.1 was Quiet Hours. Here You can set what time you want your phone to be “quiet,” shutting out noise or notifications coming from it.

There is some other new features like setting up your personal photos as the background on the said start screen, connects you to free Wi-Fi hotspots near you through Wi-Fi sense, transferring files from the internal memory and SD-card seamless through Storage Sence etc.

iOS 8:-

iOS 8 also launched with lots of new features and here I am going to share few of them:

  • iPhone has new feature “Send Last Location” which allows your iPhone (or iPad) to send its last-known location to Apple when the battery drains to a critical level. If you lost your device, it will help you to find the last location of your device even if it’s battery is completely drained.
  • You can now include photos when making notes, to-do lists and reminders in Apple’s iOS 8 notes app.
  • Now iPhone can identify the song due to Shazam integration in Siri. If you ask Siri, “What song is playing?”, it will cause her to listen to the ambient sound, using Shazam to identify music.
  • You can notice iOS 8 has new keyboard with a very smooth predictive type features, which suggests three words right above the keyboard.

I hope you liked this post. What you would like to prefer- Android L, iOS 8 or windows 8.1 and why. Please share your answer in the below comment section

Recommended Blog: Useful features of iOS 7

Looking to make your mobile application dreams come true? Contact us today to make it a reality.

Grow Your Business For Your Mobile App With Google Analytics

In this digital era, information or data plays pivotal role in the process of development. The more information you have, more precise and accurate decision you can take. And this is also applies to mobile apps.

As per report comes from Portio “1.2 billion people worldwide were using mobile apps at the end of 2012. This is forecast to grow at a 29.8 percent each year, to reach 4.4 billion users by the end of 2017.” This simply indicates industry’s future growth potential; but to stand out this industry is not an easy job. Good news is that Google has its own free analytics tool that helps you to find out insight details of your mobile app which can be your vital part of our app development process.

In June 2012, Google introduced beta version of mobile app analytics ; but now it becomes the part of Universal Analytics. Today our purpose is to educate those developers or users who are not familiar with this influential API(Application Program Interface)

How To Setup Google Analytics for Mobile App?

Step 1:

Set up a new app property in your analytics accounts.
First login into your google analytic profile. Here you get two options:

  • Option One: You can create new account for your mobile app. For this go to admin section, then create new accounts from the account tab and choose “mobile app” tab. Now just provide details like Account name, App name, Industry category and time zone and you will get your tracking code. This option is more suitable if you want to see your analytic data of your mobile apps only.
  • Option Two: Here you can create a new property from your existing account. For this simply go to account where you want to add your new property and then select “Create new property” tab under property section and rest is similar to option one.This option is more suitable if you want to see analytic data of your web application as well as corresponding mobile application.

Step 2:

Download the Google Analytics SDK for Android or iOS from the same account screen that provides the tracking ID. Suggest to take help of mobile developer to implement tracking via SDK.

Never miss an update from us. Join 10,000+ marketers and leaders.

Once you setup your analytic for mobile app you can analyze your data through lots of cool features and out of them I have listed few features here:

  • Enhance your customer base by knowing who utilizes your app, on what platform, where they come from and what they looking for from Traffic Source report and Google play integration.Note: If you link your Google Analytics account to Google Play then your android apps will be automatically recognized in Google Analytic; but you have to associate each application separately with an analytic account.
  • Event tracking, Flow visualization, and Real time reporting helps you to identify scope of improvement for better customer engagement. With in-built crash and exception reporting, you can prioritize the issues which are impacting your visitors, helping you to serve better user experience. More you engage your visitor, better chance to achieve your objective.
  • Every single application has certain goals such as purchase, leads, signup or simply spending time on app. This helps you to setup and track those goals.
  • Google Analytics is now available on Admob. So you can get full analytic data either from Google Analytics or from Analyze tab of Admob account.

Recently, Google also released official Google Analytic app for iphone user (https://itunes.apple.com/app/google-analytics/id881599038). In future we may review this app for you.

See Also : Tips to increase your app download through App Store Optimization(ASO)

Andolasoft has been successfully delivered lots of iOS and Android app for his worldwide customer. You can check out our portfolio page. I would love to hear how you are using, or plan to use, this powerful Google API.

Tips To Increase Your App Download Through App Store Optimization

App Store Optimization (ASO) is the process of improving the visibility of a mobile app (such as an iPhone, iPad, Android, or Windows Phone app) in an app store (such as iTunes or Google Play or windows marketplace).

App store optimization is just like search engine optimization to improve the app findings by users in an app store.

App store optimization includes the process of ranking highly in an app store’s search results and top charts rankings.

Ranking higher in search results and top charts will help in more downloads for an app

On-Page optimization:

  • App Title:

    It plays a vital role in ASO. The app title should clearly describes the app and what it does, but it should be short.

    Too long app titles are get truncated, this kills user experience.

  • App Description:

    This is the second most important part of ASO. This is the place where you sell your app based on the great features!Make sure to keep this section short and concise.

    As it is going to use in user’s cell phones and not on their desktop monitors.

  • App Logo:

    This is the way you can express what your app is all about.

    So the app logo should be designed by a professional designer to create a stunning app logo. This part should not be overlooked.

  • App Screenshot:

    Screenshots should be clear and with high resolution. You should highlight the best parts of your app with multiple screenshots.

    If possible add short text/explanation to the screenshots.

  • Category:

    Make sure to categorize your app appropriately. As a lot of searchers jump straight into specific categories if they are looking for something.

    There is also a  secondary category option in which your app fits into two categories, but the primary category does act as the most important.

  • Keywords:

    You need to know which keywords are relevant and used very often by your targeted users,  to improve your search rankings. It is very useful to monitor the other competitors.

Off-Page Optimization:

  • Overall App Ratings:

    This is an important factor for ASO. If most of the people who downloaded the app gave 5 out of 5 stars, then it must be a great app.

    Ratings are also a direct reflection of your app’s performance measurement – a great app will get great ratings. The front page placement likely to rely on a combination of downloads, ratings, reviews and Google pluses.

  • App Reviews:

    Like ratings, reviews play an important role in ASO. You want as many app users to leave out genuine reviews of your app.

    The conversion rate will grow depending upon the number of the favorable reviews your app receives.

    Always keep track of the users’ reviews and try to improve your app based on the feedbacks.

  • Total App Downloads:

    This certainly affects searcher physcology. If the app has good download number, it creates the impression of being popular, then the chances download of the particular app will be higher.

Verdict

Around 63% of apps are discovered via app store searches. ASO is the most used method for discovering and downloading new apps from the app stores.

So to boost your app’s search ranking and downloading make sure to follow these quick tips of ASO. ASO is just like a secret weapon to increase your app’s visibility, ranking and overall success.

Also See: How to monetize your Android application through In-App Billing?

You can also check out some of our free apps.

How did you like this blog? Please send me your comments, if any.

How To Enhance Image Processing With Core Image In IOS Apps

Core Image is a powerful framework for image processing and analysis technology designed to provide real-time processing for still and video images. This helps you easily apply filters to images, such as modifying the hue, exposure or vibrant. It uses the GPU or CPU rendering path to process the image data very fast.

Core Image can be chained with multiple filters to an Image or video frame at once by creating custom effects. Core Image provides us more than 90 built-in filters on iOS and over 120 on OS X. You can set up filters by supplying key-value pairs for a filter’s input parameters. You can use the output of one filter as the input of another filter, to create amazing effects.

Here is how the Core Image is related to the iOS operating system

core-image-1024x415

Before going into Core Image, let’s know about the classes used in the Core Image framework:

CIContext:

The CIContext is a class which provides an evaluation context for rendering a CIImage object. CIContext class is used to take advantage of the built-in Core Image filters while processing an image.

CIImage:

The CIImage is a class which represent an image or holds an image data which may be created from a UIImage, from an image file, or from pixel data.

CIFilter:

The CIFilter class produces a CIImage object as output. A filter takes one or more images as input. The filter class has a dictionary that defines the attributes,so the parameters of a CIFilter object are set and retrieved through the use of key-value pairs. This helps us to add some beautiful effect on the input image.

Sample example:

In this example local image path is used in resource file to apply effects.

// 1 Retrieving the localimage.png path from resource bundle

NSString *filePath =
  [[NSBundle mainBundle] pathForResource:@"localimage" ofType:@"png"];
NSURL *fileNameAndPath = [NSURL fileURLWithPath:filePath];

// 2 Converting the normal image to CIImage object by passing the URL of original localimage.png

CIImage *beginImage =
  [CIImage imageWithContentsOfURL:fileNameAndPath];

// 3 Adding the filter SepiaTone effect to the localimage.png

CIFilter *filter = [CIFilter filterWithName:@"CISepiaTone"
                              keysAndValues: kCIInputImageKey, beginImage,
                    @"inputIntensity", @0.8, nil];
CIImage *outputImage = [filter outputImage];

// 4 showing the output image in the UIImageView

IImage *newImage = [UIImage imageWithCIImage:outputImage];
self.imageView.image = newImage;

Note : Here we can change the value of the CIFilter value which is given 0.8 by using a slider which min value is 0 and max value is 1.

Here we have not used the CIContext to perform an CIFilter as said earlier. It helps us to make it easier.

Lets change the above code to include the CIContex:

CIImage *beginImage =
[CIImage imageWithContentsOfURL:fileNameAndPath];
 
// 1
CIContext *context = [CIContext contextWithOptions:nil];
 
CIFilter *filter = [CIFilter filterWithName:@"CISepiaTone"
keysAndValues: kCIInputImageKey, beginImage,
@"inputIntensity", @0.8, nil];
CIImage *outputImage = [filter outputImage];
 
// 2
CGImageRef cgimg =
[context createCGImage:outputImage fromRect:[outputImage extent]];
 
// 3
UIImage *newImage = [UIImage imageWithCGImage:cgimg];
self.imageView.image = newImage;
 
// 4
CGImageRelease(cgimg);

Let’s see what happened here:

Here we set up the CIContext object. The CIContext takes an NSDictionary that specifies options including the color format and whether the context should run on the CPU/GPU. Here the default values are fine and so you passed as nil for that argument.

Here we used an method on the context object to draw a CGImage. Calling this method createCGImage:fromRect: on the context with the supplied CIImage will give us an output as CGImageRef.

Next, we converted the CGImage to UIImage using “imageWithCGImage”.

At last we release the CGImageRef as CGImage. CGImage is a C API which need to free memory even it runs with ARC.

Note: To know about all available filters write the following code and call the method in viewDidLoad / onLaunch. The filters are written on the console log.

-(void)logAllFilters {
NSArray *properties = [CIFilter filterNamesInCategory:
kCICategoryBuiltIn];
NSLog(@"%@", properties);
for (NSString *filterName in properties) {
CIFilter *fltr = [CIFilter filterWithName:filterName];
NSLog(@"%@", [fltr attributes]);
}
}

Like this blog? I’d love to hear about your thoughts on this. Thanks for sharing your comments.

How to monetize your Android application through In-App Billing?

In-App-Billing1What is In-app Billing ?

In-app products are the digital goods that you offer for sale from inside your Android application to your app users. You cannot use In-app Billing to sell personal services, physical goods, or anything that requires physical delivery.

Product types

The Version 3 API supports managed in-app products and subscriptions to give you flexibility in how you monetize your application. You can specify these types of products by using the Google Play Developer Console.

  • Managed in-app products:
    When a managed in-app item is purchased by an user, Google Play stores the purchase information for each item on a per-user basis.
  • Subscriptions :
    In In-app Billing, subscription plan offered you to sell content, services, or features to users from inside your app with recurring monthly or annual billing.

I will demonstrate a small example with In-app Billing,

To implement in app billing in your android project follow the below steps:

Step# 1: Installing the Google Play Billing Library
Before proceeding, verify you have installed the library by launching the Android SDK Manager by selecting the Eclipse Window -> Android SDK Manager option. Once loaded SDK Manager, scroll down to the Extras section and the Status column next to the Google Play Billing Library
Step# 2: Adding Billing Permission to the Manifest File
Add the following line in your AndroidManifest.xml file in order to make your app eligible to use in-App billing.

<uses-permission android:name=”com.android.vending.BILLING” />
Step# 3: Adding the Utility Classes to the Project
Find out the “TrivialDrive” sample project that was installed into the android SDK as part of the Google Play Billing library, includes a set of classes intended specifically for in-app billing implementation.

Locate the IInAppBillingService.aidl file in “TrivialDrive” sample project and add it to the package named “com.android.vending.billing”.

Then Select all nine Java files within “com.example.android.trivialdrivesample.util” package and copy and paste them into the <domainname>.inappbilling.util package of your InAppBilling project.

Step# 4: Designing the User Interface
Design your UI according to your need. This is a sample design developed to demonstrate the In-App Billing.

In-App-Billing-181x300


Step# 5: Obtaining the Public License Key for the App
Google Play billing must be identified by a unique public license key. The only way to get a public license key is to register an application within the Google Play.
Go to http://play.google.com/apps/publish Once you are logged in, In home page of the Google Play Developer Console, click the Add new application button, which specifying the default language and a title of InAppBilling. Once the above information has been entered, click the Upload APK button:
This APK file upload is not necessary at this point, so once the application has been registered, click on the Services & APIs option to display the Base64-encoded RSA public key for the application.

Step# 6: Creating a New In-app Product
Select the In-app Products menu item from the left hand panel of the developer console.To add a new product, click on Add new product button and, in the result panel, set the product type to Managed product and enter a Product ID (in this case com.andolasoft.testInApp). Click on Continue and in the second screen By entering a title, description and price for the item. Change on the menu at the top of the page to Activate.

Step# 7: Implementing “Purchase” Button click

public class MainActivity extends Activity {
 
    private static final String TAG = "<your domain>.inappbilling";
    IabHelper mHelper;
     
    private Button clickButton;
    private Button buyButton;
    private static final String TAG = "com.andolasoft.testInApp";
    IabHelper mHelper;
    static final String ITEM_SKU = "android.test.purchased";
.    @Override
    protected void onCreate(Bundle savedInstanceState) {
        super.onCreate(savedInstanceState);
        setContentView(R.layout.main);
 
        buyButton = (Button)findViewById(R.id.buyButton);
         
        String base64EncodedPublicKey =
                                       "<your license key here>";
         
            mHelper = new IabHelper(this, base64EncodedPublicKey);
         
            mHelper.startSetup(new
            IabHelper.OnIabSetupFinishedListener() {
                    public void onIabSetupFinished(IabResult result)
             {
                       if (!result.isSuccess()) {
                         Log.d(TAG, "In-app Billing setup failed: " +
                    result);
                       } else {             
                           Log.d(TAG, "In-app Billing is set up OK");
                              }
                      }
            });
    }
public void buyClick(View view) {
             mHelper.launchPurchaseFlow(this, ITEM_SKU, 10001,   
                    mPurchaseFinishedListener, "mypurchasetoken");
/*The developer payload token string. This can be any string value and is used to identify the purchase. For the purposes of this example, this is set to “mypurchasetoken”.*/
 
    }
@Override
protected void onActivityResult(int requestCode, int resultCode,
     Intent data)
{
      if (!mHelper.handleActivityResult(requestCode,
              resultCode, data)) {     
        super.onActivityResult(requestCode, resultCode, data);
      }
}
IabHelper.OnIabPurchaseFinishedListener mPurchaseFinishedListener
    = new IabHelper.OnIabPurchaseFinishedListener() {
    public void onIabPurchaseFinished(IabResult result,
                    Purchase purchase)
    {
       if (result.isFailure()) {
          // Handle error
          return;
     }      
     else if (purchase.getSku().equals(ITEM_SKU)) {
         consumeItem();
        buyButton.setEnabled(false);
    }
           
   }
};
public void consumeItem() {
    mHelper.queryInventoryAsync(mReceivedInventoryListener);
}
     
IabHelper.QueryInventoryFinishedListener mReceivedInventoryListener
   = new IabHelper.QueryInventoryFinishedListener() {
       public void onQueryInventoryFinished(IabResult result,
          Inventory inventory) {
 
                       
          if (result.isFailure()) {
          // Handle failure
          } else {
                 mHelper.consumeAsync(inventory.getPurchase(ITEM_SKU),
            mConsumeFinishedListener);
          }
    }
};
IabHelper.OnConsumeFinishedListener mConsumeFinishedListener =
      new IabHelper.OnConsumeFinishedListener() {
       public void onConsumeFinished(Purchase purchase,
             IabResult result) {
 
     if (result.isSuccess()) {                
            //Here user paid for the app so write your logic to show the content to user
     } else {
             // handle error
     }
  }
};
 
@Override
public void onDestroy() {
    super.onDestroy();
    if (mHelper != null) mHelper.dispose();
    mHelper = null;
}
 
}

Step#8 : Upload the “APK”
Create the signed APK of your project and upload it in your added Application in Google Play Developer Console

Step# 9: Adding In-app Billing Test Accounts
Unfortunately, Google does not allow developers to make test purchases from their own Google accounts app billing, Other Google accounts used as testing accounts. . From ths ipoint on, in order to test in-app,  the users of these Google accounts must load your application onto their devices and make test purchases. To add a test user account, click Settings icon located on the left hand side of your Google Play Developer Console home screen and on the account details screen scroll down to the License Testing section. In the corresponding text box, give the Gmail accounts for the users who will be performing the in-app testing on your behalf before saving the changes.

Note: This email Id should be the primary account of an android device where this app is to be tested. Check with Google policy before publishing the app to the android market place.

Conclusion: I hope you find this post useful to sell your android in-app products and services, make transaction smoother and easier, and improve your revenue. If you are looking for any assistance regarding android application development or other android integration, then you can contact us.

See Also: How to monetize your iOS app through Apple In-App Purchase integration

Like this blog? I’d love to hear about your thoughts on this. Thanks for sharing your comments.