What’s new in Android 4.4 ‘KitKat’ for Developers

Google released the latest version of Android (version 4.4), known as KitKat on 31st Oct 2013. It is designed to work on a wide variety of devices. The new version of Android has got a lot of exciting features for both users and developers.


KitKat

Some of the new features in the latest version of Android for developers to learn and explore are:

Screen Recording

The screen recording feature of Android 4.4 lets you capture video of your app and save it as an MP4 file. The recording can done at any device-supported resolution and then shared directly from the device to a computer for post-production.

Full Screen Immersive Mode

Full-screen immersive mode in KitKat allows any app to go truly full-screen, hiding both the navigation and status bars and takes advantage of every last pixel on the screen of a smartphone or tablet. You simply need to do a swipe from the top or bottom of the screen, in order to display the system bars again. Basically, developers can hide the entire system’s interface while the user is engaged in their apps(like e-reader and other media apps and games).

Scene Transitions

Android 4.4’s new transitions framework allows app developers to define how one screen animate to another scene. Developers can use predefined transition types called TransitionManager that animate the properties that matters the most to your app.

Storage Access Framework

With the release of Android 4.4 KitKat, users now have a smoother way of accessing and creating documents in an app from a variety of cloud storage providers. Developers can add their own storage devices to Android without having to do it on a specific vendor by vendor basis.

New WebView & Chromium Features

KitKat includes new implementation of WebView based on Chrome for Android 3.0. It allows developers to use the latest compatibility features, performance standards and support in WebView to access their Web-based content. Chromium WebView supports many aspects of HTML5 as well as CSS3 and JavaScript.

New Near Field Communications Platform Support

One of the new features in Android 4.4 is Host Card Emulation (HCE) to support Near Field Communications (NFC) transactions. Apps can also act in a new “Reader Mode” to receive NFC functionality (like payment processing, building access, tickets etc.) as it uses an Application Identifier (AID) to route the different NFC function from the hardware in a device to the app.

Low-Power Sensors

Android 4.4 support for hardware sensor batching, a new optimization that can dramatically reduce power consumed by ongoing sensor activities. It can makes your app more efficient and it lets you track sensor events continuously.

RenderScript Takes Advantage of Device Hardware

RenderScript can now be accessed in kitkat 4.4 by a new C++ api in the android native developer kit. High hardware consuming tasks can now be integrated into an apps native code and it allow for support from multiple smartphone CPU and GPU cores.

Andolasoft has a team of experienced android developers who are skilled to develop innovative apps for all versions of android devices. We have developed Android Apps like KurrentJobs, EstateMobz and many more.

How To Create A Static Library Or Framework For IOS?

A static library is a package of classes, functions, definitions and resources, which can be packed together and easily shared among projects. This facilitates reuse of code easier as you will have your own set of classes and utility functions.

Here are the steps to create your static library or framework

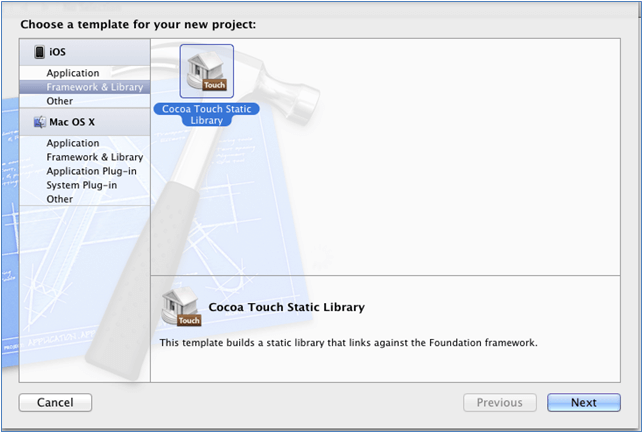
Step 1 : Create A New ‘Cocoa Touch Static Library’ Project

  • Choose template as Cocoa Touch Static Library.
  • Start with create new project >> iOS >> Framework & Library >> Cocoa Touch Static Library

choose_template_for_project

Note: The name you entered in product field will be the name of your framework.
Example:  ‘MyCompany’ will generate ‘MyCompany.framework’

Step 2: Create The Primary Framework Header (Recommended)

Usually, framework header is imported this way – <MyCompany/MyCompany.h>

  • Create an ‘.h’ file – ‘MyCompany.h
  • If X-Code creates it for you, just delete the ‘.m’ file and import the inner classes used in ‘.h’ file
  • If you import only ‘MyCompany.h’ (#import <MyCompany/MyCompany.h>) then the rest of the files need not be imported
#import <Foundation/Foundation.h>
  • Now, add your new sources
  • Make the header ‘Public’

Public headers are copied to the .framework and can be imported using the framework

  • Select the header in the project explorer, then expand the Utilities pane (Cmd+Option+0) to modify the scope of header.
  • In the ‘Target Membership’ group select the checkbox next to the ‘.h’ file.
  • Then, change the scope of the header from ‘Project’ to ‘Public’.

You might have to uncheck and check the box to get the dropdown list. This will ensure that the header is copied to the correct location in the copy headers phase.

Step 3: Update The Public Headers Location

  • To avoid copying private headers to the framework check that the public headers are copied to a separate directory, e.g. $(PROJECT_NAME)Headers.
  • Select the project in the file explorer >> select the targets >> ‘Build Settings’ tab.
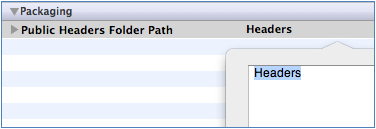
  • Set ‘Public Headers Folder Path’ to ‘$(PROJECT_NAME)Headers’ for all configurations by searching the ‘Public Headers Folder Path’. This folder must be unique if you are working with multiple Frameworks.

headers_xcode


Step 4: Setup ‘Build Settings’

"Dead Code Stripping" => No (for all settings)
"Strip Debug Symbols During Copy" => No (for all settings)
"Strip Style" => Non-Global Symbols (for all settings)

Step 5: Make Sure That Framework Is Used As Dependent Target

  • Generate the basic skeleton of the framework in the static library target. Also include a simple post-build script.
  • Select your target in the file navigator and click the ‘Build Phases’ tab
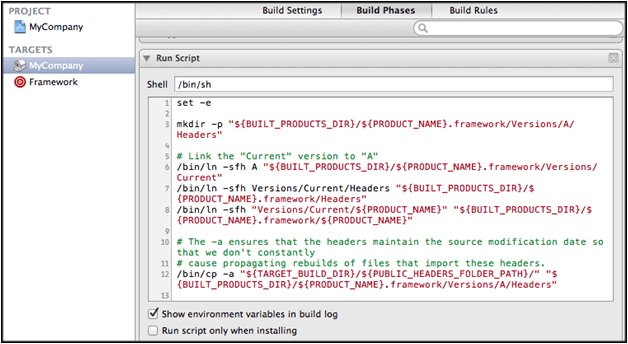
  • Then, click ‘Add Build Phase’ >> ‘Add Run Script’ and paste the following script in the source portion of the run script build phase.
set–e
mkdir -p "${BUILT_PRODUCTS_DIR}/${PRODUCT_NAME}.framework/Versions/A/Headers"
# Link the "Current" version to "A"
/bin/ln -sfh A "${BUILT_PRODUCTS_DIR}/${PRODUCT_NAME}.framework/Versions/Current"
/bin/ln -sfh Versions/Current/Headers "${BUILT_PRODUCTS_DIR}/${PRODUCT_NAME}.framework/Headers"
/bin/ln -sfh "Versions/Current/${PRODUCT_NAME}" "${BUILT_PRODUCTS_DIR}/${PRODUCT_NAME}.framework/${PRODUCT_NAME}"
# The -a ensures that the headers maintain the source modification date so that we don't constantly
# cause propagating rebuilds of files that import these headers.
/bin/cp -a "${TARGET_BUILD_DIR}/${PUBLIC_HEADERS_FOLDER_PATH}/" "${BUILT_PRODUCTS_DIR}/${PRODUCT_NAME}.framework/Versions/A/Headers"
mycompany_xcode
  • Build your project

The build products directory is usually in-
(~/Library/Developer/Xcode/DerivedData/<ProjectName>-<gibberish>/Build/Products/…)

You will find the ‘libMyCompany.a’ static library, a headers folder, and a ‘MyComapny.framework’ folder which contains the basic skeleton of your framework.

build_product_directory

SEE ALSO: How to make Static Framework iOS device independent?

I hope you enjoyed this topic, if you have any questions or comments please share below!

Auditnet® Is Now Available On Mobile (iPhone/iPad/Android)

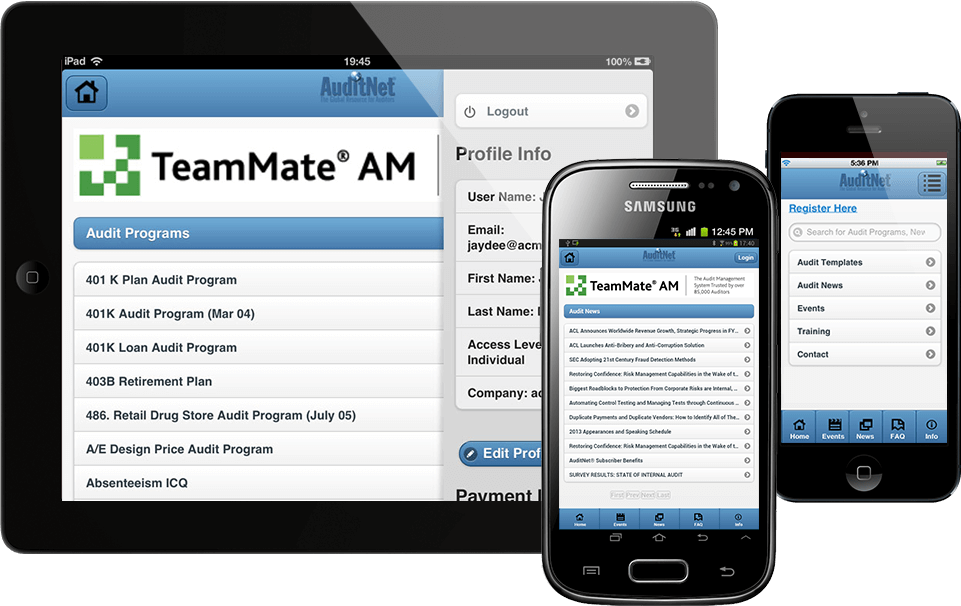
We are delighted to announce that AuditNet® is now available on Mobile both iPhone/iPad and Android. With this app, now the existing users can enjoy browsing and downloading the same rich content what they see on web app, also a new user will be able to register to the site. Now advertisers will get traffic from both web and mobile application.  For last 12 weeks a dedicated team from Andolasoft (Mobile App Developers, UI Developers, Ruby On Rails developers and QA team) worked diligently to make it available on the app stores right on time. AndolaSoft team worked on UX/UI design, app development, testing, and deployment of app to the respective apps store.

Looking into current surge of iPhone, iPad and Android devices worldwide, AuditNet® started looking for a way to provide access to the audit templates to its mobile users to target rise in subscriptions. Hence, Andolasoft proposed a cost effective solution by developing a mobile app using Cross Platform technology – PhoneGap, on top of Ruby on Rails framework, enabling to run on both iOS and Android platform. The back-end uses RESTful API hosted on AWS for smoother performance.


Auditnet_mobile_image

Auditnet_appstore1Auditnet_googleplay


About Auditnet:

AuditNet® serves the global audit community as the primary communication resource with an online digital network where auditors share resources, tools, and experience including audit work programs and other audit documentation. In 2009 AuditNet® launched Web-based training for fraud detection and prevention, IT audit, data analysis, audit software tools and techniques, enabling auditors to learn essential skills anywhere at any time. As a NASBA approved CPE sponsor AuditNet® now offers low-cost high-quality training for auditors and financial professionals, providing convenience while eliminating the need for travel.

Visit www.auditnet.org to know more.

About AndolaSoft:

Based in Silicon Valley, Andolasoft is a Web and Mobile app Development Company. Here, we do web applications using Ruby on Rails, PHP and CakePHP. We’ve expertize on Mobile App Development involving as iPhone, iPad, Android, PhoneGap andSencha.
With a team of 200+ expert developers, we deliver cutting-edge solutions within budget and on schedule. We have happy customers from across the USA, UK, Australia, Canada, Singapore, Switzerland and Brazil.

Visit andolasoft.com to know more

Things you must do after Apps development

mobile_marketing-large

Android and iOS both are the most lucrative mobile app development platform. Although Apple is the dominant player in US, Android has the widest customers around the world. Hence for business requirements, both iOS and Android is the most viable option. With over 850,000 applications in the Google Play and still counting Android has become the most versatile platform for the businesses as well as individuals to release any sort of apps in the market. Whereas App Store accounts for over 40 billion apps purchases and possesses around 775,000 apps ‘and still counting’.

After publishing the application to the App Store and Google Play, it is essential to promote those apps for generating revenue. Developers should popularize their apps over web to attract the attention of customers. Here are few ways to market and promote your applications on application stores.

Simultaneous App marketing and Development

Don’t wait till you finish developing your app; instead start marketing when the development process is ongoing. You could setup a website or a blog about the application you would be releasing in future. You could also promote the concept of your application through blog or social media websites. Developers should also write articles and reviews on topics and products related to the type of application they are willing to develop. This would help to gain visibility on the web as well as making people familiar about the idea of the applications. All the articles and app promotion through social media and blog posting has to be relevant.

Search optimize your Google Play and App Store Page

Every application released on the Google Play and App Store has its own page. Customers and users would come to this page through links in articles, blogs and social media updates. Developers will have just few seconds to persuade their possible customers through their page hence, the contents and information on the page has to be compelling. It would help if the app is named smartly i.e. the name should reflect the purpose of the application. Developers should also take utmost care while designing the app icons. It would be helpful if high resolution screenshots are also included in the Google Play and App Store page.

Involve your Friends, Family any one you can

The first few days of the release of the application to the application stores are the most crucial time which would decide the future of your apps promotion. Most users rely on the ratings given to the application before actually downloading it to their mobile device. Along with the rating, comments and reviews also matters. If the app gets a good number of downloads and has good ratings, there is a chance that it will be placed in the top list of best selling app or staff picks section.  Hence, ask your friends and family to give 5-star ratings to the applications, in fact ask as many people you know to give your application a 5-star rating and write impressive comments and reviews about the applications. Ensure a higher number of downloads by requesting trusted friends to download the app.

Support:

Offer continuous support to the users by addressing their queries and comments. If a user has raised an issue regarding app’s performance or functionality, address them by fixing the issue and then reply their comments by intimating them about the bug fixes. It facilitates developers to build a trust with their customers. Also watch out for negative feedback and bad reviews and remove any prevalent bugs that might be hampering your app’s reputation.

Android Application Development and iPhone application development are considered to be the best mobile app development platform for businesses. Because of its wider reach, it facilitates them to promote and market their application to a wider group of people.

Things You Should Know Before Planning Your Mobile App-Part-I

When you are looking at all the popular apps, you too are tempted to have one of your own; however, it can’t be done overnight. It is because; there are thousands of mobile app programmers and companies who may be thinking of doing the very much similar things. To have a successful mobile app it takes lots of hard work and well defined requirements.  You need to think about the main development aspects before planning to go for your mobile app.

Basic Steps You Need to Know For Developing Mobile App:

From our experiences, here are some guidelines you must go through if you are planning to develop a successful mobile app:

  1. The most crucial step is to come up with an innovative idea. Here, you need to make sure that there is little or no competition for it.
  2. Identify your targeted audience and build your app form their perspective, something that is more likely to be appreciated by these users.
  3.  Judge and determine major pain points and challenges that you expect to face for your application. You should hire a dedicated development team who could understand your specific business requirements and turn your ideas into a working app.
  4. Make sure that your app provides good usability and practical values to the users i.e., they should find your app useful and productive.
  5. Your app should have a solid built with no loose ends. Make sure to run a vigorous crash test and beta test phase before actually publishing it. User experience must be intuitive as well as engaging. If you are willing to implement APIs, ensure that it is robust and doesn’t generate any glitches in the application.
  6. After publishing your app to the application stores, you need to start promoting and market your application. One of the best ways to reach a wider audience is by promoting it over social media. Next, you will have to avail as much positive feedback from users as possible.
  7. You should offer constant support to your customers by addressing their comments, expectations and complaints. Then you should release updates and new features for your app to woo your existing customers as well as attracting the attention of new ones.
  8. Offering basic features for free and then selling premium stuff is a popular way to keep users hooked up and to gain traction. Also make sure that the app is noticed and favored by your customer.

iOS application development and Android app development can be easily executed and managed with the help of expertise mobile app developers. Moreover, it is advisable to outsource mobile application development tasks to development companies. Hiring a professional development company would facilitate you to build flawless and unique mobile apps which would greatly leverage revenue.

How to use ‘Contextual Action’ bar in ‘ListView’ page

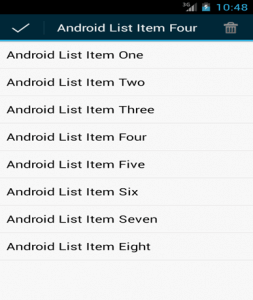
Android_list_item

Introduction:

‘Android.View.ActionMode’ is an Android API that is used to set up contextual actionbar with the help of xml. When an app enables this action mode by selecting an item, a contextual action bar is displayed at the header of the page. Here, users are enabled to perform on the currently chosen item.

The contextual action bar disappears when the user selects other action icon (in this case ‘delete’ icon), or selects the ‘Done’ action on the left side of the action bar.

Note: The contextual action bar works independently and overtakes the action bar position.

Steps to create a contextual action bar with the delete action:

1. In the main activity, implement the ‘ActionMode.Callback’ interface and override all implemented methods as per application requirements:

  • public boolean onActionItemClicked(ActionMode mode, MenuItem item)
  • public boolean onCreateActionMode(ActionMode mode, Menu menu)
  • public void onDestroyActionMode(ActionMode arg0)
  • public boolean onPrepareActionMode(ActionMode arg0, Menu arg1)

2. For selecting list item, implement the ‘setOnItemLongClickListener’ method on ‘ListView ‘object and call ‘this.startActionMode()’ to start ‘actionmode’ by passing ‘ActionMode.Callback’ object.

Example of Main-Activity:

[sourcecode]package com.example.contextualactionbardemo;

import java.util.ArrayList;

import android.os.Bundle;
import android.app.AlertDialog;
import android.app.ListActivity;
import android.content.DialogInterface;
import android.util.Log;
import android.view.ActionMode;
import android.view.Menu;
import android.view.MenuInflater;
import android.view.MenuItem;
import android.view.View;
import android.widget.AdapterView;
import android.widget.ArrayAdapter;
import android.widget.ListView;
import android.widget.AdapterView.OnItemLongClickListener;

public class MainActivity extends ListActivity {
protected Object mActionMode;
private static int selectedItem = -1;
private ArrayList list;
private String listItem = "";
private ArrayAdapter adapter;

@Override
protected void onCreate(Bundle savedInstanceState) {
super.onCreate(savedInstanceState);
ListView listView = (ListView) findViewById(R.id.listview);
String[] values = new String[] { "Android List Item One",
"Android List Item Two",
"Android List Item Three",
"Android List Item Four",
"Android List Item Five",
"Android List Item Six",
"Android List Item Seven",
"Android List Item Eight"
};

list = new ArrayList();
for (int i = 0; i < values.length; ++i) {
list.add(values[i]);
}
adapter = new ArrayAdapter(this,
android.R.layout.simple_list_item_1, android.R.id.text1, list);
setListAdapter(adapter);

listView = getListView();
listView.setOnItemLongClickListener(new OnItemLongClickListener() {

public boolean onItemLongClick(AdapterView<?> arg0, View arg1,
int pos, long id) {
Log.v("long clicked","pos"+" "+pos);
if (mActionMode != null) {
return false;
}
selectedItem = -1;
selectedItem = pos;
listItem = list.get(selectedItem);
mActionMode = MainActivity.this.startActionMode(mActionModeCallback);
arg1.setSelected(true);
return true;
}
});

}

private ActionMode.Callback mActionModeCallback = new ActionMode.Callback() {
@Override
public boolean onActionItemClicked(ActionMode mode, MenuItem item) {
switch (item.getItemId()) {
case R.id.action_delete:
AlertDialog.Builder alertDialog = new AlertDialog.Builder(MainActivity.this);
// Setting Dialog Title
alertDialog.setTitle("Confirm Delete…");
// Setting Dialog Message
alertDialog.setMessage("Are you sure you want to delete?");
alertDialog.setPositiveButton("YES", new DialogInterface.OnClickListener() {
public void onClick(DialogInterface dialog,int which) {
adapter.remove(listItem);
adapter.notifyDataSetChanged();
}
});
// Setting Negative "NO" Button
alertDialog.setNegativeButton("NO", new DialogInterface.OnClickListener() {
public void onClick(DialogInterface dialog, int which) {
dialog.cancel();
}
});
// Showing Alert Message
alertDialog.show();
mode.finish();
return true;
default:
return false;
}
}

@Override
public boolean onCreateActionMode(ActionMode mode, Menu menu) {
mode.setTitle(listItem);
MenuInflater inflater = mode.getMenuInflater();
inflater.inflate(R.menu.deletemenu, menu);
return true;
}

@Override
public void onDestroyActionMode(ActionMode arg0) {
// TODO Auto-generated method stub
mActionMode = null;
selectedItem = -1;
}

@Override
public boolean onPrepareActionMode(ActionMode arg0, Menu arg1) {
// TODO Auto-generated method stub
return false;
}
};
}[/sourcecode]

Example of /res/menu/deletemenu.xml:

Conclusion:

Contextual action mode is useful in following cases:

  • To show customize menu display with icon of edit, rename, delete
  • To display dynamic customize menu over the action bar

Have something to add to this topic? Share it in the comments.