How to show Captured Images dynamically in “GridView” Layout

There are numerous camera apps in the market which displays shopping items (i.e. image view). In these camera apps we need to arrange each photo items in a list view, basically a ‘Grid View’.

In such cases, ‘table layout’ would be easier to use; but it is difficult to arrange large number of items in
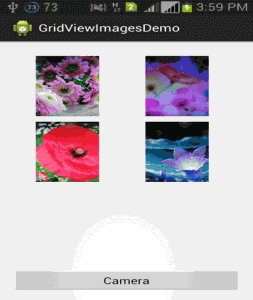
gridview_sample-253x300

side scroll view. As ‘table view’ is just a layout manager, it doesn’t allow direct interaction with each item to the users.

In order to tackle such development issues, it would be smart to implement ‘Grid View’ Layout.

What is “Grid View” Layout?

Grid View (android.widget.Grid View) is a layout that is implemented to show two-dimensional view with scrollable structure.

With the help of ‘List’ adapter, we can add images dynamically to a ‘Grid View’ layout by customizing the number of columns.

Let me tell you the process to show your Android Smartphone captured images dynamically in “Grid View” layout with some example.

Example of Layout xml

[sourcecode]<RelativeLayout xmlns:android="http://schemas.android.com/apk/res/android"
xmlns:tools="http://schemas.android.com/tools"
android:layout_width="match_parent"
android:layout_height="match_parent"
android:paddingBottom="@dimen/activity_vertical_margin"
android:paddingLeft="@dimen/activity_horizontal_margin"
android:paddingRight="@dimen/activity_horizontal_margin"
android:paddingTop="@dimen/activity_vertical_margin"
tools:context=".MainActivity" >

<RelativeLayout
android:id="@+id/RelativeGridLayout"
android:layout_width="wrap_content"
android:layout_height="fill_parent" >

<GridView
android:id="@+id/gridviewimg"
android:layout_width="wrap_content"
android:layout_height="fill_parent"
android:gravity="center"
android:numColumns="2"
android:scrollbarStyle="outsideInset"
android:smoothScrollbar="true"
android:verticalSpacing="10dp"
android:paddingBottom="50dp"
android:paddingTop="10dp"
/>
</RelativeLayout>

<RelativeLayout
android:id="@+id/RelativeLayout01"
android:layout_width="fill_parent"
android:layout_height="40dp"
android:layout_alignBottom="@+id/RelativeGridLayout"
>

<Button
android:id="@+id/capture_btn1"
android:layout_width="fill_parent"
android:layout_height="wrap_content"
android:layout_alignParentTop="true"
android:layout_centerHorizontal="true"
android:text="Camera" />
</RelativeLayout>

</RelativeLayout>[/sourcecode]

Example of Main form Activity class

1.MainActivity.java

[sourcecode]package com.example.gridviewimagesdemo;

import java.io.File;
import java.io.FileInputStream;
import java.io.FileNotFoundException;
import java.io.FileOutputStream;
import java.io.IOException;
import java.text.DateFormat;
import java.text.SimpleDateFormat;
import java.util.ArrayList;
import java.util.Arrays;
import java.util.Date;
import java.util.List;

import android.net.Uri;
import android.os.Bundle;
import android.os.Environment;
import android.provider.MediaStore;
import android.app.Activity;
import android.content.ActivityNotFoundException;
import android.content.Context;
import android.content.Intent;
import android.graphics.Bitmap;
import android.graphics.BitmapFactory;
import android.util.Log;
import android.view.Menu;
import android.view.View;
import android.view.ViewGroup;
import android.view.View.OnClickListener;
import android.widget.BaseAdapter;
import android.widget.Button;
import android.widget.GridView;
import android.widget.ImageView;
import android.widget.Toast;

public class MainActivity extends Activity implements OnClickListener {

Button captureBtn = null;
final int CAMERA_CAPTURE = 1;
private Uri picUri;
private DateFormat dateFormat = new SimpleDateFormat("yyyy-MM-dd HH:mm:ss");
private GridView grid;
private  List<String> listOfImagesPath;

public static final String GridViewDemo_ImagePath = Environment.getExternalStorageDirectory().getAbsolutePath() + "/GridViewDemo/";

@Override
protected void onCreate(Bundle savedInstanceState) {
super.onCreate(savedInstanceState);
setContentView(R.layout.activity_main);

captureBtn = (Button)findViewById(R.id.capture_btn1);
captureBtn.setOnClickListener(this);
grid = ( GridView) findViewById(R.id.gridviewimg);

listOfImagesPath = null;
listOfImagesPath = RetriveCapturedImagePath();
if(listOfImagesPath!=null){
grid.setAdapter(new ImageListAdapter(this,listOfImagesPath));
}
}

@Override
public boolean onCreateOptionsMenu(Menu menu) {
// Inflate the menu; this adds items to the action bar if it is present.
getMenuInflater().inflate(R.menu.main, menu);
return true;
}

@Override
public void onClick(View arg0) {
// TODO Auto-generated method stub
if (arg0.getId() == R.id.capture_btn1) {

try {
//use standard intent to capture an image
Intent captureIntent = new Intent(MediaStore.ACTION_IMAGE_CAPTURE);
//we will handle the returned data in onActivityResult
startActivityForResult(captureIntent, CAMERA_CAPTURE);
} catch(ActivityNotFoundException anfe){
//display an error message
String errorMessage = "Whoops – your device doesn’t support capturing images!";
Toast toast = Toast.makeText(this, errorMessage, Toast.LENGTH_SHORT);
toast.show();
}
}

}

protected void onActivityResult(int requestCode, int resultCode, Intent data) {
if (resultCode == RESULT_OK) {
//user is returning from capturing an image using the camera
if(requestCode == CAMERA_CAPTURE){
Bundle extras = data.getExtras();
Bitmap thePic = extras.getParcelable("data");
String imgcurTime = dateFormat.format(new Date());
File imageDirectory = new File(GridViewDemo_ImagePath);
imageDirectory.mkdirs();
String _path = GridViewDemo_ImagePath + imgcurTime+".jpg";
try {
FileOutputStream out = new FileOutputStream(_path);
thePic.compress(Bitmap.CompressFormat.JPEG, 90, out);
out.close();
} catch (FileNotFoundException e) {
e.getMessage();
} catch (IOException e) {
e.printStackTrace();
}
listOfImagesPath = null;
listOfImagesPath = RetriveCapturedImagePath();
if(listOfImagesPath!=null){
grid.setAdapter(new ImageListAdapter(this,listOfImagesPath));
}
}
}
}

private List<String> RetriveCapturedImagePath() {
List<String> tFileList = new ArrayList<String>();
File f = new File(GridViewDemo_ImagePath);
if (f.exists()) {
File[] files=f.listFiles();
Arrays.sort(files);

for(int i=0; i<files.length; i++){
File file = files[i];
if(file.isDirectory())
continue;
tFileList.add(file.getPath());
}
}
return tFileList;
}

public class ImageListAdapter extends BaseAdapter
{
private Context context;
private List<String> imgPic;
public ImageListAdapter(Context c, List<String> thePic)
{
context = c;
imgPic = thePic;
}
public int getCount() {
if(imgPic != null)
return imgPic.size();
else
return 0;
}

//—returns the ID of an item—
public Object getItem(int position) {
return position;
}

public long getItemId(int position) {
return position;
}

//—returns an ImageView view—
public View getView(int position, View convertView, ViewGroup parent)
{
ImageView imageView;
BitmapFactory.Options bfOptions=new BitmapFactory.Options();
bfOptions.inDither=false;                     //Disable Dithering mode
bfOptions.inPurgeable=true;                   //Tell to gc that whether it needs free memory, the Bitmap can be cleared
bfOptions.inInputShareable=true;              //Which kind of reference will be used to recover the Bitmap data after being clear, when it will be used in the future
bfOptions.inTempStorage=new byte[32 * 1024];
if (convertView == null) {
imageView = new ImageView(context);
imageView.setLayoutParams(new GridView.LayoutParams(ViewGroup.LayoutParams.MATCH_PARENT, ViewGroup.LayoutParams.MATCH_PARENT));
imageView.setPadding(0, 0, 0, 0);
} else {
imageView = (ImageView) convertView;
}
FileInputStream fs = null;
Bitmap bm;
try {
fs = new FileInputStream(new File(imgPic.get(position).toString()));

if(fs!=null) {
bm=BitmapFactory.decodeFileDescriptor(fs.getFD(), null, bfOptions);
imageView.setImageBitmap(bm);
imageView.setId(position);
imageView.setLayoutParams(new GridView.LayoutParams(200, 160));
}
} catch (IOException e) {
e.printStackTrace();
} finally{
if(fs!=null) {
try {
fs.close();
} catch (IOException e) {
e.printStackTrace();
}
}
}
return imageView;
}
}
}[/sourcecode]

Example of Manifest.xml file content:

Example of AndroidManifest.xml

[sourcecode]<?xml version="1.0" encoding="utf-8"?>
<manifest xmlns:android="http://schemas.android.com/apk/res/android"
package="com.example.gridviewimagesdemo"
android:versionCode="1"
android:versionName="1.0" >

<uses-sdk
android:minSdkVersion="8"
android:targetSdkVersion="17" />

<uses-permission android:name="android.permission.WRITE_EXTERNAL_STORAGE" />

<application
android:allowBackup="true"
android:icon="@drawable/ic_launcher"
android:label="@string/app_name"
android:theme="@style/AppTheme" >
<activity
android:name="com.example.gridviewimagesdemo.MainActivity"
android:label="@string/app_name" >
<intent-filter>
<action android:name="android.intent.action.MAIN" />

<category android:name="android.intent.category.LAUNCHER" />
</intent-filter>
</activity>
</application>

</manifest>[/sourcecode]

Conclusion:

So, a ‘Grid view’ implementation would result in following features and benefits:

  • In ‘GridView’ layout items would be listed in a static grid, defined in layout xml file.
  • ‘Gridview’ extends android.widget.Adapter, so it could be used where large amount of data is managed in a single page frame.
  • Enhanced data source binding capabilities (Direct interaction with SQLite Data Source)
  • Built-in support for sorting and paging mechanism
  • Additional Column types (ImageField)

I would like to recommend you to go through my previous article on where I have clearly narrate the process to display your iPhone captured images in Grid View layout.

I hope you find this useful. If you want to develop android or iPhone mobile app for you or for your organization, then you can hire single or group of developers from the pool of skilled and accomplished android specialists. Drop me a line below with your thoughts, thanks.

How to Import CSV Configuration File to Device’s SQLite db

Much like web applications, certain Android apps necessitate configuration adjustments to facilitate app testing and deployment across various environments.

Managing configurations for devices has become a critical task. One efficient way to handle configurations is by uploading them to an SQLite database within the device. This approach offers a structured and easily accessible repository for storing and retrieving configurations.

Incorporating distinct web services APIs, we employ the same Android APK to access data from both developmental and staging servers. Additionally, we exercise control over the integrated camera configuration within the Android APK.

Furthermore, seamless operationality demands the implementation of diverse configuration settings within the APK, dynamically applied without necessitating alterations to the source code during runtime.

  • We used different web services API to access data on server, so we need to use same android APK to access data in dev server as well as stager server.
  • We need to control the camera configuration integrated in android APK
  • Similarly, we need different configuration settings to set dynamically in APK without changing the source code at run-time.

Considering the above scenario, the best thing is to use CSV files, such as the properties files used in Java and .NET platform. In Android, we put CSV file in the device’s phone storage (in this example, the file path is “/storage/sdcard0/Android/data/com.example/”).

We have to write codes to read the CSV file and then spilt the data programmatically using separator. Then it has to be inserted in to a SQLite table (in this example uses ‘appconfigtbl‘).

The sample program in this blog will perform the below mentioned steps to achieve the above mentioned initialization of configuration value inside android app:

  • Check if the CSV file exists in the device with proper file path location defined in the APK
  • Use the asynchronous task that runs in the background of the app and initialize the CSV content to the targeted table.
  • While the data is imported from the CSV file to database, the user will see the progress bar of data being uploaded. In case of larger data, the progress bar dialog will be shown with the value of %completed.
  • Since the data is stored in a config-table, the app can retrieve the record from this table and use it in appropriate section.

Benefits:

  • The APK will be re-initialized with basic configuration data at any time.
  • No need to re-write the APK and compile it again.
  • Easier to setup and run inside the device. We get the changed configuration data at run time.
  • APK can be set up to a different configuration data base when required and can be deployed with different config data (CSV file) at different location easily.

Example of CSV File contents (appconfig.csv)

[sourcecode]
Config ID,Config Name,Config Value
validate_url,http://50.56.70.140/
webservice_url,http://50.56.70.140:8080/HOSTAPP/resources/inspection
camera_resolution_hight,800
camera_resolution_width,600
camera_flashlight_mode,auto
long_password,abc123
[/sourcecode]

Example of Layout xml

[sourcecode]
xmlns:tools="http://schemas.android.com/tools"
android:layout_width="match_parent"
android:layout_height="match_parent"
android:paddingBottom="@dimen/activity_vertical_margin"
android:paddingLeft="@dimen/activity_horizontal_margin"
android:paddingRight="@dimen/activity_horizontal_margin"
android:paddingTop="@dimen/activity_vertical_margin"
tools:context=".MainActivity" >

<TextView
android:id="@+id/showResult"
android:layout_width="wrap_content"
android:layout_height="wrap_content"
android:text="" />

[/sourcecode]

Example of  Main form Activity class

1. MainActivity.java

[sourcecode]
package com.example.csvdemo;

import java.io.BufferedReader;
import java.io.File;
import java.io.FileReader;
import java.util.Date;

import android.os.AsyncTask;
import android.os.Bundle;
import android.os.Environment;
import android.app.Activity;
import android.app.AlertDialog;
import android.app.Dialog;
import android.app.ProgressDialog;
import android.content.DialogInterface;
import android.content.Intent;
import android.content.SharedPreferences;
import android.content.res.Resources;
import android.database.Cursor;
import android.util.Log;
import android.view.Menu;
import android.widget.TextView;

public class MainActivity extends Activity {

private boolean isCsvFileNeedToInitialize = true;
private static final int DIALOG_DOWNLOAD_PROGRESS = 0;
private DBHelper mDbHelper;
private ProgressDialog mProgressDialog;
private static int totalRowsUpdate = 0;

public static final String external_sd = Environment.getExternalStorageDirectory().getAbsolutePath();
public static final File sdCard = Environment.getExternalStorageDirectory();
public static final String sdcardBaseDir = sdCard.getAbsolutePath();
public static final String externalPath = "/Android/data/com.example/";
public static final String csvFileName = "appconfig.csv";

@Override
protected void onCreate(Bundle savedInstanceState) {
super.onCreate(savedInstanceState);
setContentView(R.layout.activity_main);

mDbHelper = new DBHelper(this);
mDbHelper.open();
totalRowsUpdate = 0;

// create empty directory if not exist
File appDir = new File(sdcardBaseDir + externalPath);
if(!appDir.exists())
appDir.mkdirs();

File externalResourceFile = new File(sdcardBaseDir + externalPath + csvFileName);
isCsvFileNeedToInitialize = externalResourceFile.exists();
TextView lableResult = (TextView) findViewById(R.id.showResult);

if(isCsvFileNeedToInitialize)
{
new InitializeCSVFileAsync().execute("");

lableResult.setText( totalRowsUpdate + " fetched from ‘appconfig.csv’ into database successfully.");

} else {
lableResult.setText("’appconfig.csv’ not found!");
PopIt("Exit Application", "’appconfig.csv’ not found!");
}
}

public static void setTotalRecord(int ctr) {
totalRowsUpdate = ctr;
}

private void PopIt( String title, String message ){
AlertDialog.Builder alertbox = new AlertDialog.Builder(this);
alertbox.setTitle(title);
alertbox.setMessage(message);
alertbox.setPositiveButton("Ok", new DialogInterface.OnClickListener() {
public void onClick(DialogInterface arg0, int arg1) {
finish();
}
});
alertbox.show();
}

@Override
public boolean onCreateOptionsMenu(Menu menu) {
// Inflate the menu; this adds items to the action bar if it is present.
getMenuInflater().inflate(R.menu.main, menu);
return true;
}

@Override
protected Dialog onCreateDialog(int id) {
Resources res = getResources();
String reader = "";
int ctr = 0;
try {
File f = new File(sdcardBaseDir + externalPath + csvFileName);
BufferedReader in = new BufferedReader(new FileReader(f));
while ((reader = in.readLine()) != null) { ctr++; }
setTotalRecord(ctr);
}catch(Exception e) {    e.getMessage();  }

switch (id) {
case DIALOG_DOWNLOAD_PROGRESS:
mProgressDialog = new ProgressDialog(this);
mProgressDialog.setProgressDrawable(res.getDrawable(R.drawable.initialize_progress_bar_states));
mProgressDialog.setMessage("Initializing…");
mProgressDialog.setMax(ctr);
mProgressDialog.setProgressStyle(ProgressDialog.STYLE_HORIZONTAL);
mProgressDialog.setCancelable(false);
mProgressDialog.show();
return mProgressDialog;
default:
return null;
}
}

// Display Initialize progress bar for uploading CSVFiles to database
class InitializeCSVFileAsync extends AsyncTask<String, String, String>
{
@Override
protected void onPreExecute() {
super.onPreExecute();
mDbHelper.deleteCongigTableOldRecord();
if(isCsvFileNeedToInitialize)
showDialog(DIALOG_DOWNLOAD_PROGRESS);
}
@Override
protected String doInBackground(String… aurl) {
try {
float total = 0F;
float fctr = 1F;
String reader = "";
int ctr = 0;
boolean skipheader = true;
File f = new File(sdcardBaseDir + externalPath + csvFileName);
BufferedReader in = new BufferedReader(new FileReader(f));

while ((reader = in.readLine()) != null) {
// skip header column name from csv
if(skipheader) {
skipheader = false;
continue;
}
String[] RowData = reader.split(",");
mDbHelper.insertDB(RowData);
total += fctr;
publishProgress(""+(int)total);
//publishProgress((int)(total*100/lenghtOfFile));
}
in.close();
} catch(Exception e) {
e.getMessage();
}
return null;
}
protected void onProgressUpdate(String… progress) {
//Log.d("ANDRO_ASYNC",progress[0]);
mProgressDialog.setProgress(Integer.parseInt(progress[0]));
}
@Override
protected void onPostExecute(String unused) {

File f = new File(sdcardBaseDir + externalPath + csvFileName);
boolean result = f.delete();
if(isCsvFileNeedToInitialize)
dismissDialog(DIALOG_DOWNLOAD_PROGRESS);
mDbHelper.close();
//fillAllList();
}
protected void onDestroy() {
if (mDbHelper != null) {
mDbHelper.close();
}
}
}
}
[/sourcecode]

Example of  Helper class for sqlite database interaction:
Example of AbstractDbAdapter java

[sourcecode]
package com.example.csvdemo;

import android.content.Context;
import android.database.SQLException;
import android.database.sqlite.SQLiteDatabase;
import android.database.sqlite.SQLiteOpenHelper;

public abstract class AbstractDbAdapter {

protected static final String TAG = "ExampleDbAdapter";
protected DatabaseHelper mDbHelper;
protected SQLiteDatabase mDb;

protected static final String CONFIG_TABLE_CREATE =
"create table appconfigtbl (_id integer primary key," + "config_name text not null," + "config_value text," + " createdAt text, " + " updatedAt text);";

protected static final String DATABASE_NAME = "example";
protected static final int DATABASE_VERSION = 2;

protected final Context mCtx;

protected static class DatabaseHelper extends SQLiteOpenHelper {

DatabaseHelper(Context context) {
super(context, DATABASE_NAME, null, DATABASE_VERSION);
}
@Override
public void onCreate(SQLiteDatabase db) {
db.execSQL(CONFIG_TABLE_CREATE);
}
@Override
public void onUpgrade(SQLiteDatabase db, int oldVersion, int newVersion) {
db.execSQL("DROP TABLE IF EXISTS CONFIG_TABLE_CREATE");
onCreate(db);
}
}

public AbstractDbAdapter(Context ctx) {
this.mCtx = ctx;
}

public AbstractDbAdapter open() throws SQLException {
mDbHelper = new DatabaseHelper(mCtx);
mDb = mDbHelper.getWritableDatabase();
return this;
}

public void close() {
if (mDbHelper != null) {
mDbHelper.close();
}
//mDbHelper.close();
}
}
[/sourcecode]

Example of DBHelper java

[sourcecode]
package com.example.csvdemo;

import java.io.File;
import java.io.FileOutputStream;
import java.io.IOException;
import java.io.InputStream;
import java.io.OutputStream;
import java.sql.SQLException;
import java.util.ArrayList;
import java.util.Date;
import java.util.Hashtable;
import java.util.Vector;

import android.content.ContentValues;
import android.content.Context;
import android.database.Cursor;
import android.util.Log;

public class DBHelper extends AbstractDbAdapter{

public static final String KEY_ROWID = "_id";
public static final String KEY_CONFIG_NAME = "config_name";
public static final String KEY_CONFIG_VALUE = "config_value";
public static final String KEY_POSTED_DATE = "createdAt";
public static final String KEY_EDITED_DATE = "updatedAt";
public int maxLevelOnCurrentMenu = 1;

public int getMaxLevelOnCurrentMenu() {
return maxLevelOnCurrentMenu;
}

public void setMaxLevelOnCurrentMenu(int maxLevelOnCurrentMenu) {
this.maxLevelOnCurrentMenu = maxLevelOnCurrentMenu;
}

public static final String DATABASE_TABLE = "appconfigtbl";

public DBHelper(Context ctx) {
super(ctx);
}

public long insertDB(String config_name,String config_value, String createdAt, String updatedAt) {
ContentValues initialValues = new ContentValues();
initialValues.put(KEY_CONFIG_NAME, config_name);
initialValues.put(KEY_CONFIG_VALUE, config_value);
initialValues.put(KEY_POSTED_DATE,createdAt);
initialValues.put(KEY_EDITED_DATE,updatedAt);
return mDb.insert(DATABASE_TABLE, null, initialValues);
}

public long insertDB(String[] RowData)
{
long result = 0;
ContentValues values = new ContentValues();
values.put(KEY_CONFIG_NAME, RowData[0]);
values.put(KEY_CONFIG_VALUE, RowData[1]);
values.put(KEY_POSTED_DATE, "");
values.put(KEY_EDITED_DATE, "");
result = mDb.insert(DATABASE_TABLE, null, values);
return result;
}

public boolean deleteList(long rowId) {

return mDb.delete(DATABASE_TABLE, KEY_ROWID + "=" + rowId, null) > 0;
}

public boolean deleteCongigTableOldRecord() {

return mDb.delete(DATABASE_TABLE,  null, null) > 0;
}

}
[/sourcecode]

Example of initialize_progress_bar_states.xml [Used to show progressbar UI %progress value]

[sourcecode]

<gradient
android:startColor="#98887b"
android:centerColor="#ddd7c9"
android:centerY="0.95"
android:endColor="#0d1522"
android:angle="270"
/>

<corners
android:bottomRightRadius="7dp" android:bottomLeftRadius="7dp"
android:topLeftRadius="7dp" android:topRightRadius="7dp"/>

<gradient
android:startColor="#74c43f"
android:centerColor="#4a9c14"
android:centerY="0.85"
android:endColor="#06101d"
android:angle="270"
/>
<corners
android:bottomRightRadius="7dp" android:bottomLeftRadius="7dp"
android:topLeftRadius="7dp" android:topRightRadius="7dp"/>

[/sourcecode]

Example of Webview Layouts and How to use in Android

clip_image002-176x300

What is WebView class?

The WebView class is a subclass of “android.view” class that facilitates to fetch external URL running in web server and display it in device’s screen. It is specifically useful for displaying dynamic contents from the web server application. However, it will show only the contents, not the features of a fully html based web browser functionality.

In the WebView app, we implemented following steps to display the web content on device and also enabling the app to upload file to the web page contents:

  1. Verify the availability of device’s network connection
  2. Add progress bar logic for on click event of hyper-link in web page
  3. Add ability to upload file from local file storage on device through webview.

The only Requirement is…

External website URL should have UI contents compatible with the android device’s screen resolution.

Example of xml for activity

[sourcecode]
android:orientation="vertical"
android:layout_width="fill_parent"
android:layout_height="fill_parent"
>

android:id="@+id/webview1"
android:layout_width="fill_parent"
android:layout_height="fill_parent"
/>

[/sourcecode]

Example of Main Activity class

[sourcecode]1.MainClass.java
=======================
package com.webviewdemo;
import java.security.KeyManagementException;
import java.security.NoSuchAlgorithmException;
import java.security.SecureRandom;
import javax.net.ssl.HttpsURLConnection;
import javax.net.ssl.SSLContext;
import javax.net.ssl.TrustManager;
import android.app.Activity;
import android.app.AlertDialog;
import android.app.ProgressDialog;
import android.content.Context;
import android.content.DialogInterface;
import android.content.Intent;
import android.graphics.Bitmap;
import android.net.ConnectivityManager;
import android.net.Uri;
import android.net.http.SslError;
import android.os.Bundle;
import android.view.KeyEvent;
import android.view.View;
import android.view.Window;
import android.webkit.SslErrorHandler;
import android.webkit.ValueCallback;
import android.webkit.WebChromeClient;
import android.webkit.WebSettings;
import android.webkit.WebView;
import android.webkit.WebViewClient;
import android.widget.ProgressBar;
import android.widget.Toast;
public class MainClass extends Activity {

WebView webview;
ProgressDialog  progressBar;
ProgressBar progressBar1;
MainClass _activity;
AlertDialog alertDialog;
boolean loadingFinished = true;
boolean redirect = false;
private ValueCallback mUploadMessage;
private final static int FILECHOOSER_RESULTCODE = 1;
/** Called when the activity is first created. */
@Override
public void onCreate(Bundle savedInstanceState) {
super.onCreate(savedInstanceState);
progressBar = null;
this.getWindow().requestFeature(Window.FEATURE_PROGRESS);
_activity = this;
setContentView(R.layout.main );
webview = (WebView) findViewById( R.id.webview1 );
WebSettings settings = webview.getSettings();
settings.setJavaScriptEnabled(true);
settings.setSupportZoom(true);
settings.setBuiltInZoomControls(true);
settings.setCacheMode(WebSettings.LOAD_NO_CACHE);
webview.setScrollBarStyle(WebView.SCROLLBARS_OUTSIDE_OVERLAY);
webview.setWebChromeClient(new WebChromeClient()
{
//The undocumented magic method override
//Eclipse will swear at you if you try to put @Override here
public void openFileChooser(ValueCallback uploadMsg) {
mUploadMessage = uploadMsg;
Intent i = new Intent(Intent.ACTION_GET_CONTENT);
i.addCategory(Intent.CATEGORY_OPENABLE);
i.setType("image/*");
MainClass.this.startActivityForResult(Intent.createChooser(i,"File Chooser"), FILECHOOSER_RESULTCODE);
}
});
if(checkInternetConnection(_activity)==true){
if(savedInstanceState==null)
webview.loadUrl("https://www.andolasoft.com/");
else
webview.loadUrl("https://www.andolasoft.com/");
alertDialog = new AlertDialog.Builder(this).create();
progressBar = ProgressDialog.show(MainClass.this, "Please wait…", "Loading…");
webview.setWebViewClient(new WebViewClient() {
@Override
public boolean shouldOverrideUrlLoading(WebView view, String urlNewString) {
if (!loadingFinished) {
redirect = true;
}
loadingFinished = false;
webview.loadUrl(urlNewString);
return true;
}
public void onReceivedSslError (WebView view, SslErrorHandler handler, SslError error) {
handler.proceed() ;
}
@Override
public void onPageFinished(WebView view, String url) {
if(!redirect){
loadingFinished = true;
}
if(loadingFinished && !redirect){
//HIDE LOADING IT HAS FINISHED
if (progressBar != null && progressBar.isShowing()) {
progressBar.hide();
}
} else{
redirect = false;
}
}
@Override
public void onPageStarted(WebView view, String url, Bitmap favicon) {
super.onPageStarted(view, url, favicon);
loadingFinished = false;
progressBar.show();
}});
}
else{
AlertDialog.Builder builder = new AlertDialog.Builder(_activity);
builder.setMessage("Please check your network connection.")
.setCancelable(false)
.setPositiveButton("OK", new DialogInterface.OnClickListener() {
public void onClick(DialogInterface dialog, int id) {
Intent intent = new Intent(Intent.ACTION_MAIN);
intent.addCategory(Intent.CATEGORY_HOME);
intent.setFlags(Intent.FLAG_ACTIVITY_NEW_TASK);
startActivity(intent);
finish();
}
});

AlertDialog alert = builder.create();
alert.show();
}
}

public static boolean checkInternetConnection(Activity _activity) {
ConnectivityManager conMgr = (ConnectivityManager) _activity.getSystemService(Context.CONNECTIVITY_SERVICE);
if (conMgr.getActiveNetworkInfo() != null
&& conMgr.getActiveNetworkInfo().isAvailable()
&& conMgr.getActiveNetworkInfo().isConnected())
return true;
else
return false;
}
@Override
protected void onActivityResult(int requestCode, int resultCode,
Intent intent) {
if (requestCode == FILECHOOSER_RESULTCODE) {
if (null == mUploadMessage)
return;
Uri result = intent == null || resultCode != RESULT_OK ? null
: intent.getData();
mUploadMessage.onReceiveValue(result);
mUploadMessage = null;

}
}
@Override
public boolean onKeyDown(int keyCode, KeyEvent event) {
if (keyCode == KeyEvent.KEYCODE_BACK){
if(webview.canGoBack()){
webview.goBack();
return true;
}
}
return super.onKeyDown(keyCode, event);
}
}
[/sourcecode]

Example of User’s permission mentioned in androidmanifest.xml

[sourcecode]

[/sourcecode]

WebView is really helpful in creating quick Mobile UI without using complex Views/Layouts of Android. A HTML developer can easily build a web page with dynamic contents using CSS/HTML tags. Generally, we can run everything on WebView i.e., in android browser we can run jQuery, Flash enabled app while replicating the web based platform to mobile based smaller screen.

Benefits:

WebView are useful in following cases:

  • Since the web contents are dynamically updated at server side, the android app will display the updated contents just by fetching from site through WebView.
  • Web apps can be easily integrated to native application through WebView controls.

How to Use Fragment Layouts in Android

android-293x300-123

Fragment is a concept of UI components-with a new idea for the ability to retain state across configuration changes. As a result, web-pages load comparatively faster because it retains their previous state. Without Fragments components, the normal activity class causes running activities to be stopped, reloaded and re-rendered using the new parameters. A fragment allows building a UI as a series of smaller, reusable graphical elements that can be arranged as needed, based on the device’s capabilities.

Fragment layout in Android is pretty distinct from other platforms. This design was first introduced for the platform in version 3.0 and onwards.

Here are the main concepts about Android fragment layout:

  • Android tabs are most often presented as text compared to icons, because it is difficult to come up with descriptive icons for all the possible navigation option. Text is much better.
  • Android tabs aren’t square buttons.  They mostly contain text
  • Visual style of Android tabs is flat. There should not be any glossy or reflection effects like in html web design.

A Fragment framework works much like an activity.
To implement it in the app we need an independent Java activity class along with a fragment xml layout:

  1. Create a layout XML and an Activity subclass for your activity
  2. Create a layout XML and a Fragment subclass for your fragment
  3. Map the two together in your Activity layout XML (or using FragmentTransaction mostly in Java code)

Example of layout xml for activity

[sourcecode]<?xml version=”1.0″ encoding=”utf-8″?>
<TabHost
xmlns:android=”http://schemas.android.com/apk/res/android”
android:id=”@android:id/tabhost”
android:layout_width=”fill_parent”
android:layout_height=”fill_parent”>

<LinearLayout
android:orientation=”vertical”
android:layout_width=”fill_parent”
android:layout_height=”fill_parent”>

<FrameLayout
android:id=”@android:id/tabcontent”
android:layout_width=”0dp”
android:layout_height=”0dp”
android:layout_weight=”0″/>

<FrameLayout
android:id=”@+android:id/realtabcontent”
android:layout_width=”fill_parent”
android:layout_height=”0dp”
android:layout_weight=”1″/>

<TabWidget
android:id=”@android:id/tabs”
android:orientation=”horizontal”
android:layout_width=”fill_parent”
android:layout_height=”55dip”
android:layout_weight=”0″/>

</LinearLayout>
</TabHost>
[/sourcecode]

Example of Activity subclass

[sourcecode]package com.myproj;

import java.util.HashMap;
import java.util.Iterator;
import java.util.Stack;

import android.annotation.SuppressLint;
import android.app.Activity;
import android.content.Intent;
import android.os.Bundle;
import android.support.v4.app.Fragment;
import android.support.v4.app.FragmentActivity;
import android.support.v4.app.FragmentManager;
import android.support.v4.app.FragmentTransaction;
import android.view.LayoutInflater;
import android.view.View;
import android.widget.ImageView;
import android.widget.TabHost;
import android.widget.TextView;

public class AppMainTabActivity extends FragmentActivity {
/* Your Tab host */
private TabHost mTabHost;

/* A HashMap of stacks, where we use tab identifier as keys..*/
private HashMap<String, Stack<Fragment>> mStacks;

/*Save current tabs identifier in this..*/
private String mCurrentTab;

protected void onCreate(Bundle savedInstanceState) {
super.onCreate(savedInstanceState);
setContentView(R.layout.fragment_layout);
/*
*  Navigation stacks for each tab gets created..
*  tab identifier is used as key to get respective stack for each tab
*/
mStacks = new HashMap<String, Stack<Fragment>>();
mStacks.put(AppConstants.TAB_A, new Stack<Fragment>());
mStacks.put(AppConstants.TAB_B, new Stack<Fragment>());
mStacks.put(AppConstants.TAB_C, new Stack<Fragment>());
mStacks.put(AppConstants.TAB_D, new Stack<Fragment>());
mTabHost = (TabHost)findViewById(android.R.id.tabhost);
mTabHost.setOnTabChangedListener(listener);
mTabHost.setup();
initializeTabs();
}

private View createTabView(final int id,String s) {
View view = LayoutInflater.from(this).inflate(R.layout.tabs_icon, null);
ImageView imageView =   (ImageView) view.findViewById(R.id.icon);
imageView.setImageDrawable(getResources().getDrawable(id));
TextView textview= (TextView) view.findViewById(R.id.title);
textview.setText(s);
return view;
}

public void initializeTabs(){
/* Setup your tab icons and content views.. Nothing special in this..*/
TabHost.TabSpec spec    =   mTabHost.newTabSpec(AppConstants.TAB_A);
mTabHost.setCurrentTab(-3);
spec.setContent(new TabHost.TabContentFactory() {
public View createTabContent(String tag) {
return findViewById(R.id.realtabcontent);
}
});
spec.setIndicator(createTabView(R.drawable.cameratab, “Camera”));
mTabHost.addTab(spec);

spec = mTabHost.newTabSpec(AppConstants.TAB_B);
spec.setContent(new TabHost.TabContentFactory() {
public View createTabContent(String tag) {
return findViewById(R.id.realtabcontent);
}
});
spec.setIndicator(createTabView(R.drawable.presettab, “Presets”));
mTabHost.addTab(spec);

//Create a class AppConstants to declare your variables

spec = mTabHost.newTabSpec(AppConstants.TAB_C);
spec.setContent(new TabHost.TabContentFactory() {
public View createTabContent(String tag) {
return findViewById(R.id.realtabcontent);
}
});
spec.setIndicator(createTabView(R.drawable.manualtab, “Manual Entry”));

mTabHost.addTab(spec);

spec = mTabHost.newTabSpec(AppConstants.TAB_D);
spec.setContent(new TabHost.TabContentFactory() {
public View createTabContent(String tag) {
return findViewById(R.id.realtabcontent);
}
});
spec.setIndicator(createTabView(R.drawable.infotab, “Info”));
mTabHost.addTab(spec);
}

/*Comes here when user switch tab, or we do programmatically*/
TabHost.OnTabChangeListener listener    =   new
TabHost.OnTabChangeListener() {
public void onTabChanged(String tabId) {
/*Set current tab..*/
mCurrentTab                     =   tabId;

if(mStacks.get(tabId).size() == 0){
/*
*    First time this tab is selected. So add first fragment of that tab.
*    Dont need animation, so that argument is false.
*    We are adding a new fragment which is not present in stack. So add to stack is true.
*/
if(tabId.equals(AppConstants.TAB_A)){
pushFragments(tabId, new Camera(), false,true);
}else if(tabId.equals(AppConstants.TAB_B)){
pushFragments(tabId, new PresetsActivity(), false,true);
}else if(tabId.equals(AppConstants.TAB_C)){
pushFragments(tabId, new ManualActivity(), false,true);
}else if(tabId.equals(AppConstants.TAB_D)){
pushFragments(tabId, new InfoActivity(), false,true);
}
}else {
/*
*    We are switching tabs, and target tab is already has atleast one fragment.
*    No need of animation, no need of stack pushing. Just show the target fragment
*/
pushFragments(tabId, mStacks.get(tabId).lastElement(), false,false);
}
}
};

/* Might be useful if we want to switch tab programmatically, from
inside any of the fragment.*/
public void setCurrentTab(int val){
mTabHost.setCurrentTab(val);
}

/*
*      To add fragment to a tab.
*  tag             ->  Tab identifier
*  fragment        ->  Fragment to show, in tab identified by tag
*  shouldAnimate   ->  should animate transaction. false when we switch tabs, or adding first fragment to a tab
*                      true when when we are pushing more fragment into navigation stack.
*  shouldAdd       ->  Should add to fragment navigation stack (mStacks.get(tag)). false when we are switching tabs (except for the first time)
*                      true in all other cases.
*/
public void pushFragments(String tag, Fragment fragment,boolean shouldAnimate, boolean shouldAdd){
if(shouldAdd)
mStacks.get(tag).push(fragment);
FragmentManager   manager         =   getSupportFragmentManager();
FragmentTransaction ft            =   manager.beginTransaction();
if(shouldAnimate)
ft.setCustomAnimations(R.anim.slide_in_right, R.anim.slide_out_left);
ft.replace(R.id.realtabcontent, fragment);
ft.commit();
}

public void popFragments(){
/*
*    Select the second last fragment in current tab’s stack..
*    which will be shown after the fragment transaction given below
*/
Fragment fragment             =   mStacks.get(mCurrentTab).elementAt(mStacks.get(mCurrentTab).size() – 2);

/*pop current fragment from stack.. */
mStacks.get(mCurrentTab).pop();

/* We have the target fragment in hand.. Just show it.. Show a standard navigation animation*/
FragmentManager   manager         =   getSupportFragmentManager();
FragmentTransaction ft            =   manager.beginTransaction();
ft.setCustomAnimations(R.anim.slide_in_left, R.anim.slide_out_right);
ft.replace(R.id.realtabcontent, fragment);
ft.commit();
}

@SuppressLint(“NewApi”)
@Override
public void onBackPressed() {
if(((BaseFragment)mStacks.get(mCurrentTab).lastElement()).onBackPressed() == false){
/*
* top fragment in current tab doesn’t handles back press, we can do our thing, which is
*
* if current tab has only one fragment in stack, ie first fragment is showing for this tab.
*        finish the activity
* else
*        pop to previous fragment in stack for the same tab
*
*/
if(mStacks.get(mCurrentTab).size() == 1){
super.onBackPressed();  // or call finish..
}else{
popFragments();
}
}else{
//do nothing.. fragment already handled back button press.
}
}

/*
*   Imagine if you wanted to get an image selected using ImagePicker intent to the fragment. Ofcourse I could have created a public function
*  in that fragment, and called it from the activity. But couldn’t resist myself.
*/
@Override
protected void onActivityResult(int requestCode, int resultCode, Intent data) {

mStacks.get(mCurrentTab).lastElement().onActivityResult(requestCode, resultCode, data);
}
}
[/sourcecode]

Example of Fragment subclass

[sourcecode]package com.myproj;

import android.content.Intent;
import android.os.Bundle;
import android.support.v4.app.Fragment;

public class BaseFragment extends Fragment {
public AppMainTabActivity mActivity;
@Override
public void onCreate(Bundle savedInstanceState) {
super.onCreate(savedInstanceState);

mActivity    = (AppMainTabActivity) this.getActivity();
}

public boolean onBackPressed(){
return false;
}
public void onActivityResult(int requestCode, int resultCode, Intent data){

}
}
[/sourcecode]

Fragment layout in Android is pretty distinct from other platforms. This design was first introduced for the platform in version 3.0 and onwards.

Here are the main concepts about Android fragment layout:

  1. Android tabs are most often presented as text compared to icons. Because, it is difficult to come up with descriptive icons for all the possible navigation option. Text is much better.
  2. Android tabs aren’t square buttons.  They mostly contain text
  3. Visual style of Android tabs is flat. There should not be any glossy or reflection effects like in html web design.

A fragment must always be embedded in an activity and the fragment’s lifecycle is directly affected by the parent activity’s lifecycle. When we add a fragment as a part of an activity layout, it lives in ViewGroup inside the activity’s view hierarchy and the fragment defines its own view layout. We can insert a fragment into the activity layout by declaring the fragment in the activity’s layout file, as a <fragment> element, or from the application code by adding it to an existing ViewGroup.
To animate the transition between fragments or to animate the process of showing or hiding a fragment the Fragment Manager API can be used and create a Fragment Transaction.
Within each Fragment Transaction we can specify in and out animations that will be used for show and hide respectively (or both when replace is used).

Benefits:

Fragments are useful in following cases:

  • If we split up views on some devices/orientations and show them in two activities and show all the content in one on other devices. That would be a use case if you go on a tablet or maybe even in landscape mode on a phone: e.g. you show the list of items and the details on one screen. On a phone or in portrait mode you just show one part.
  • Another use case is reusable views. So if we have some views that are visible on different activities and also perform some actions we could put this behavior into a fragment and then reuse it.
  • Animated effects can availed when dynamically adding and removing fragments from the screen
  • Integration with the action bar for tabs, as a replacement for TabHost
  • Integration with the action bar for “list”-based navigation (really a Spinner in the action bar, toggling between different fragments)

See Also: Webview Layouts usages in Android

If you have thoughts about or experiences with Android fragments, share them with us. We’d love to hear from you.

Expected devices with Android 4.2 upgrades

android_jelly_been_123

Google’s Android 4.2 was released last October, which introduced numerous new features and enhancement for Jelly Bean OS platform. It included lock screen widgets and photo Sphere as well as new quick settings panel and screensaver function. For tablets, the upgrade included phone like user-interfaces and multi-user support

It has been nearly a year since the release of Samsung Galaxy Tab and apparently Samsung is planning to release an update to Android 4.1.2 first and then the final OTA Update with Android 4.2.2 Jelly Bean OS for the tablet. This will be the last official update from Samsung and hence further the users will have to rely on the Android development community for custom ROMs based on Android 5.0. The news first surfaced at ‘SamMobile’ and it seems like Samsung has fixed issues with Android 4.2.2 and Exynos CPU. Samsung will probably abandon updates for its former flagship tablet after the release of Jelly Bean 4.2.2 firmware update. These update i.e. Android 4.2.1 and 4.2.2 is expected to be available till September 2013. It is also rumored that Samsung devices with dual-core CPU will also receive Jelly Bean 4.2.2 updates.

There were other Galaxy Tab devices that are tested on Jelly Bean ROMs and its official release is expected by April 2013. The Jelly Bean OS is now tested on Galaxy Tab 10.1 GT 7500, Galaxy Tab GT 7300, Galaxy Tab 7.7 P6800 and the Galaxy Tab Plus P6200. These updates are yet to happen until Samsung decides to officially announce the release dates of OTA updates for Jelly Bean 4.2.2.

For Google’s nexus devices the upgrades are often early and directly from Google. Even carrier connected devices like the Verizon Galaxy Nexus are finally catching up, which generally experienced delays in update because of carrier interference. Asus gave Android 4.2 update to its Transformer Pad TF300 at the beginning of March and has said to release updates for Transformer Pad Infinity, MeMO Pad Smart and MeMO Pad, later this year. Sony has confirmed that it would release Android 4.2 upgrades for Xperia Z and Xperia Tablet Z devices. Motorola has also promised it would upgrade their Android OS for Motorola’s International Razr D1 and D3, but haven’t provided any definite timeline for the process.

Mobile device manufacturers are now willing to focus their Android Application Development efforts on Android 4.1 upgrade before heading to 4.2, because 4.2 is relatively a minor step from 4.1. Some companies are even considering to skip directly to the next major Android release i.e. Android Key Lime Pie, which is expected to be announced at Google’s I/O conference in May .

SwiftKey has unveiled its version 4 keyboard app for Android devices

androidimg

To be completely honest, most android users are not satisfied with the android’s default keyboard. It can be fiddly for some users, who write languages other than English on a daily basis. After all it doesn’t cater to everyone’s typing style either. However “SwiftKey” has always proved to be the best keyboard app alternative for the android platform. This time the developers at SwiftKey have launched its version 4 for the android devices

One of the best features of this keyboard is its ability to gradually learn the user’s typing preferences. It studies how a user writes over time and generates predictive texts for him, which is surprisingly accurate and better than any other applications. SwiftKey has also included its swipe like feature called the SwiftKey Flow which lets the user type sentences without lifting finger from the mobile screen. SwiftKey now supports over 60 international languages.

Here are some of the most notable features in version 4 release:

  • SwiftKey Flow is a gesture typing feature that facilitates the users to write sentences simply by gliding over the keys. It also adds auto-correction ability as-well-as predicts the possible next words while typing.
  • It can also be blend with tap inputs and switching mid-word.
  • If the predicted word is correct then it can be inserted by simply lifting the finger off.
  • Flow through space lets the user type a complete sentence in one motion without lifting the finger, to give spaces between the words.
  • It supports word prediction for over 60 languages like Javanese, Sundanese, and Vietnamese etc with both auto-correction and word prediction abilities.
  • Easier correction and auto adaptability to users typing style.

According to reports Android application development with SwiftKey’s SDK now supports iOS, JVM, Linux, Mac OS-X, Windows, and C++ etc. SwiftKey had released its Flow feature in the last October and its Beta version was tested with a community of million users.  Being awarded numerous times for its keyboard application, it surely is one of the best android keyboard apps, plus it comes with a reasonable price.