BuildContext is the object that stores information about the current build. It provides information such as the minimum and maximum supported Flutter version, the device’s screen size and pixel density, the currently active theme, and more.
The BuildContext is the set of inputs that Flutter uses to create an instance of a widget. It includes properties on the Android and iOS platforms, as well as properties related to the current device and environment.
It can be used to customize the behavior and appearance of your widget, but it’s important to understand how it works in order to avoid any issues.
For instance, you can use BuildContext.host () to get a string that specifies the current app’s host name. You can also use BuildContext.local (context).emulator so you can set up an emulator for testing your app on different devices without needing to change settings in Android Studio every time you want to switch emulators.
Flutter is one of the hottest technologies for cross-platform mobile development. It has been described as a new contender in the app development industry, competing with traditional frameworks like React Native and Xamarin.
Flutter builds on Google’s own Dart programming language and provides a library of scalable, customizable UI widgets to help developers build beautiful native interfaces that run across all platforms. It has been designed to help developers build high-quality, natively compiled apps that run on both Android and iOS from one codebase.
Never miss an update from us. Join 10,000+ marketers and leaders.
What is a BuildContext?
The BuildContext is a locator that is used to point the location of the widget in the widget tree.
In Flutter we have to create widgets through the build method & we have to pass the BuildContext as an argument to the build method.
Each BuildContext is different for every widget. Each widget you create has its own BuildContext and they can locate themselves in the widget tree or reach out to the nearest widget.
This is how we create a widget
[code language=”css”]
Widget build (BuildContext context)=> MyAwesomeWidget();
[/code]
Flutter widget tree
Everything in Flutter is a widget. Whether it is a container, providers, text, button, image etc. everything is a widget, whether it reflects the UI in the app or not.
The UI or display in Flutter comprises stacks of widgets popularly called a widget tree. Each component is responsible for a small unit of the entire UI.
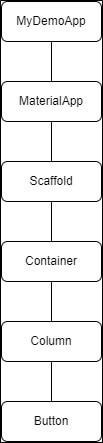
The above image is an example of a widget tree in Flutter. We can observe that every widget has its own place in the widget tree i.e. the Button widget is under column widget.
Widgets are only visible to its BuildContext or to its parent’s BuildContext. That means we can locate the parent widget from the child widget. For the above image tree structure we can get Scaffold from Container by going up:
[code language=”css”]
context.ancestorWidgetOfExactType(Scaffold)
[/code]
You can also locate a child widget from a parent widget and for that, we use Inherited Widgets.
There are three main trees in Flutter:
- Widget
- Element
- Render
Widget
Widgets are immutable, they represent the structure for RenderObjects Fluorescence is optimized, which can easily create and destroy widgets without any significant performance implications.
The same can’t be said for RenderObjects.
Element
In the middle of Widgets and RenderObjects sits elements. These act as the glue between the immutable widget layer and the mutable render layer.
As the configuration of a widget changes (for example, the user calls the set state that triggers a rebuild), the element notices incoming changes and says to the corresponding render object,
“Hey! Please update. ”
Render
RenderObjects are what the visual pieces on the screen correspond to. Their purpose is to define areas on the screen regarding their spatial dimensions. They are referenced by the element. As a consequence we are dealing with another (third) tree here: the RenderObjects together form a tree which is called Render Tree whose root node is a RenderView (being a variant of a RenderObject). The RenderObject, on the other hand, are mutable objects that do the heavy lifting of turning the configuration supplied from widgets into pixels users can see and interact with on the screen.
Unlike widgets that are cheap and can safely be created and destroyed without any significant performance implications, the same cannot be said for RenderObjects.
For this reason, whenever the configuration of a widget changes, the framework looks at the change and updates the associated RenderObject instead of creating a new one each time.
Conclusion
Understanding BuildContext is very crucial to develop applications in Flutter. This improves our knowledge on how Flutter works and helps to build apps confidently.
BuildContext is a facade that provides a consistent API for implementing custom layouts and animations. The code is platform-specific, but the abstraction weaves some of the underlying platform-specific logic out of sight. BuildContext also helps reduce the need to know about the underlying platform details when implementing custom layouts and animations.
I’ve worked with the team at Andolasoft on multiple websites. They are professional, responsive, & easy to work with. I’ve had great experiences & would recommend their services to anyone.
Ruthie Miller, Sr. Mktg. Specialist
Salesforce, Houston, Texas

Flutter is an open-source mobile app SDK that is used to make a high-quality app with a beautiful and consistent user experience. Unlike native mobile development, Flutter does not require that an app has a single, complete codebase but instead lets you mix and match code for different platforms. It also provides a rich set of pre-built widgets and allows for shared state.
The BuildContext is the context in which the Flutter app is running and is used for determining where to find resources and strings. It can be thought of as the environment in which the app is being used. Flutter provides an abstract class called BuildContext that handles the loading of resources, without requiring the developer to use hardcoded paths. This abstraction is one of the things that makes flutter so easy to use.
Flutter provides a set of high-level classes to help flutter developers build reactive user interfaces. Are you looking to develop an application in flutter framework? Let’s discuss