In today’s digital age, mobile apps have become an integral part of our daily lives, revolutionizing how we communicate, work, shop, and entertain ourselves. Building a disruptive iOS mobile app requires more than just technical expertise; it demands creativity, innovation, and a deep understanding of user needs and market trends. Among the plethora of mobile platforms available, iOS stands out for its user-friendly interface, robust security features, and loyal user base.
If you are looking to build modern iOS apps that are optimized to outperform in your niche then Andolsoft is the best iOS app development agency for you.
In this blog, we’ll explore the essential steps and strategies to unleash innovation and create a disruptive iOS mobile app that captivates users and disrupts the industry.
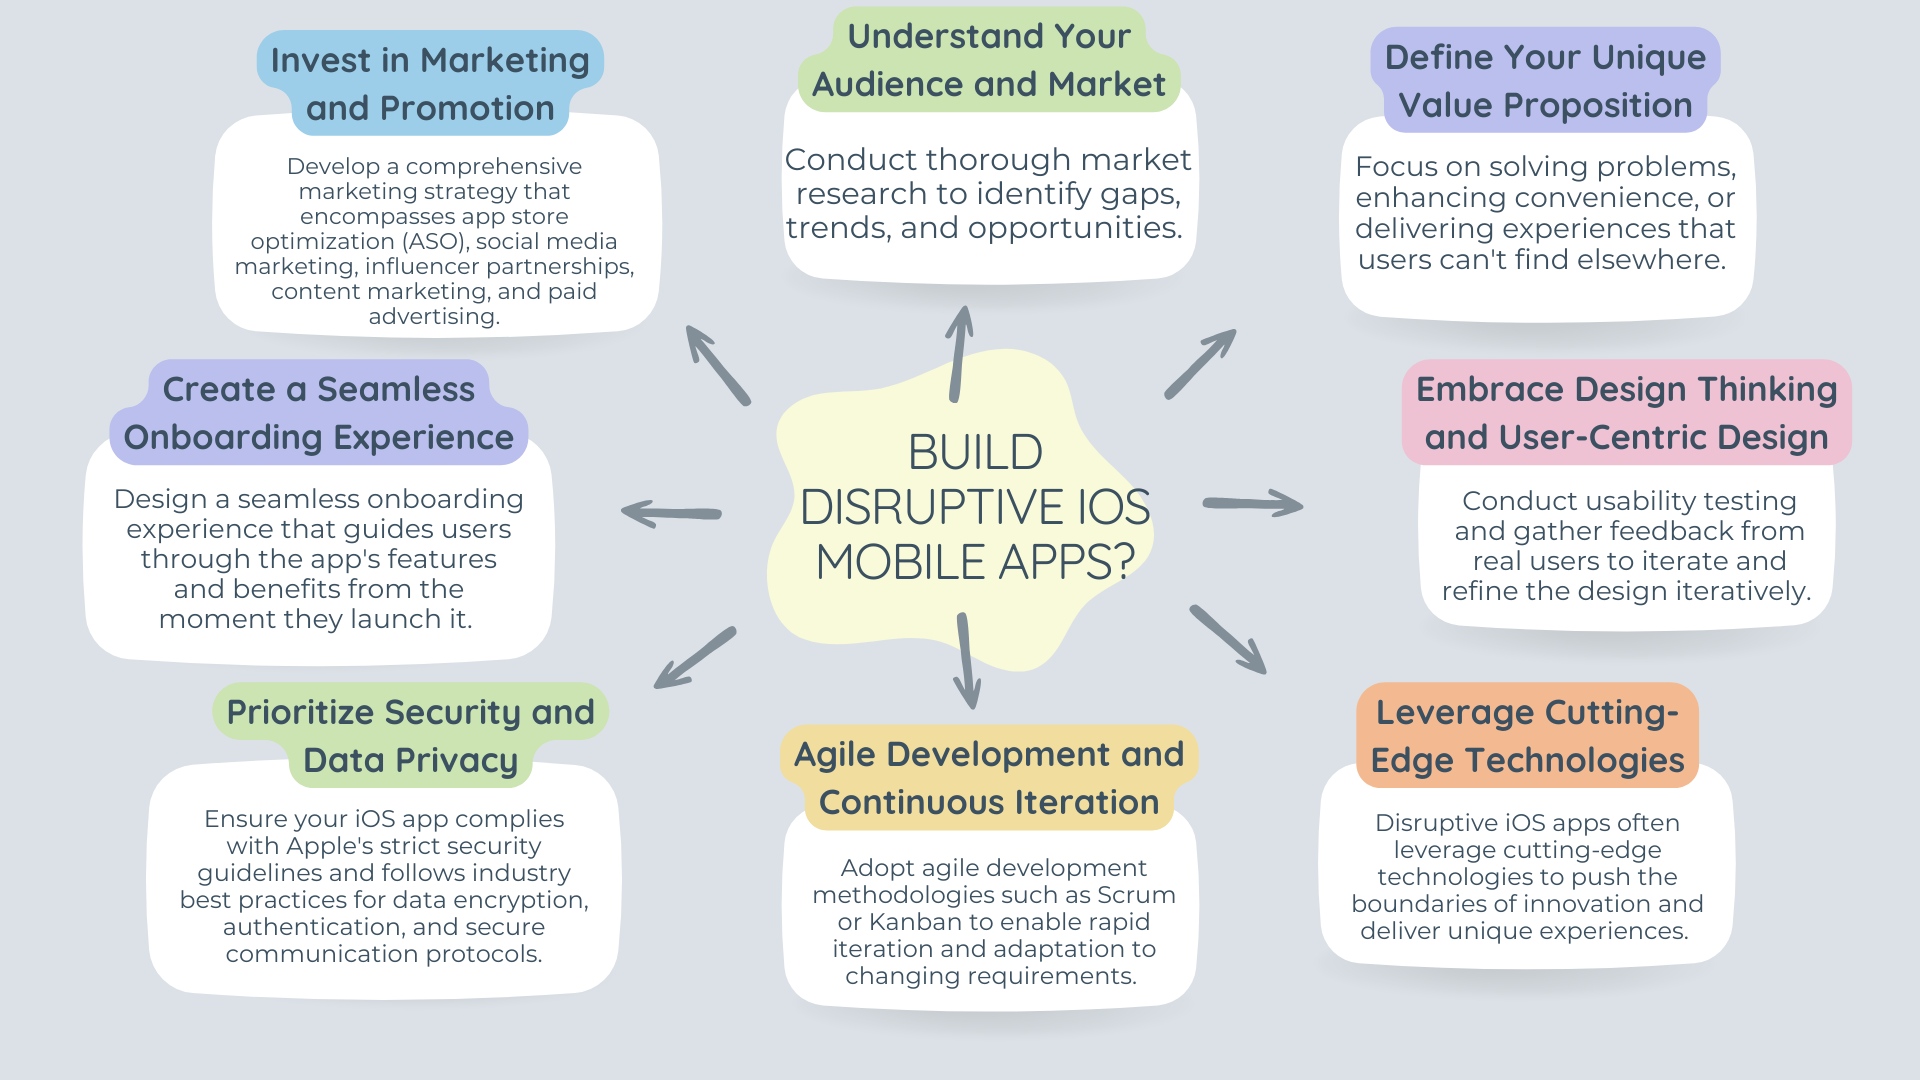
1. Understand Your Audience and Market
The foundation of any successful iOS mobile app lies in understanding your target audience and the market landscape. Conduct thorough market research to identify gaps, trends, and opportunities.
Analyze competitors’ apps to learn from their strengths and weaknesses. Gather insights into user preferences, pain points, and behaviors through surveys, interviews, and user data analysis.
This deep understanding will guide your app’s design, features, and marketing strategy, ensuring it resonates with your target audience.
2. Define Your Unique Value Proposition
To disrupt the market, your iOS mobile app must offer something unique and valuable that sets it apart from existing solutions. Define a compelling value proposition that addresses a specific need or pain point of your target users.
Focus on solving problems, enhancing convenience, or delivering experiences that users can’t find elsewhere.
Whether it’s a revolutionary feature, seamless user experience, or innovative business model, your app’s value proposition should clearly communicate why users should choose it over competitors.
3. Embrace Design Thinking and User-Centric Design
User experience (UX) is a critical factor in the success of any mobile app, especially in the competitive iOS ecosystem. Embrace design thinking principles and adopt a user-centric approach to app development.
Create wireframes, prototypes, and mockups to visualize the app’s interface and user flow. Conduct usability testing and gather feedback from real users to iterate and refine the design iteratively.
Prioritize simplicity, intuitiveness, and aesthetics to create a delightful user experience that keeps users engaged and coming back for more.
4. Leverage Cutting-Edge Technologies
Disruptive iOS apps often leverage cutting-edge technologies to push the boundaries of innovation and deliver unique experiences.
Explore emerging technologies such as augmented reality (AR), machine learning (ML), blockchain, or Internet of Things (IoT) to enhance your app’s capabilities.
Whether it’s integrating AR features for immersive experiences, implementing ML algorithms for personalized recommendations, or leveraging blockchain for secure transactions, strategic use of technology can differentiate your app and capture users’ attention.
5. Agile Development and Continuous Iteration
In the fast-paced world of mobile app development, agility is key to staying ahead of the curve. Adopt agile development methodologies such as Scrum or Kanban to enable rapid iteration and adaptation to changing requirements.
Break down the app development process into small, manageable tasks or sprints, allowing for frequent releases and feedback loops.
Embrace a culture of continuous improvement, where each iteration brings the app closer to perfection based on user feedback, analytics, and market insights.
6. Prioritize Security and Data Privacy
With growing concerns about data privacy and security, users expect mobile apps to prioritize their personal information’s protection.
Ensure your iOS app complies with Apple’s strict security guidelines and follows industry best practices for data encryption, authentication, and secure communication protocols.
Implement robust security measures to safeguard user data from unauthorized access, breaches, or cyber threats.
Transparency and proactive communication about your app’s security measures can build trust and confidence among users.
7. Create a Seamless Onboarding Experience
First impressions matter, especially in the competitive app market. Design a seamless onboarding experience that guides users through the app’s features and benefits from the moment they launch it.
Keep the onboarding process simple, intuitive, and frictionless, minimizing the steps required to get started. Use interactive tutorials, tooltips, or guided tours to familiarize users with key functionalities and encourage exploration.
A well-crafted onboarding experience can significantly impact user retention and engagement, setting the stage for long-term success.
8. Invest in Marketing and Promotion
Even the most innovative iOS app won’t succeed without effective marketing and promotion. Develop a comprehensive marketing strategy that encompasses app store optimization (ASO), social media marketing, influencer partnerships, content marketing, and paid advertising.
Create compelling app store listings with eye-catching visuals, engaging descriptions, and targeted keywords to improve visibility and attract downloads.
Leverage social media platforms, blogs, and forums to generate buzz and create a community around your app. Engage with users, respond to feedback, and continuously promote your app to maximize its reach and impact.
Conclusion
Building a disruptive iOS mobile app requires a combination of creativity, technical expertise, and market insight.
By understanding your audience, defining a unique value proposition, embracing user-centric design, leveraging cutting-edge technologies, and prioritizing security and privacy, you can create an app that stands out in the crowded app market.
With agile development, continuous iteration, seamless onboarding, and strategic marketing, you can unleash innovation and disrupt the industry, leaving a lasting impression on users and shaping the future of mobile technology.
Andolsoft is a leading developer of optimized iOS apps. We have expertise in technologies such as Xcode, Swift, ObjectiveC and other frameworks necessary to build our clients million dollar iPhone and iPad apps.