How To Create A Gridview With ‘UICollectionView’ In IOS6 & Above

What Is ‘UICollectionView’?

‘UICollectionView’ is a class introduced in iOS 6 SDK. It helps developers in creating grid view to handle ordered collection of data items using customizable layouts. ‘Collection view’, available in this class is like ‘UItableview’ which supports multiple column layouts.

Getting Started:

Create new ‘.h‘ and ‘.m‘ files to display the images.

In ‘ShowImagesViewController.h

#import <UIKit/UIKit.h>
@interface ShowImagesViewController :UICollectionViewController
{
NSArray *allImages;
}
@property (nonatomic, retain) NSArray *allImages;
@end

In ‘ShowImagesViewController.m

#import "ShowImagesViewController.h"
@implementation ShowImagesViewController
@synthesize allImages;
- (void)viewDidLoad
{
[superviewDidLoad];
allImages = [NSArrayarrayWithObjects:@"pizza.jpeg",
@"sides_img.png", @"sandwich_img.png", @"pizza_img.png",
@"pasta_img.png", @"drinks_img.png", @"pizza.jpeg",
@"sides_img.png", @"sandwich_img.png", @"pizza_img.png",
@"pasta_img.png", @"drinks_img.png", nil];
}
 
- (void)didReceiveMemoryWarning
{
[superdidReceiveMemoryWarning];
// Dispose of any resources that can be recreated.
}
- (BOOL)shouldAutorotateToInterfaceOrientation:
(UIInterfaceOrientation)interfaceOrientation
{
return YES;
}
- (NSInteger)collectionView:(UICollectionView *)collectionViewnumberOfItemsInSection:(NSInteger)section
{
returnrecipeImages.count;
}
- (UICollectionViewCell *)collectionView:(UICollectionView *)collectionViewcellForItemAtIndexPath:(NSIndexPath *)indexPath
{
staticNSString *identifier = @"Cell";
UICollectionViewCell *cell = [collectionView
dequeueReusableCellWithReuseIdentifier:identifier
forIndexPath:indexPath];
 
UIImageView *allImageView = (UIImageView *)[cell viewWithTag:100];
allImageView.image = [UIImageimageNamed:[allImagesobjectAtIndex:indexPath.row]];
return cell;
}
- (void)collectionView:(UICollectionView *)collectionViewdidSelectItemAtIndexPath:(NSIndexPath *)indexPath{
}
@end

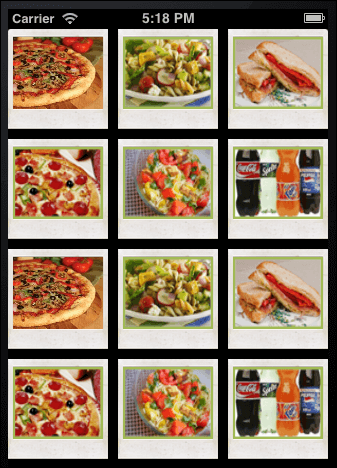
Example of Grid layout using ‘UICollectionViewController

uicollectionview

Conclusion:

‘UICollectionViewController’ creates ‘Grid’/’Tile’ layout much faster and offers intuitive user interface in iOS 6 devices.

Auditnet® Is Now Available On Mobile (iPhone/iPad/Android)

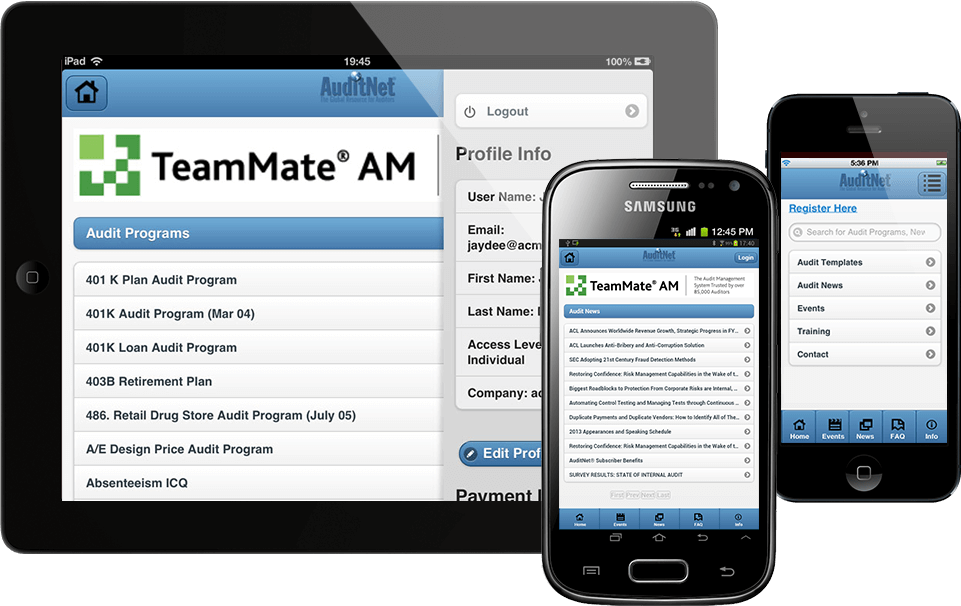
We are delighted to announce that AuditNet® is now available on Mobile both iPhone/iPad and Android. With this app, now the existing users can enjoy browsing and downloading the same rich content what they see on web app, also a new user will be able to register to the site. Now advertisers will get traffic from both web and mobile application.  For last 12 weeks a dedicated team from Andolasoft (Mobile App Developers, UI Developers, Ruby On Rails developers and QA team) worked diligently to make it available on the app stores right on time. AndolaSoft team worked on UX/UI design, app development, testing, and deployment of app to the respective apps store.

Looking into current surge of iPhone, iPad and Android devices worldwide, AuditNet® started looking for a way to provide access to the audit templates to its mobile users to target rise in subscriptions. Hence, Andolasoft proposed a cost effective solution by developing a mobile app using Cross Platform technology – PhoneGap, on top of Ruby on Rails framework, enabling to run on both iOS and Android platform. The back-end uses RESTful API hosted on AWS for smoother performance.


Auditnet_mobile_image

Auditnet_appstore1Auditnet_googleplay


About Auditnet:

AuditNet® serves the global audit community as the primary communication resource with an online digital network where auditors share resources, tools, and experience including audit work programs and other audit documentation. In 2009 AuditNet® launched Web-based training for fraud detection and prevention, IT audit, data analysis, audit software tools and techniques, enabling auditors to learn essential skills anywhere at any time. As a NASBA approved CPE sponsor AuditNet® now offers low-cost high-quality training for auditors and financial professionals, providing convenience while eliminating the need for travel.

Visit www.auditnet.org to know more.

About AndolaSoft:

Based in Silicon Valley, Andolasoft is a Web and Mobile app Development Company. Here, we do web applications using Ruby on Rails, PHP and CakePHP. We’ve expertize on Mobile App Development involving as iPhone, iPad, Android, PhoneGap andSencha.
With a team of 200+ expert developers, we deliver cutting-edge solutions within budget and on schedule. We have happy customers from across the USA, UK, Australia, Canada, Singapore, Switzerland and Brazil.

Visit andolasoft.com to know more

Andolasoft Awarded As TOP #21 iPhone App Development Company

top_10_php


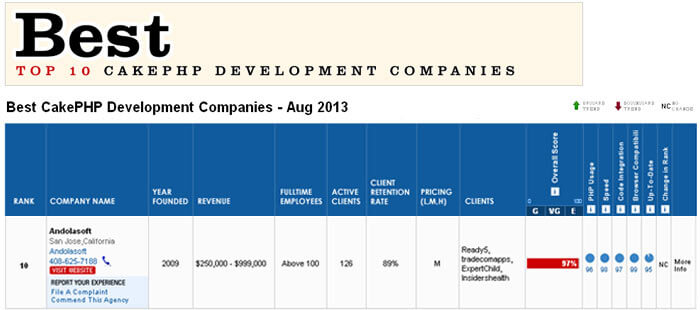
It is a great privilege to announce that Andolasoft has been ranked at 21 in Top 25 iPhone app development companies by bestwebdesignagencies.com. Heartfelt thanks to our customers for their continued appreciation which helped us to be here today.

Needless to say that our top-notch iOS app developers, our efficient project management team have been providing excellent customer service won us the rank.

Few more reasons behind our success:

  • Easy-to-use iPhone app with rich and engaging user experience
  • Agile methodology to facilitate rapid mobile app development
  • Step-by-step guidance and suggestions to our customers starting from creating an App-Store account, publishing and marketing their application
  • We provide the right technical help and resources to our customer’s need
  • Industry Best Practices
  • We help customers knowledgeable in building as well as promoting their applications
  • On-time delivery
  • Fast and responsive communication support
  • Quick turnaround service

The bestwebdesignagencies.com is an autonomous body that identifies and lists out the best design and development companies in the world. The purpose is to help customers to find the best names in the industry. They adopt a stringent evaluation process to determine the quality of work delivered by a company and customer satisfaction.

Things You Should Know Before Planning Your Mobile App-Part-I

When you are looking at all the popular apps, you too are tempted to have one of your own; however, it can’t be done overnight. It is because; there are thousands of mobile app programmers and companies who may be thinking of doing the very much similar things. To have a successful mobile app it takes lots of hard work and well defined requirements.  You need to think about the main development aspects before planning to go for your mobile app.

Basic Steps You Need to Know For Developing Mobile App:

From our experiences, here are some guidelines you must go through if you are planning to develop a successful mobile app:

  1. The most crucial step is to come up with an innovative idea. Here, you need to make sure that there is little or no competition for it.
  2. Identify your targeted audience and build your app form their perspective, something that is more likely to be appreciated by these users.
  3.  Judge and determine major pain points and challenges that you expect to face for your application. You should hire a dedicated development team who could understand your specific business requirements and turn your ideas into a working app.
  4. Make sure that your app provides good usability and practical values to the users i.e., they should find your app useful and productive.
  5. Your app should have a solid built with no loose ends. Make sure to run a vigorous crash test and beta test phase before actually publishing it. User experience must be intuitive as well as engaging. If you are willing to implement APIs, ensure that it is robust and doesn’t generate any glitches in the application.
  6. After publishing your app to the application stores, you need to start promoting and market your application. One of the best ways to reach a wider audience is by promoting it over social media. Next, you will have to avail as much positive feedback from users as possible.
  7. You should offer constant support to your customers by addressing their comments, expectations and complaints. Then you should release updates and new features for your app to woo your existing customers as well as attracting the attention of new ones.
  8. Offering basic features for free and then selling premium stuff is a popular way to keep users hooked up and to gain traction. Also make sure that the app is noticed and favored by your customer.

iOS application development and Android app development can be easily executed and managed with the help of expertise mobile app developers. Moreover, it is advisable to outsource mobile application development tasks to development companies. Hiring a professional development company would facilitate you to build flawless and unique mobile apps which would greatly leverage revenue.

How To Use “UIActionSheet” As A Pop-over View In Your IOS Apps

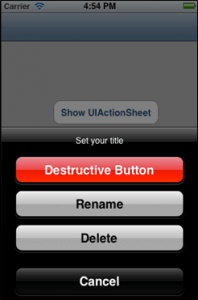
iOS-destructive_button

What is UIActionSheet

The action sheet in iOS contains a title and one or more buttons. Each of the buttons is associated with separate actions. It can be presented from a toolbar; tab bar, button bar item or from a view, however the title can be optional.

Why use UIActionSheet?

UIActionSheet is used in the following cases:

  • To show an option for a given task
  • To prompt the user to confirm an action
  • To get user input

Action sheet is dismissed by touching anywhere outside the pop-over.

How to use it?

  • Extend the UIActionSheetDeleagte in the .h header file of the ViewController
  • Then add a method named as”showActionSheet”

Example

[sourcecode]@interface MyViewController : UIViewController {

}

-(IBAction)showActionSheet:(id)sender;
@end[/sourcecode]

Initializing the UIActionSheet takes 5 following parameters

  •  initWithTitle
  • delegate
  • cancelButtonTitle
  • destructiveButtonTitle
  • otherButtonTitles

Add the following code in the .m file of viewcontroller.

Example

[sourcecode]-(IBAction)showActionSheet:(id)sender {
UIActionSheet *popupQuery = [[UIActionSheet alloc] initWithTitle:@"Set your title" delegate:self cancelButtonTitle:@"Cancel" destructiveButtonTitle:@"Destructive Button" otherButtonTitles:@"Rename",@"Delete", nil];

popupQuery.actionSheetStyle = UIActionSheetStyleBlackOpaque;
[popupQuery showInView:self.view];
[popupQuery release];
}[/sourcecode]

How to know which button was clicked by user?

There is a delegate method named as “actionSheet clickedButtonAtIndex” in which you can get the action.

[sourcecode]-(void)actionSheet:(UIActionSheet *)actionSheet clickedButtonAtIndex:(NSInteger)buttonIndex {

switch (buttonIndex) {
case 0:
NSLog(@”%@”,Destructive Button Clicked);
break;
case 1:
NSLog(@”%@”,Rename Button Clicked);
break;
case 2:
NSLog(@”%@”,Delete Button Clicked);
break;
case 3:
NSLog(@”%@”,Cancel Button Clicked);
break;
}
}[/sourcecode]

Conclusion:

UIActionSheet gives additional choices to the users for a particular action & gives a cleaner look to the app.

How Do I Implement Localization In IOS Apps?

We know that, all the apps in the Apple App Store are English-speaking, i.e. the menu, information, settings and everything else is in English. However, the apps become almost useless for the consumers from non native English speaking countries. Hence, it becomes essential for the developers to release apps with multiple language support. This is where internationalization and localization comes in handy which facilitates the iOS application developers to support numerous native languages that greatly increase the global user experience.

What Exactly Is Internationalization And Localization?

  • Internationalization and localization means adapting the software product to different languages, regional differences and technical requirements of a targeted market.
  • Internationalization is the process of designing a software application, so that it can be adapted to various languages and regions without engineering changes.
  • Localization is the process of accommodating internationalized software product for a specific region or language by adding locale-specific components and translating text.

Here Is An Example To Help You Grasp The Concept:

Let’s say there is an iPhone/iPad application made for Brazilian client and he needs to localize that product to Portuguese language so that every users of Brazil can use it.

Each and every application must contain some hardcoded strings. We need to pull all of these hardcoded strings into a separate file so that we can localize them.

To do this, create a “.strings” file in the Xcode to contain all of the strings that your project needs. Then the hardcoded strings should be replaced with a function call to look up the appropriate string from the “.strings” file based on the current language.

For example:

To create a “.string” file, follow below mentioned steps

  • Select the Project group in Xcode, and navigate to File >>New >>New File.
  • Choose iOS >>Resource >>Strings File, and click Next, as shown in the below snapshot.
  • Name the new file Localizable.strings, and then click Save.

Note that the “Localizable.strings” is the default filename; iOS looks for when dealing with localized text. If you rename the file, you’ll need to specify the name of the .strings file every time.

The format for the strings file is:

[sourcecode]"KEY" = "CONTENT";[/sourcecode]

For our ‘Account’ text add in:

[sourcecode]"TITLE" = "Account";[/sourcecode]

Now switch to “ViewController.m”, and find the “viewDidLoad” method. Now you can set the text as below:

[sourcecode]self.titleLabel.text = @"Account";[/sourcecode]

We want it to read from our “.strings” file. For this, you need to change the current line to use a macro called “NSLocalizedString” as shown below:

[sourcecode]self.titleLabel.text = NSLocalizedString(@"TITLE", nil);[/sourcecode]

Adding A Portuguese Localization

Steps to add a Portuguese localization are as follows:

  • You need to select “Localizable.strings”, and open the Info pane.
  • You can do this by selecting the 3rd tab in the top toolbar of the View section, and selecting the 1st tab in the top section, as shown in the below screenshot.

To add support for another language execute following steps:

  • You need to simply click on the ‘+’ (Plus) in that ‘Localization’ pane on the right of the view.
  • At first it will create localization for English.
  • If the “Localizable.Strings” deselect after your click then select the “Localizable.Strings” again. After the “Localizable.Strings” selected click the ‘+’ button once again and choose ‘Portuguese(pt)’ from the dropdown.

Now, Xcode has set up some directories containing a separate version of “Localizable.strings” for each language that you selected, behind the scenes. To view this for yourself, go to your project folder in Finder and open it. There you’ll get the following:

  • ‘en.lproj’ and ‘pt.lproj’ contain language-specific versions of files.
  • ‘en’ is the localization code for English, whereas ‘pt’ is for Portuguese.

To change the text for Portuguese, select ‘Localizable.strings (Portuguese)’ and change the text as follows:

[sourcecode]"TITLE" = "Conta";
“Back” = “Voltar”;
etc.
[/sourcecode]

It’s all about how to localize a string. But you also need to localize the UI, as the text length for a button may vary in different languages.

How To Adjust UI Elements:

Let’s discuss about how to localize the button text.

  • For Portuguese let’s say the button text is ‘MODIFICAR’.
  • The problem is that you need your button border to be relatively tight around the text. This isn’t a problem for title label because there is no constraint on its width, but here you’ll need to adjust the size of the button to make it look perfect.
  • If you simply change the text in “viewDidLoad” it will look odd, as the text of that button may or may not fit into it.

So you need to add localization to your “xib” and make the button bigger in Portuguese.

  • Go to “ViewController.xib” and in the info pane on the right of the view, click the ‘+’ button to add a Localization and choose Portuguese.
  • Note you may need to scroll down in the Info pane as it has some Interface Builder content in that side.
  • Now we have copy of “ViewController.xib” in our Portuguese folder (pt.lproj).
  • Select “ViewController.xib (Portuguese)”, and edit the button text in that version to say ‘MODIFICAR’.
  • It will resize the button by default.

Once, all the set up is done perfectly, delete the application from simulator/device and select Project>>Clean to get a fresh build and install. Then build and run your app.

How To Apply Localization For Images:

If you have text in your image you need to localize it.Follow the steps mentioned below.

  • Select the .jpg file and add localization for Portuguese.
  • Check out the project folder.
  • The ‘.jpg’ image file has been added to the English folder (en.lproj) and then copied to the Portuguse folder (pt.lproj).
  • To make a different image for the Portuguese version, you need to overwrite the image in the Portuguese folder.
  • Rebuild and get the final result!

Benefits:

It is better to have localization in your iOS apps to target the global users. The app will display the contents according to the visitor’s language.

  • Same information can be shared across the world.
  • Great user experience.