Memcached Vs Redis, Which One to Pick for Large Web App?

Introduction:

MemcacheD is easy yet powerful. It’s manageable design promotes fast deployment, ease of exaggeration, and solves many problems related to large data caches. It has its inbuilt APIs which provide a very large hash table distributed across multiple machines & uses internal memory management which is more efficient in the simplest use cases because it consumes comparatively less memory for metadata. MemcacheD supports only String data type which are ideal for storing read-only data.

Memcached is a volatile in-memory key-value origin. It is rude, multi-threaded and used primarily for caching objects.

Redis is an open source in-memory data structure store which also can be used as a database as well as caching. It supports almost all types of data structures such as strings, hashes, lists, sets, sorted sets with range queries, bitmaps, hyperloglogs and geospatial indexes through radius queries. Redis also can be used for messaging system used as pub/sub.

Internal Architecture:

Internal Architecture


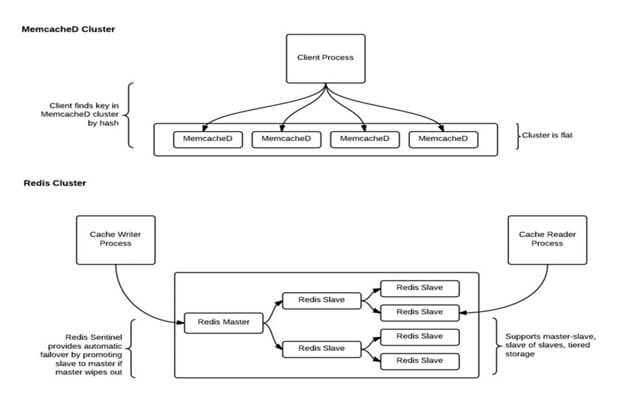
Here are the key points to consider,

Installation:

Installing Redis is so much easier. No dependencies required.

Memory Usage:

MemcacheD’s internal memory supervision, while not exactly a substitute to Redis; Is more efficient because it consumes comparatively less memory resources for metadata. For easy key-value pairs, MemcacheD is more memory efficient than Redis. Redis is more memory efficient, only after you use Redis hashes.

Persistence:

If you are using MemcacheD, data might be lost with a restart and rebuilding cache is a costly process. On the other hand, Redis can handle persistent data. By default it syncs data to the disk at least every 2 seconds, offering optional & tuneable data persistence meant to bootstrap the cache after a planned shutdown or an unintentional failure. While we tend to regard the data in caches as volatile and transient, persisting data to disk can be quite valuable in caching scenarios.

Replication:

MemcacheD does not support replication, whereas Redis supports master-slave replication. It allows slave Redis servers to be the exact copies of master servers. Data from any Redis server can replicate to any number of slaves. Replication can be used for implementing a cache setup that can withstand failures and find the maintenance for uninterrupted facilitation to the application.

Storage type:

MemcacheD stores variables in its memory & retrieves any information directly from the server memory instead of hitting the database again. On the other hand, Redis is like a database that resides in memory. It executes (reads and writes) a key/value pair from its database to return the result set. Developers use Redis for real-time metrics & analytics too.

Read/Write Speed:

MemcacheD is very good to handle high traffic websites. It can read lots of information at a time and give you back at a great response time. Redis can neither handle high traffic on read nor heavy writes.

Data Structure:

MemcacheD uses strings and integers in its data structure. Hence, everything you save can either be one or the other. With integers, the only data manipulation you can do is adding or subtracting them. If you need to save arrays or objects, you will have to serialize them first and then save them. To read them back, you will need to un-serialize.

In comparison Redis has stronger data structures, which can handle not only strings & integers but also binary-safe strings, lists of binary-safe strings, sets of binary-safe strings and sorted sets.

Key Length:

MemcacheD’s key length has a maximum of 250 bytes, whereas Redis has a maximum of 2GB.

Here is the benchmarking result by DB-Engines, which clearly shows the leader.

Conclusion:

Use Redis, if you need to do operations on cached datasets at once or need to spread one enormous cache over a geographically challenged area. Read-write splitting against caching will enormously help performance and alleviate the cache connection starvation.

On the other hand, you might want to stick to Memcached for its simplicity, reliability and speed.

SEE ALSO: How to Install and Configure Redis Server on Centos/Fedora Server

If you’re thinking anything on Ruby on Rails, get in touch with Andolasoft’s experts. Let’s convert your idea into an App.

Have something to add to this topic? Share it in the comments.

12 Security Checks to Perform Before Launching Your Rails App

In today’s interconnected world, software security is paramount. With the rise in cyber threats and the potential for data breaches, it’s crucial to ensure that your Rails application is fortified against vulnerabilities before releasing it into the wild.

Neglecting security checks can lead to devastating consequences, tarnishing your reputation and putting sensitive user data at risk.

The possible threats could be hijacking user accounts, manipulation of access control, accessing sensitive data & doctoring with garbage contents. You should act proactively to protect your valuable information.

In this comprehensive guide, we’ll walk you through the essential security checks you must perform after Rails app development and before launching your Rails app.

Here you go with some useful security tips which you cannot ignore. Courtsey, Ruby on Rails Security Guide.

  • Don’t trust logged in users (Authentication != Authorization)

    • Always check whether the current logged in user is allowed to perform operation like create, update, delete and view.
    • Devise, a library which handles authentication, to verify that you can only get to the destroy action if you’re logged in. However, Devise does not handle authorization.
    • Apart from authentication authorization must be checked prior to allow any data sensitive operation.
  • Mass assignments vulnerability. (Use attr_accessible in your models!)

    • ‘Mass Assignment’ is the name Rails has given to the act of constructing your object with a parameters hash. Using “mass assignment” that you can assign multiple values to attributes via a single assignment operator.
    • A ‘params hash’ can contain anything, so protect all sensitive attributes from re-assignment. The best way to do this is by disabling mass assignment using ‘attr_accessible’ (or attr_protected) in your models.
  • Prevent your attribute being changed from outside with attr_readonly

    • Remember to disable updating protected attributes.
    • Using ‘attr_readonly’ declaration of ActiveRecord allows the attribute to be set on create, but never edited on update.
  • SQL Injection(SQLi)

    • SQL injection (SQLi) is a code injection technique in which a user can manipulate a database in an unintended manner. Consequences of SQL injection vulnerabilities range from data leaks, to authentication bypass, to root access on a database server.
    • To get rid, never include user submitted strings in database queries. Check all model scopes and find conditions that include ‘params’ or interpolated strings.

    Instead of using such unsafe code

Post.all(:conditions => "title = #{params[:title]}")

You can have safer, simpler code like

Post.all(:conditions => {:title => params[:title]})
  • Prevent executable files from being uploaded

    • We should always distrust the user/browser provided information, to make decisions on a file’s mime/content type.
    • Validate the content type of all attachments, and place uploaded files in protected directories or on another server/service e.g. S3/Cloudfront.
    • Content-types can easily faked, so check the file extensions and be sure to disable your web server from executing scripts in the upload directory.
    • Also, beware of plugins creating or writing in temp directories during file upload operation.They may create files or directories from user submitted ‘params’ without checking the file path.
  • Avoid Redirection

    • Avoid using redirects to user supplied URLs like redirect_to(params[:some_parameter]).
    • When the arguments for a redirect comes from ‘params’, you are open to redirect to unintended URLs.
  • Security updates and patches of Gems and Plugins

    • Always check your dependencies for security updates and patches.
    • If possible subscribe to the GitHub issues list (or any mailing list) of the gems or plugins you are using.
    • Always specify the version to avoid undesirable breaks to your code.
  • Passwords in the database

    • Never ever store passwords in the database as clear text.
    • Encourage strong alphanumeric passwords and if necessary follow other strong password practices (like multiple failed logins, password expiry/reset etc.)
    • Keep encrypted password in your database like the one devise generates.
  • Make non-ActionController methods private

    • Check whether the methods you have declared in a controller is accessible to the public.
    • Change accordingly in your ‘routes’ so that it is private and inaccessible to the public.
  • Include CSRF token in all form submissions

    • Include ‘csrf_meta_tag’ helper in the HTML head tag in Rails 3.
    • Enable ‘protect_from_forgery’ and use form helpers to include the Rails authenticity token in all form submissions.
  • Cross-Site Scripting (XSS)

    • Cross-site scripting attacks occur when malicious scripts are injected into web pages and executed in users’ browsers. 
    • Employ content security policies (CSP), sanitize user-generated content, and use proper escaping methods to prevent this attack vector.
  • Cross-Site Request Forgery (CSRF)

    • CSRF attacks exploit the trust a website has in a user’s browser by tricking it into executing unwanted actions on the site. 
    • Protect against this threat by implementing CSRF tokens in your forms and utilizing the built-in Rails mechanisms.

SEE ALSO: Security Patch to deal authentication bypass for RoR

Conclusion

The security of your Rails application is not a feature that can be fixed on at the last moment. It should be an integral part of your development process from day one.

By conducting comprehensive security checks before releasing your app, you demonstrate your commitment to safeguarding user data and maintaining the trust of your audience.

In a digital landscape where threats are ever-evolving, a proactive approach to security is not just a best practice—it’s a necessity.

Rails app developers always maintain a checklist of security measures to take before releasing the app. Top Rails app development companies have even more stringent security measures and follow them from the inception of the app development.

Related Questions

Q1: What is the first step in ensuring the security of a Rails app before its release?

A1: The first step is to perform a thorough code review and security assessment of your application. This involves analyzing the codebase for potential vulnerabilities, checking for proper implementation of authentication and authorization, and reviewing the usage of third-party libraries and dependencies.

Q2: How can I prevent SQL injection attacks in my Rails app?

A2: To prevent SQL injection attacks, you should use parameterized queries or an ORM (Object-Relational Mapping) framework like ActiveRecord. Avoid constructing SQL queries using string concatenation and ensure that user inputs are properly sanitized before being used in queries.

Q3: What measures can I take to protect against Cross-Site Scripting (XSS) attacks in my Rails app?

A3: To protect against XSS attacks, implement Content Security Policies (CSP) to restrict the sources of executable content, sanitize user-generated inputs to prevent the injection of malicious scripts, and use proper output escaping methods, such as using the h helper, when displaying dynamic content.

Q4: How do I handle secure session management in my Rails app?

A4: Secure session management involves setting appropriate session expiration times, using secure and HTTP-only cookies, and ensuring proper handling of session logout upon user inactivity. Rails provides mechanisms like protect_from_forgery and the session helper to help with these aspects.

Q5: Why is it important to update third-party dependencies in my Rails app?

A5: Third-party libraries and gems often contain vulnerabilities that can be exploited by attackers. Regularly updating and patching these dependencies is crucial to address known security issues. You can use tools like Bundler Audit to identify and mitigate potential risks associated with third-party code.


Supercharge your Rails app development with “Metric_fu”

Why we need Metric_fu?

Sometimes we are unaware of unknown complexities in our rails code and it gets messy. Moreover, it reduces application performance, scalability and maintainability.

What is Metric_fu?

Metric_fu is a set of rake tasks and compilation of several different tools that provides reports. This show which parts of your rails code might need extra work. It uses the following built-in tasks to create a series of reports.

  • Rcov – Measures test coverage
  • Flog – Measures code complexity
  • Saikuro – Measures cyclomatic complexity
  • Flay – Finds duplication (both copy/paste and structural)
  • Reek – Spots code smells
  • Roodi – Finds lots of general problems
  • Churn – Identifies files that changes too often
  • Rails best practices – code matric tool
  • Cane -code quality threshold violations
  • HotSpot– Meta analysis of your metrics to find hotspots in the code

Benefits of Metric_fu

  • You can measure the complexity of rails code
  • Creates a “hit list” of most complex methods
  • Reveals hidden issues like bugs and other complexities
  • Examine worst offenders
  • Refactoring complex methods
  • Creates smaller, easier to understand methods

Step#1

  • Add ‘metric_fu’ gem to your gem file
gem "metric_fu"
  • Run “bundle install”

Metric_fu will install several other dependencies unless they are already present.
These include Flay, Flog, Rcov, Reek, Facets and Roodi.

  • Run following command to generate the metrics
rake metrics:all

It will generate a metric of your code in the temp/matric_fu repository,
it uses a number of other open source project to generate the metric.
metrics_home_page-1024x551

Rails_best_pratices_metrics-840x1024

Code analysis isn’t an exact science and none of the tools shown are perfect in themselves.
So they should all be used as an aid to help you find complex areas of your code and supercharge Rails app development.

The Best Practices for Rails App Development

“Rails” is an amazing framework to develop web applications quickly through its inbuilt helper libraries. However, there are certain best practices that you should follow to get your rails app perform better.

Conventional programming methods:

Most developers love to place the logic inside the controller and use the model for the “Active Record” operation only.

This leads to a “Fat controller and skinny model” interface which eventually kills an app’s performance and looses the maintainability of the code. This way, application stops responding when the load is high.

What should be the best practices?

Below, I have mentioned some of the most essential and useful practices that should be followed by every Ruby on Rails developer.

Fat Model, Skinny Controller

Write all the non-response-related logics inside the model with nice and testable methods; and don’t forget to use comments.

You should follow the Ruby on Rails motto i.e. “Fat Model, Skinny Controller”. Because the “skinny” controller offers a nice interface between the view and model.

By moving any logic that isn’t about the response (for example, setting a flash message, or choosing whether to redirect or render a view) to the model instead of the controller, not only you can reuse the codes where

possible but you’ve also made it possible to test your code.

Reusable Scopes

A scope is a set of constraints on database interactions (such as a condition, limit, or offset) that are chainable and reusable.

Let’s see a simple example:

[sourcecode language=”plain”]
def index
@paid_users= User.where(“is_active=? AND is_paid=?”,true, true).order(“name”)
@unpaid_users= User.where(“is_active=? AND is_paid=?”, true, false).order(“name”)
[/sourcecode]

You can change it to this:

[sourcecode language=”plain”]
def index
@paid_users= User.paid.all
@unpaid_users= User.unpaid.all
end[/sourcecode]

Then, you can move the logic to your User model, where it might look like this:

[sourcecode language=”plain”]
scope :paid, lambda { where(“is_active=? AND is_paid=?”,true, true).order(“name”) }
scope :unpaid, lambda { where(“is_active=? AND is_paid=?”,true, false).order(“name”) }
[/sourcecode]

Using the methods User.paid.all and User.unpaid.all, we’ve not only made it simpler to test our code, but also made it possible to reuse that same set of conditions in another location.

You should avoid the use of default_scope because:

  1. You can’t override default scope
  2. default_scope will affect your model initialization

Package Your Code into Gems and Plugins

Writing a particular set code more than once for different applications is exhausting as well as redundant, hence, it is advisable to create a plugin or gem to use it further. It will save your development time and effort.

Manage Your Attribute Access

While creating or updating an object, Rails app usually assigns every attribute without checking the data. Validation only prevents the bad data but doesn’t exactly prevent it from overwriting an attribute that we don’t want to change.

To solve this issue, ActiveRecord is implemented which uses two methods: attr_protected and attr_accessibile.

Using attr_protected, you can declare a blacklist of variables you don’t want to be assigned and using attr_accessible, you can declare a list of variables that can be assigned.

By implementing above steps, you could prevent any mass assignment that could occur via your application’s forms; because if the form does not have the field for a given attribute, doesn’t mean a hacker can’t add it to the request.

From a security perspective, using attr_accessible and attr_protected forces you to think about what should be editable and how to protect the ways in which your class’s attributes are set.

Use Non-database-backed Models

In Rails app, Model is not restricted to associate with table. To organize application logic, write it down by creating a new model.

Virtual Attributes

If you are manipulating data before passing it to a model, use virtual attributes instead.

Virtual attributes are a simple own getter and setter methods.

For example
To set a user’s name:

[sourcecode language=”plain”]
@user = User.new(params[:user])
@user.first_name, @user.last_name = params[:user][:name].split(" ", 2)
[/sourcecode]

By using virtual method inside the model

[sourcecode language=”plain”]
def name=(value)
self.first_name, self.last_name = value.to_s.split(“ ”, 2)
end[/sourcecode]

Whenever you set the name attribute, your model will automatically set the first_name and last_name attributes for you, even though name doesn’t exist in the database.

Use Translations

Rails i18n framework makes it easy to declare the map of an abstract context to a string.

All you need to do is maintain a YAML file of translations, and use I18n.t / t in your code where there is data shown to the use.

I18n is useful to avail your app to more locales.

Using of after_commit callback

Use “after_commit” instead of using after_create/after_update/after_destroy callbacks to start background processes. Because, in relational database, several operations are wrapped in one unit and pass or fail of transaction depends upon all the operations.

If you use after_create/after_update/after_destroy in first model and if any error occurs in the second model then the background process will raise NotFoundError.

Use select in ActiveRecord association

Use select with has_many and belongs_to on Active Record Associations to speed up the query.

For example:

[sourcecode language=”plain”]
class Patient < ActiveRecord::Base
belongs_to :physician, :select => ‘id,name, surname’
end

class Physician < ActiveRecord::Base
has_many :patients, :select => ‘id,name, physician_id’
end
[/sourcecode]

Fix N+1 Queries

N+1 Queries is a serious database performance problem. Use “Bullet” gem to avoid N+1 query problem

Conclusion:

Employing the above mentioned Rails best practices would keep the code cleaner and reusable.

The application performance would increases tremendously and the maintenance of the code will be easier.

Why Rails Framework is Popular Among Ruby Developers?

Most companies whether it’s a start-up or an established enterprise have evidently landed to the conclusion that Ruby on Rails is the most viable option for rapid and cost efficient web app development.

Ruby on Rails or simply called ‘Rails’ is an open-source, full-scale multilevel web app framework that implements MVC development architecture for the Ruby programming language and is supported by a strong community around it.

Several reasons lie to use Ruby on rails, the main one is that it is a better choice than any other tools. However, before proceed forward let’s have a quick look on:

What Is Ruby On Rails?

Ruby is a dynamic, general purpose, interpreted language used for object oriented programming. The Framework has simple coding that a non-technical person can understand to some extent.

Developing new software using Ruby seems to be bit tedious. Rails, a special tool, was developed to optimize the development process.

Rails is the web development framework which is written in the Ruby language. After 9 years of development, Ruby was introduced.

Never miss an update from us. Join 10,000+ marketers and leaders.

With this development the ruby on rails developers can easily makes the web app programming.

Ruby on Rails(Source: Clariontech)

Let’s take a quick look on the features of ROR:

Mature Framework

Ruby on Rails was first released in 2003, which possessed several large and actively maintained APIs that make application development faster, easier and more manageable. One of the best examples is CSRF (Cross Site Request Forgery) protection; using which, you don’t have to do anything to add CSRF. Active Record is an extremely powerful feature in terms of building usable data models.

MVC Architecture:

With Ruby on Rails development is based on the model, controller and view pattern, widely used web application architecture. Therefore, developers using other MVC framework languages can find Ruby on Rails to be more user-friendly.

By using Ruby on Rails architecture, you can get separate codes for different functions, i.e. data layer, presentation layer, and can maintain a resource layer.

Generators/Scaffolding:

It’s a rapid prototyping tool; Rails’ scaffold will generate a starting point that allows us to list, add, remove, edit, and view things. It will explain the command, the model name and related database table, naming conventions, attributes and types.

The generated script will produce files of Ruby code that the application can use to interact with the database. It is somewhat less convenient than dynamic scaffolding, but gives the programmer the flexibility of modifying and customizing the generated APIs.

Gems/Plugin:

Ruby gems are highly portable chunks of Ruby code that can be used inside any Ruby script or application.

Rails plugins have the flexibility to hook into every part of Rails, including generators, rake tasks and tests/specs. Rails-specific features cannot be used with other Ruby frameworks like Merb, Sinatra, etc.

Active Record ORM:

Object-Relational Mapping (ORM) is a technique that connects the rich objects of an application to tables in a relational database management system.

Active record pattern is an architectural pattern found in Ruby on Rails that stores its data in relational databases. It relies heavily on the naming in that it uses class and association names to establish mappings between respective database tables and foreign key columns.

Integrated Testing Tools:

Rails features a convenient testing tool, for which, it automatically starts producing the skeleton test code in background whilst you are creating the application models and controllers.

Rails tests can also simulate browser requests and thus you can test your application’s response without having to test it over the browser.

Some convenient tools for testing Rails application:

  • Test Unit
  • RSpec
  • Cucumber
  • Mocha
  • Flexmock
  • Factory Girl

Version Control Systems:

There are numerous version control systems. CVS was the first system widely used in the open-source community. Several years ago, it was largely replaced by Subversion (SVN). And in early 2008, most of the Rails world moved to a newer version control system, called GIT.

I’ve worked with the team at Andolasoft on multiple websites. They are professional, responsive, & easy to work with. I’ve had great experiences & would recommend their services to anyone.

Ruthie Miller, Sr. Mktg. Specialist

Salesforce, Houston, Texas

LEARN MORE

Git is usually the best choice if you are new to Ruby, because nearly all code that you need to fetch as examples or libraries will be available via a GIT repository.

Conclusion

With Ruby on Rails providing a programming framework that includes reusable, easily configurable components commonly used for creating web-based applications, it is gaining traction with developers.

From the recent studies on the job growth trends, it is seen that Ruby on Rails developers are a very hot commodity. Ruby as the language of the cloud, the job market will continue to show high demand for the developers. It’s nearly impossible to be an unemployed Ruby on Rails developer.

RoR_graph_new1-1024x532 (1)

If you are in search of a dedicated developer, to create your ruby application, then contact us.

Our dedicated ruby developers will deliver a quick and efficient solution by developing a web application of your requirement.

How to Install & Configure Redis-Server on Centos/Fedora Server

‘Redis’ is an Open source key-value data store, shared by multiple processes, multiple applications, or multiple Servers. Key values are more complex types like Hashes, Lists, Sets or Sorted Sets.

Let’s have a quick look on the installation steps of “Redis

Here we go…

Step – 1

First of all we need to switch to superuser & install dependencies:

[code language=”html”]
su
yum install make gcc wget tcl
[/code]

Step-2
Download Redis Packages & Unzip. This guide is based on installing Redis 2.8.3:

[code language=”html”]
wget http://download.redis.io/releases/redis-2.8.3.tar.gz
tar xzvf redis-2.8.3.tar.gz
[/code]

Step-3
Compiling and Installing Redis from the source:

[code language=”html”]
cd redis-2.8.3
make
make install
[/code]

Step- 4

Starting Redis server by executing the following command without any argument:

[code language=”html”]
redis-server
[/code]

Step-5

Check if Redis is working. To check, send a PING command using redis-cli. This will return ‘PONG’ if everything is fine.

[code language=”html”]
redis-cli ping
PONG
[/code]

Step-6

Add Redis-server to init script. Create a directory to store your Redis config files & data:

[code language=”html”]
mkdir -p /etc/redis
mkdir -p /var/redis
[/code]

Also we need to create a directory inside “/var/redis” that works as data &  a working directory for this Redis instance.

[code language=”html”]
mkdir /var/redis/redis
[/code]

Step-7

Copy the template configuration file you’ll find in the root directory of Redis distribution into /etc/redis/

[code language=”html”]
cp redis.conf /etc/redis/redis.conf
[/code]

Edit the configuration file, make sure to perform the following changes:

  • Set daemonize to yes (by default it’s set to ‘No’).
  • Set the pidfile to /var/run/redis.pid
  • Set your preferred loglevel
  • Set the logfile to /var/log/redis.log
  • Set the dir to /var/redis/redis
  • Save and exit from the editor

Step-8 
Add the Redis init script.

[code language=”html”]
vi /etc/init.d/redis
[/code]

And paste the following codes to it

[code language=”html”]
#!/bin/sh
#
# chkconfig: 345 20 80
# description: Redis is an open source (BSD licensed), in-memory data structure store, used as database, cache and message broker.

# Source function library.
. /etc/init.d/functions

REDISPORT=6379
EXEC=/usr/local/bin/redis-server
CLIEXEC=/usr/local/bin/redis-cli

PIDFILE=/var/run/redis.pid
CONF="/etc/redis/redis.conf"

case "$1" in
start)
if [ -f $PIDFILE ]
then
echo "$PIDFILE exists, process is already running or crashed"
else
echo "Starting Redis server…"
$EXEC $CONF
fi
;;
stop)
if [ ! -f $PIDFILE ]
then
echo "$PIDFILE does not exist, process is not running"
else
PID=$(cat $PIDFILE)
echo "Stopping …"
$CLIEXEC -p $REDISPORT shutdown
while [ -x /proc/${PID} ]
do
echo "Waiting for Redis to shutdown …"
sleep 1
done
echo "Redis stopped"
fi
;;
restart)
stop
start
;;
*)
echo "Please use start or stop as first argument"
;;
esac
exit 0
[/code]

Save the file and exit from the editor.

Step-9
Give appropriate permission to the init script

[code language=”html”]
chmod u+x /etc/init.d/redis
[/code]

Step-10
To run the Redis server at startup we need to add it to the chkconfig list.

[code language=”html”]
chkconfig –add redis
chkconfig –level 345 redis on
[/code]

Step-11
Finally we are ready to start the Redis Server.

[code language=”html”]
/etc/init.d/redis start
[/code]

The redis server will start automatically on system boot.

Conclusion:

‘Redis’ also supports datatypes such as Transitions, Publish and Subscribe. ‘Redis’ is considered more powerful than ‘Memcache’. It would be smart to bring ‘Redis’ into practice and put ‘Memcache’ down for a while.

We provide one-stop solution by utilizing Redis server with Rails , PHP applications and deploy in cloud services such as AWS to make sure that the application is fully scalable.

You can also check the compression of Memcached vs Redis, to know more information on which one to pick for Large web apps?

Do you have anything to add here? Share your thoughts with comments.

It’s always pleasure to hear from you and for5 any assistance and support on AWS you can write us at info@andolasoft.com.