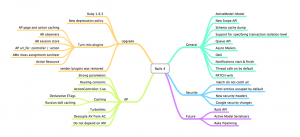
What new features you will get in the latest release of Rails4

Rails_4-300x137

Introduction:

Finally, the most awaited Rails 4.0 version has been released by the Rails team on 25th of June. Rails 4 has got huge changes. There are tons of new features available, which can make your life as a Rails developer a lot easier. We will talk about the most exciting features in Rails 4 and why you should upgrade from Rails 3 version as soon as possible.

New features of Rails4

1. Ruby Versions

It is essential to note that Rails 4 would require Ruby 1.9.3 or higher, in fact Ruby 2.0.0 is recommended for your Rails 4 apps.

2. ‘Gemfile’

Rails now uses a ‘Gemfile’ in the application root to determine the gems you need for your app to start. This ‘Gemfile’ is processed by the Bundler gem, which then installs all the dependencies. It can also install all the dependencies locally to your app so that it doesn’t depend on the system gems.

Read Also: How to do tagging in Rails with gem ‘Acts_as_taggable_on’?

3. ‘Threadsafe’ by Default

Rails 4 will be thread-safe by default i.e. removing overhead and improving the performance on threaded servers, like thin and puma. You will have to ensure that your application and its dependencies are thread-safe, in other words, avoiding global state e.g. class or global variables.

4. No More vendor/plugins

Rails 4.0 will no longer support loading of plugins from vendor. You must replace any plugins by extracting them to gems and adding them to your ‘Gemfile’. If you choose not to make them gems, you can also move them into a different directory such as lib/my_plugin/* and add an appropriate initializer in config/initializers/my_plugin.rb.

5. New Testing Directories

The biggest change made to the testing of Rails 4 app is not the swapping of the testing framework, rather the testing folder structure. The test folder will now have a structure very similar to RSpec:

  • controllers:
  • fixtures
  • helpers
  • integration
  • mailers
  • models

Developers will no longer have to worry if the test is “functional” or a “unit”. The structure provides a clear separation of where the tests in your application should go.

6. Strong Parameters

In Rails 4, a new pattern has been introduced to secure your models from mass assignment. You can filter the parameters passed to your model in the controller instead of ‘whitelisting’ the attributes in your model using “attr_accessible”.

[sourcecode]class PostController < ApplicationController
def create
@post = Post.create(params[:user])
end
end[/sourcecode]

You can protect against unexpected input with declarations in the model using “attr_accessible”.

[sourcecode]attr_accessible :title, :description[/sourcecode]

In Rails 4, you don’t need to worry about unexpected input attributes in your model anymore.
Strong Parameters gem moves user input into the controller.

[sourcecode]class PostController < ApplicationController
def create
@post = Post.create(post_params)
end

private
def post_params
params.require(:post).permit(:title, :description)
end
end[/sourcecode]

The “params hash” in your controller is not a normal hash. It’s actually an instance of ActionController::Parameters, which exposes the “require” and “permit” methods.

The “require” method ensures that the specified key is available in the “params” hash, and raises an ActionController::ParameterMissing exception if the key doesn’t exist.

The “permit” method protects you from unexpected mass assignment.

7. Renamed Callbacks

Action callbacks in controllers are now renamed from *_filter to *_action

Example:

[sourcecode]before_filter :before_action
arround_filter :arround_action
after_filter :after_action[/sourcecode]

All existing *_filter methods will still work with no deprecation warnings. However, It would recommend to replace of *_filter calls to *_action

8. Rails 2 Model.find(:[all|:first:last]) syntax is now deprecated.

9. Deprecated dynamic finders

Rails 4 deprecates all dynamic finder methods (with the exception of find_by and find_by_…). Instead, you’ll use where

[sourcecode]find_all_by_… => where(…)
scoped_by_… => where(…)
find_last_by_… => where(…).last
find_or_initialize_by… => where(…).first_or_initialize
find_or_create_by… => where(…).first_or_create
find_or_create_by_…! => where(…).first_or_create![/sourcecode]

The deprecated finders gem will be included as a dependency in 4.0 and removed in 4.1. The gem, however, will be around and maintained until 5.0.

10. Queuing system

Rails4 added the support for a queue to run background jobs. The queuing API is very simple. The ActiveSupport::Queue class comes with a push method that accepts any object, as long as that object defines a run method.

Example
Let’s say that you have a job class TestJob that prints the name of an author

[sourcecode]class TestJob
def run
puts "I am running!"
end
end[/sourcecode]

You can queue a job to print “I am running!” in the background by pushing an instance of that class to Rails.queue:

[sourcecode]Rails.queue.push(TestJob.new)
"I am running!"[/sourcecode]

The job will run in a background thread and it will not block any of your operations.

11. Live Streaming

Live Streaming is a major new feature in Rails 4. It facilitates you to stream data to the browser. Enabling live streaming requires you to mix in the ActionController::Live class in your controller.

[sourcecode]class MyController < ActionController::Base
include ActionController::Live
def stream
response.headers[‘Content-Type’] = ‘text/event-stream’
100.times {
response.stream.write "hello world\n"
sleep 1
}
response.stream.close
end
end[/sourcecode]

It will stream the string “hello world” to your client 100 times.

You should take notice of following things

  • Manually close the stream after you are done streaming in the browser.
  • Headers must be written first before writing anything to the client.
  • You will need a concurrent Ruby web server, such as puma.io, Rainbow or Thin. Using the default ‘WEBrick’ server won’t work, since it buffers all the output. Also note that Unicorn won’t work either, since it kills the connection after 30 seconds.
  • All controllers that include ActionController::Live would be executed in another thread, so make sure your code is thread-safe.

12. Rails 4 and Hstore from Postgres 9.2

ActiveRecord in Rails 4 will now support the PostgreSQL hstore extension. This database extension allows a new data type for a column in PostgreSQL called ‘hstore’ which effectively represents a string-only hash. For most purposes this would be similar to serializing data in a text column, but the fact that this is now a native datatype, it would grant a huge performance boost and the capability to query against it directly. You can now have a hint of a schema-less database available to your application without needing to perform a full upgrade to MongoDB, CouchDB, Riak or other similar schema-less data store.

13. Cache Digests (Russian Doll Caching)

Make it super easy to do Russian Doll-caching through key-based expiration with automatic dependency management of nested templates

14. Turbolinks

Now you can speed-up the client-side with ‘Turbolinks’. It essentially turns your app into a single-page ‘JavaScript’ application in terms of speed, but with none of the developmental drawbacks (except, maybe, compatibility issues with some existing JavaScript packages).

15. Routing Concerns

In Rails 4, routing concerns has been added to the router. The basic idea is to define common sub-resources (like comments) as concerns and include them in other resources/routes.

16. Rails3 code

[sourcecode]resources :posts do
resources :comments
end
resources :articles do
resources :comments
resources :remarks
end[/sourcecode]

In rails4 the concern routes will only be included within a resource by passing it to the routing option :concerns. The :concerns option can accept one or more concerns.

[sourcecode]concern :commentable do
resources :comments
end
concern :remarkable do
resources :remarks
end
resources :posts, :concerns, :commentable
resources :articles, :concerns =>[:commentable, :remarkable][/sourcecode]

Why we should upgrade to rails4?

Rails4 is recommended to be used with Ruby 2.0.0. It stopped supporting Ruby 1.8.x after Rails 3.2. Ruby 1.9.2+ will be supported until Rails 5 is released!

Aware of any other not-so-obvious features? Please post it in the comments below.

How to configure Rails application with Puma and Ngnix on CentOS

Rails__new_0912

Puma is a multi-threaded high performance web server written in Ruby. Currently it is very popular in market as a ruby application server. We can use it for any kind of ruby web application that supports rack. Here, I have mentioned detailed steps to help you configure Rails application with Puma and Nginx on CentOS.

Steps to install Puma:

We can install puma via RubyGems.

1. Append the below line to your Gemfile, if you have Rails 3.0 or above:

[sourcecode]gem ‘puma’, ‘~> 2.0′[/sourcecode]

2. Then we have to issue the below command to install puma

[sourcecode]# bundle install[/sourcecode]

3. Now you can run your application with puma using the below command

[sourcecode]# RAILS_ENV=production bundle exec puma -e production –b unix:///var/run/my_app.sock[/sourcecode]

You should see the following outcomes:

[sourcecode]Puma 2.0.1 starting…
* Min threads: 0, max threads: 16
* Environment: production
* Listening on unix:///var/run/my_app.sock
Use Ctrl-C to stop[/sourcecode]

4. Press Ctrl-C and stop the process for now. We will start the server again after installation and configuration of ‘Ngnix’.

Steps to Install Ngnix:

1. To install Nginx on CentOS type below commands

[sourcecode]# wget http://nginx.org/packages/centos/6/noarch/RPMS/nginx-release-centos-6-0.el6.ngx.noarch.rpm
# rpm -ivh nginx-release-centos-6-0.el6.ngx.noarch.rpm
# yum install nginx[/sourcecode]

Configuring Ngnix:

1. First we have to create a virtual host file

[sourcecode]#vi /etc/nginx/conf.d/my-NewProject.conf[/sourcecode]

2. Now add the below line to your config file (Change fields as your requirement)

[sourcecode]upstream my_app
{
server unix:///var/run/my_app.sock;
}
server {
listen 80
server_name www.example.com; # change to match your URL
root /var/www/html/my_app/public; # I assume your app is located at this location
location / {
proxy_pass http://my_app; # match the name of upstream directive which is defined above
proxy_set_header Host $host;
proxy_set_header X-Forwarded-For $proxy_add_x_forwarded_for;
}
}[/sourcecode]

3.Then we have to restart the Ngnix

[sourcecode]#service nginx restart[/sourcecode]

4.After restarting the Ngnix we need to again start puma

[sourcecode]# cd /var/www/html/my_app/
# RAILS_ENV=production bundle exec puma -e production -b unix:///var/run/my_app.sock
Puma 2.0.1 starting…
* Min threads: 0, max threads 16
* Environment: production
* Listening on unix:///var/run/my_app.sock
Use Ctrl-C to stop</pre>
<pre>[/sourcecode]

Now you will be able to browse your application.

Type the Server Name you mentioned on your virtual host configuration.

For example: http://www.example.com

How to run Puma as a demon:

1. If you want to run puma as a foreground process (daemon) then start puma with –d option with the following command

[sourcecode]# RAILS_ENV=production bundle exec puma -e production -d -b unix:///var/run/my_app.sock[/sourcecode]

2.To verify whether puma is running or not we have to issue the below command

[sourcecode]# ps aux | grep puma
root  19119 13.1  1.3  43276 27792 ?   Sl   21:02   0:01 ruby /usr/local/rvm/gems/ruby-1.9.3-p0@tapas1/bin/puma -e production -d -b unix:///var/run/my_app.sock[/sourcecode]

Finally-steps to stop and restart our puma server

‘pumactl’ is a command line that helps to stop and restart the application server. It takes parameter from the file where we store the puma process state.

1.Currently we have to kill the running process of puma by issuing following command.

[sourcecode]pkill –f puma[/sourcecode]

2. You can again verify the process is running or not by issuing the following command:

[sourcecode]# ps aux | grep puma[/sourcecode]

3.Then start the puma with –S option

[sourcecode]RAILS_ENV=production bundle exec puma -e production -d -b unix:///var/run/my_app.sock -S /var/run/my_app.state –control ‘unix:///var/run/my_app_ctl.sock'[/sourcecode]

4.Now puma would generate the file /var/run/my_app.state like below content:

[sourcecode]pid: 20937
config: !ruby/object:Puma::Configuration
options:
:min_threads: 0
:max_threads: 16
:quiet: true
:debug: false
:binds:- unix:///var/run/my_app.sock
:workers: 0
:daemon: true
:worker_directory: /var/www/html/my_app/
:environment: production
:state: /var/run/my_app.state
:control_url: unix:///var/run/my_app_ctl.sock
:control_auth_token: c0c3983017b972da3318a33349e8ee
[/sourcecode]

5.Now, you can restart and stop your application with ‘pumactl’ using the file /var/run/my_app.state

a) To restart puma server issue the following command

[sourcecode]bundle exec pumactl -S /var/run/my_app.state restart[/sourcecode]

b) To stop the puma server issue the following command

[sourcecode]bundle exec pumactl -S /var/run/my_app.state stop[/sourcecode]

Following the above mentioned steps would result you with a clean configuration of Rails application with ‘Puma’ and ‘Nginx’.

Recommended Reading: New features of Rails4

Unveiling FeedZirra: Simplifying Feed Parsing in Your Rails Application

What is a Feed?

A feed is a data format which is used to provide frequent updates and latest contents to the users. A feed has no particular type; it could be news, latest technology, game, gadgets, sports etc. These feeds can be easily parsed into your Rails application to make it more useful for the users. The feed is build up with XML and has particular format type.

What is Feedzirra?

“Feedzirra” on the other hand is a feed library built on Ruby that is designed to get and update a number of feeds as fast as possible. This includes using “libcurl-multi” through the “curb” gem for faster http gets, and “libxml” through “nokogiri” and “sax-machine” for faster parsing.

Suppose you need to add some updated information to your Rails application from other feed site like ‘feedburner’, in such cases you can easily work it out by using the gem “feedzirra”.

Here are the steps to use ‘feedzirra’ in your Rails application.

Step-1

Add the gem ‘feedzirra’ in to your gem file.

[sourcecode language=”plain”]gem ‘feedzirra'[/sourcecode]

Run ‘bundle install’ to install the gem along with its dependencies.

Step-2

Modify your controller where you are fetching the feeds.

[sourcecode language=”plain”]require ‘feedzirra'[/sourcecode]

Step-3

Now, write the following code in your method in order to parse feeds from an external site.

[sourcecode language=”plain”]feed =Feedzirra::Feed.fetch_and_parse("http://feeds.feedburner.com/TechCrunch/gaming")
@entry = feed.entries
[/sourcecode]

Note: Here we are parsing the feeds from ‘feedburne’r site with updated information on gaming news.

Step-4

Now, open your view section and write the following code snippet to display the information regarding the feeds.

[sourcecode language=”plain”]<ul>
<%@entry.each do |t|%>
<li>
<%= link_to "#{t.title}", "#{t.url}",:target => "_blank" %>
<%=t.author%>
<%=t.content%>
<%=t.published%>
<%=t.categories%>
</li>
<%end%>
</ul>
[/sourcecode]

Note: The above code will display the feed title, author name, content, published date and category type. Clicking the feed title, will launch a new tab in browser and display the detail information of that feed.

Step-5

You can also fetch multiple feeds by writing the following code.

[sourcecode language=”plain”]feed_urls = ["http://feeds.feedburner.com/PaulDixExplainsNothing", "http://feeds.feedburner.com/trottercashion"]
feeds = Feedzirra::Feed.fetch_and_parse(feed_urls)
[/sourcecode]

Conclusion:

The FeedZirra gem empowers Rails developers to seamlessly integrate feed parsing capabilities into their applications. 

Are you looking for a Ruby on Rails developer

Contact Us

Whether you’re building a news aggregator, a blog reader, or a content recommendation system, FeedZirra simplifies the process of retrieving and presenting timely content from various sources. 

By harnessing the power of FeedZirra, you can enhance user engagement, keep your app’s content fresh, and deliver a more dynamic user experience.

Related Questions

Q1: What is the FeedZirra gem, and how does it simplify feed parsing in Rails applications?

The FeedZirra gem is a powerful tool in the Ruby ecosystem that provides a user-friendly way to parse RSS and Atom feeds. It abstracts the complexities of handling different feed formats, making it easier for developers to extract and utilize the content they need within their Rails apps.

Q2: How can I integrate the FeedZirra gem into my Rails application for parsing feeds?

To integrate the FeedZirra gem into your Rails app, start by adding it to your Gemfile with the following line: gem ‘feedzirra’. After running bundle install, you can fetch and parse feeds using the Feedzirra::Feed.fetch_and_parse method. This allows you to access the feed’s entries (articles) and display them in your app.

Q3: What are some of the advanced features offered by the FeedZirra gem for feed parsing in Rails?

The FeedZirra gem provides several advanced features, including access to various properties of feed entries such as publication date, author, summary, and content. It also offers automatic HTML content sanitization to ensure safe rendering. Additionally, you can implement caching to reduce the load on feed sources and optimize performance.

Q4: How does the FeedZirra gem benefit developers when integrating feed parsing into their Rails applications?

The FeedZirra gem brings several benefits to developers, including streamlined efficiency by handling the intricacies of feed parsing. It supports multiple feed formats (RSS and Atom), making it compatible with a wide range of sources. The gem’s simple API is designed for ease of use, catering to developers of various skill levels. Moreover, it provides customization options to tailor parsed feed content to suit your app’s design and requirements.

Q5: Can the FeedZirra gem be used to enhance user engagement and content freshness in Rails apps?

Absolutely. By utilizing the FeedZirra gem to parse feeds, you can enhance user engagement by providing fresh and relevant content from various sources. Whether you’re building a news aggregator, a blog reader, or a content recommendation system, integrating feed parsing into your Rails app with FeedZirra helps create a dynamic user experience that keeps users informed and engaged.

3 Easy Steps to optimize Queries in Rails using ‘Bullet’

In the world of web development, performance optimization is a crucial aspect that can make or break the user experience. 

One area that often demands attention is database query optimization. Rails developers, rejoice!

The ‘Bullet’ gem is here to help you fine-tune your database queries and boost your application’s speed and efficiency. In this blog, we’ll delve into the steps to optimize queries in your Rails app using the powerful ‘Bullet’ gem.

First,

let me introduce you to the ‘Bullet’ gem

‘Bullet’ is a ruby gem which facilitates the developers by alerting when an application performs an inefficient database query, such as an N+1 query. It is one of the most efficient tool to optimize a Rails application.

Traditional Method (w/o optimization):

This example illustrates the old-fashioned method of optimizing a query.

For example there are two models, one is Order and other is Product’. And an order has many products. Then the code for order listing page will be

In app/controllers/orders_controller.rb

class OrdersController < ApplicationController
  def index
    @orders = Order.all
  end
end

In app/views/orders/index.html.erb

<h1>Orders</h1>

<% @orders.each do |order| %>
  <div class="order">
    <h2><%=link_to order.title, order_path(order)%></h2>
  </div>
  <%order.products.each do |product|%>
     <ul class=”product”>
        <li><%=link_to product.title, product_path(product)%></li>
     </ul>
  <%end%>
<% end %>

These codes would generate N+1 query issues, because here we have queried just once to get the orders and then separate queries for each order to fetch its products. These sorts of problems can be easily overlooked during development.

‘Bullet’ gem comes in handy for avoiding such problems.

Optimized Method – integrating gem ‘Bullet’:

Let me explain in just 3 easy steps, how the gem ‘Bullet’ can be integrated to optimize the query,

Step#1 – Add the gem to the Gemfile

Example

/Gemfile.rb

  gem 'bullet', '4.6.0', :group => “development”

Run “bundle install” to install the bullet gem in the development group.

Step#2 – Configuration setting in development.rb file

To enable Bullet change its configuration with the after_initialize block in the development.rb file. Set alert as true to get alert popup through the browser.

config.after_initialize do 
    Bullet.enable = true 
    Bullet.alert = true  
    Bullet.bullet_logger = true 
    Bullet.console = true 
    Bullet.rails_logger = true 
  end

Step#3 – Restart the Server

Restart the server as well as reload the page.
After completing the above mentioned steps a JavaScript alert popup would appear with the detected N+1 query. The alert would display the file containing the issue as well as what could be done to overcome the problem.

The previous N+1 query can be fixed by following below mentioned steps:

In Controller,

lass OrdersController < ApplicationController
  def index
    @orders = Order.includes(:products)
  end
end

After changing the statement from ‘Order.all’ to ‘Order.includes’(:products). We can fetch the products through eager loading. Now, if we reload the page we wouldn’t get any alert as we are fetching the efficiently. Here the data is fetched by only two queries, one to get the orders and the other to get the products in those orders.

‘Bullet’ can also tell us when we’re doing eager loading unnecessarily. Let’s say in the order listing page only order will be displayed. So, we removed the code that was displaying the list of products. Now after reloading the page we will get an alert popup displaying that Bullet has detected unused eager loading.

Step 4: Run Your App

With ‘Bullet’ enabled, navigate through your application by using its various features. ‘Bullet’ will keep a close eye on your queries and provide alerts if it detects N+1 query problems or suggests eager loading opportunities.

Step 5: Review Alerts

As you interact with your app, pay attention to any alerts generated by ‘Bullet.’ It will notify you about potential N+1 query issues, which occur when a single query fetches associated records for multiple main records, leading to excessive database hits.

Step 6: Eager Loading Optimization

When ‘Bullet’ suggests eager loading, take action by optimising your queries. Use ActiveRecord includes or eager_load methods to load associated records in advance, reducing the need for multiple queries.

Benefits:

  • No need to search the codes in each file to figure out the inefficient database query.
  • Bullet can notify us, through an alert message, by writing in the console or in the log file.
  • Prevent our application from performing an inefficient database query like an N+1 query.
  • It can also detect unused eager loading.

Conclusion

The ‘Bullet’ gem is a powerful tool that empowers Rails developers to optimize their application’s database queries and improve overall performance. 

By following the step-by-step guide outlined in this blog, you can easily integrate ‘Bullet’ into your development workflow, identify potential N+1 query problems, and capitalize on eager loading opportunities. 

Embrace the ‘Bullet’ gem and take your Rails app’s speed and efficiency to new heights, ensuring a seamless and delightful user experience.

Related Questions

Q1: What is the main purpose of the ‘Bullet’ gem in a Rails application?

Ans:
The ‘Bullet’ gem serves as a performance optimization tool in Rails applications. It monitors queries and helps identify potential N+1 query issues and opportunities for eager loading, ultimately optimizing database queries for improved application performance.

Q2: What steps are involved in installing and configuring the ‘Bullet’ gem for query optimization?

Ans:
To optimize queries using the ‘Bullet’ gem, start by adding it to your Gemfile. After installation, configure the gem in your config/environments/development.rb file by enabling it, enabling alerts, and setting up bullet logging. This allows ‘Bullet’ to monitor and alert you about query-related issues.

Q3: How does the ‘Bullet’ gem help in identifying N+1 query issues?

Ans:
The ‘Bullet’ gem identifies N+1 query problems by analyzing your application’s query patterns. If it detects instances where multiple queries are being executed to retrieve associated records for a main record, it generates alerts. These alerts prompt developers to address the issue and optimize queries through eager loading.

Q4: What is eager loading, and how does the ‘Bullet’ gem assist in optimizing it?

Ans:
Eager loading is a technique to fetch associated records in advance to avoid N+1 query problems. The ‘Bullet’ gem suggests opportunities for eager loading by analyzing query patterns. When an N+1 query issue is detected, ‘Bullet’ recommends using ActiveRecord’s includes or eager_load methods to load associated records efficiently.

Q5: What are the benefits of using the ‘Bullet’ gem for query optimization in Rails applications?

Ans:
Using the ‘Bullet’ gem offers several benefits, including optimized queries that reduce database hits, enhanced application performance, increased developer productivity through quick problem identification, and efficient use of eager loading to minimize query-related issues. Overall, it leads to a smoother user experience and improved application responsiveness.

Steps to execute pagination using “Kaminari” gem in Rails3

Pagination is a technique that divides content into manageable chunks, allowing users to easily browse through a dataset. 

In this blog, we’ll dive into the process of implementing pagination using the “Kaminari” gem in a Rails 3 application. 

Kaminari is a powerful and flexible gem that simplifies the pagination process, enhancing the performance and usability of your web application.

Key Features:

  • Easy to use.
  • Customizable engine-based I18n-aware helper.
  • The pagination helper outputs the HTML5 <nav> tag by default and the helper supports Rails 3 unobtrusive Ajax.

Recommended Reading: AJAX Pagination using jQuery in Rails3

Here are the steps to implement “kaminari gem” in a Rails app.

Step#1

  • Put this code in your Gemfile:

[sourcecode]gem ‘kaminari'[/sourcecode]

  • Run “bundle install”

Step#2

  • Modify the controller as mentioned below

[sourcecode]@blogs = Blog.order("name").page(params[:page])[/sourcecode]

Step#3

  • Now, add the paginate helper method in your listing page which is provided by Kaminari, by passing in the list we’re paginating.

[sourcecode]<%= paginate @blogs%>[/sourcecode]

Step#4

  • When the page reloads, the pagination links will be visible. Kaminari will show 25 items per page by default, but we can easily change that by calling another scope called “per” as mentioned below.

[sourcecode]@blogs = Blog.order("name").page(params[:page]).per(10)[/sourcecode]

  • Now it should display 10 items per page.

Step#5

  • You can configure the below mentioned default values of kaminari by running the command

[sourcecode]rails g kaminari:config[/sourcecode]

It’ll generate a file “kaminari_config.rb” in your config/initializers folder with the following code snippet as commented.

[sourcecode]
default_per_page # 25 by default
max_per_page # nil by default
window # 4 by default
outer_window # 0 by default
left # 0 by default
right # 0 by default
page_method_name # :page by default
param_name # :page by default[/sourcecode]

  • Next, you can change the values according to your requirement.
  • If you change your view page like:

[sourcecode]<%= paginate @blogs, :window => 2 %> [/sourcecode]

  • The output will be:

[sourcecode]« First ‹ Prev 1 2 3 4 5 … Next › Last »[/sourcecode]

  • There are some other custom attributes you can use in view page like:

[sourcecode]
<%= paginate @users, :outer_window => 3 %>
<%= paginate @users, :left => 1, :right => 3 %>
<%= paginate @users, :params => {:controller => ‘foo’, :action => ‘bar’} %>
<%= paginate @users, :remote => true %> [/sourcecode]

Kaminari also includes a handy template generator. You can override them by running following command.

[sourcecode]rails g kaminari:views default[/sourcecode]

It’ll generate a “Kaminari” folder in app/views with dependent files inside it.

I hope you liked it. If you want you can contact our experienced ruby on rails developer for your webs and mobile application.
Please leave your comment about this post on the comment section below.

You’re just 2 steps away from implementing ‘Backbone’ in Rails 3

backbone1-300x300-123

Before illustrating steps to implement ‘Backbone.js’, let me explain what ‘Backbone.js’ really is. It is a convenient way to organize client side ‘JavaScript’ code into MVC pattern of Rails server applications. Just like in Rails, It has ‘Models’ to represent data, ‘Views’ to render it and ‘Controllers’ to coordinate between the two. It also has an object called “collection” which manages a list of models. Backbone was also designed with Rails backend in mind, and is easier to connect to a server application using JSON in order to transfer data back and forth.

Why need to implement ‘Backone.js’ into Rails applications:

  • The major advantage of “Backbone.js” is that it’s simple, lightweight, and provides structure to organize large JavaScript projects.
  • “Backbone.js” helps to reduce the load of server for code that really doesn’t need to be executed server-side.
  • Flexible with regards to data persistence.
  • Easier integration with RESTful interfaces.
  • “Backbone.js” gives structure to web applications by providing models with key-value binding and custom events, collections with a rich API of enumerable functions, views with declarative event handling, and connects it all to your existing API over a RESTful JSON interface.

Architecture of “Backbone.js”

Integration

Step#1

  • In rails 3.x

In Gemfile add below line

[sourcecode]gem ‘rails-backbone'[/sourcecode]

Run “bundle install”

Then install “Backbone.js” in the app by running the following command

[sourcecode]rails g backbone:install[/sourcecode]

This creates the following Directory structure under app/assets/javascripts/backbone.

[sourcecode]backbone/
routers/  (maps HTML routes to actions)
models/  (maintains state)
templates/ (presents clientside views)
views/ (presents model data in the DOM)[/sourcecode]

To setup initial requirements and name spacing, it also creates a coffee script file as app_name.js.coffee.

[sourcecode]app/assets/javascript/backbone/app_name.js.coffee[/sourcecode]

Step#2

It also provides 3 simple generators which only create client side JavaScript code

Create a backbone model and collection inside app/assets/javascripts/backbone/models to be used to communicate with rails backend.

[sourcecode]rails g backbone:model model_name field_name:datatype[/sourcecode]

Create a backbone router with corresponding views and templates for the actions.

[sourcecode]rails g backbone:router[/sourcecode]

For Scaffolding

[sourcecode]rails g backbone:scaffold[/sourcecode]

Example

Create a new rails application called Demo

[sourcecode]rails new Demo[/sourcecode]

Edit, /Gemfile.rb

[sourcecode]gem ‘rails-backbone'[/sourcecode]

Install the gem and generate scaffolding by running following commands

[sourcecode]bundle install
rails g backbone:install
rails g scaffold Job title:string description:string
rake db:migrate
rails g backbone:scaffold Job title:string description:string[/sourcecode]

Edit the jobs index view (app/views/jobs/index.html.erb)

[sourcecode]<div id="jobs"></div>
<script type="text/javascript">
$(function() {
// Demo is the app name
window.router = new Demo.Routers.JobsRouter({jobs: <%= @jobs.to_json.html_safe -%>});
Backbone.history.start();
});

</script>[/sourcecode]

Now start the server

[sourcecode]rails s[/sourcecode]

Then browse “localhost:3000/jobs” and now you will get a fully functioning single page crud app for Job model.

Benefits of implementing backbone on Rails application:

  • ‘Backbone’ speeds up loading of WebPages.
  • Backbone implementation is comparatively easier for the developers working on JavaScript applications.
  • It uses minimal set of data-structuring (Models and Collections) and user interface (Views and URLs).
  • It also facilitates in improving and maintaining the application structure.