How To Migrate Your WordPress Website Manually

Migrating a WordPress website manually can seem daunting, but with the right steps and preparation, it can be a relatively straightforward process. Here in this article I will walk you through the process of manually migrating your WordPress site, including how to backup your current site, install a new version of WordPress, import your content, update URLs and file paths, test your new site, and finally go live.

Whether you’re moving to a new hosting provider or simply want to change the domain of your website, this guide will provide the information you need to successfully migrate your site.

Keep in mind that the process can be complex and time-consuming, so it’s always best to consult with an expert if you’re not sure about how to proceed.

Manually WordPress website Migrating steps –

Migrating a WordPress website manually involves several steps, including:

1. Backing up your current site:

This includes creating a full backup of your site’s files, as well as a database export. Backing up your current website is an essential step in the process of manually migrating a WordPress website. Here are the steps to create a full backup of your site:

  1. Database Backup: Using a plugin like “Duplicator” or phpMyAdmin, export a copy of your database. This will save all of your posts, pages, comments, and settings.
  2. File Backup: Use an FTP client like FileZilla to download a copy of all the files from your website. This includes all of your themes, plugins, images, and other media.
  3. Store the Backup: Store the backups in a safe place, like an external hard drive or cloud storage service.

It’s important to regularly backup your site to have a recent copy to restore if something goes wrong during the migration process. Once you have created a backup of your website, you can then proceed to the next step, which is installing a new version of WordPress on your new server or hosting account.

Note: You also can use various backup plugins for WordPress to automate the backup process

2. Installing a new version of WordPress:

Installing a new version of WordPress is the next step after you have backed up your current website. Download and install the latest version of WordPress on your new server or hosting account. Here are the steps to install a new version of WordPress:

  1. Download WordPress: Go to the WordPress.org website and download the latest version of WordPress.
  2. Upload WordPress: Use an FTP client like FileZilla to upload the WordPress files to your new server or hosting account.
  3. Create a Database: Create a new database on your new server or hosting account. Make sure to note the database name, username, and password, as you will need them during the installation process.
  4. Run the Installation: Go to the URL of your new server or hosting account and run the WordPress installation process. This will involve entering the information for your new database, such as the name, username, and password.
  5. Complete the Installation: Follow the prompts to complete the installation process, including setting up your site title, creating a username and password, and selecting a theme.

Once the installation is complete, you can proceed to the next step, which is importing your content into the new site.

It’s important to note that, before installing the new version of WordPress, you must check the server requirements and also the compatibility of the theme and plugins you’re going to use with the latest version of WordPress.

3. Importing your content:

Importing your content is the next step after installing a new version of WordPress. Here are the steps to import your content:

  1. Install the Import/Export Plugin- Go to the WordPress plugin repository and install an import/export plugin such as “All-in-One WP Migration” or “Duplicator”.
  2. Import the Database: Using the plugin, import the database export file that you created earlier in the process. This will import all of your posts, pages, comments, and settings into your new site.
  3. Import Media Files: Use the plugin to import the media files from your file backup. This will include all of your images, videos, and other media.
  4. Check your content: Once the import process is complete, check your new site to make sure that all of your content has been imported correctly. You should also check that all of your links are working properly.
  5. Update Permalinks: Go to the permalink settings page and update the permalinks structure.

It’s important to note that, depending on the size of your website, the import process may take some time. Also, some plugins can have limitations in importing large files, in that case, you may need to split the database into smaller chunks and import them one by one.

Once your content has been imported, you can proceed to the next step, which is updating URLs and file paths.

4. Updating URLs and file paths:

Update any URLs and file paths that have changed, such as when moving from a development domain to a live domain.

Updating URLs and file paths is an important step in the process of manually migrating a WordPress site. This step ensures that all of your links and media files are working properly on your new site. Here are the steps to update URLs and file paths:

  1. Update the URLs: Go to the general settings page in your WordPress dashboard and update the site URL and home URL to the new URL of your site.
  2. Update the file paths: If your file paths have changed, you will need to update them in the database. You can use a plugin such as “Better Search Replace” to do this.
  3. Check your links: After updating the URLs and file paths, check your site to ensure that all of your links and media files are working properly.
  4. Update hard coded links: If you have any hard coded links in your theme or plugin files, you will need to update them manually.
  5. Update internal links: Go through your website and update any internal links that may have changed as a result of the migration.

It’s important to note that, Updating the URLs and file paths can be a tedious task, so it’s essential to double-check everything to avoid any broken links. A broken link can harm the user experience and your SEO ranking.

Once you have updated the URLs and file paths, you can then proceed to the next step which is testing your new site to ensure that everything is working properly.

5. Testing your new site:

Test your new site to ensure that all of your content has been transferred correctly, and that all of your links are working properly.

Testing your new site is an important step in the process of manually migrating a WordPress site. This step ensures that everything is working properly on your new site before you make it live. Here are the steps to test your new site:

  1. Test all the links: Go through your site and test all of the links to ensure that they are working properly.
  2. Test forms: Test all the forms on your site, such as contact forms and registration forms, to ensure that they are submitting and sending properly.
  3. Test media: Check that all of your media, such as images and videos, are displaying correctly.
  4. Test e-commerce functionality: If you have an e-commerce site, test the checkout and payment process to ensure that everything is working correctly.
  5. Test on different devices: Test your site on different devices, such as desktops, laptops, tablets, and smartphones, to ensure that it is responsive and working correctly on all devices.
  6. Test on different browsers: Test your site on different web browsers, such as Chrome, Firefox, Safari, and Edge, to ensure that it is working correctly on all browsers.

It’s important to note that, testing your new site thoroughly is crucial before you make it live, as any issues found after going live can be harmful to your users and your business.

Once you have thoroughly tested your new site and are satisfied that everything is working properly, you can then proceed to the final step, which is going live.

6. Going live:

Once you are satisfied that your new site is working as expected, you can update your DNS settings and make your new site live.

Going live is the final step in the process of manually migrating a WordPress site. This step makes your new site live and accessible to the public. Here are the steps to go live:

  1. Update DNS settings: Update the DNS settings of your domain to point to the new server or hosting account where your new site is located.
  2. Update the CDN: If you’re using a Content Delivery Network (CDN), make sure to update the CDN settings to point to your new site’s IP address.
  3. Set up redirects: Set up redirects from your old site to your new site, to ensure that any incoming traffic to your old site is redirected to your new site.
  4. Monitor your site: Monitor your site’s performance and uptime after going live, to ensure that everything is working as expected.
  5. Update Google Analytics: Update the tracking code of your Google Analytics account with the new site’s tracking code
  6. Notify your visitors: Inform your visitors that the site has been moved and provide them with the new site’s URL

It’s important to note that, going live is a critical step, so make sure to double-check everything before making the switch. It’s also recommended to schedule the migration during a low traffic time to minimize the impact on your visitors.

By following these steps, you can ensure that your site migration is successful, and your new site is up and running smoothly for your visitors.

It’s important to note that this process can be complex and time-consuming, and it’s always recommended to consult with an expert if you’re not sure about how to proceed.

Conclusion:

Manually migrating a WordPress website can be a complex process, but with the right steps and preparation, it can be done successfully. The key to a successful migration is to create a full backup of your site, including both files and database export. Additionally, it’s important to install the latest version of WordPress, import your content, update URLs and file paths, test your new site, and finally go live.

It’s important to note that migrating a site can be time-consuming and may require some technical expertise, so it’s always recommended to consult with an expert if you’re not sure about how to proceed. Here is the quick recap,

  1. Backup your current site.
  2. Install the latest version of WordPress.
  3. Import your content.
  4. Update URLs and file paths.
  5. Test your new site.
  6. Go live.

By following these steps, you can ensure that your migration goes smoothly and your site is up and running on your new server or hosting account in no time. Andolasoft has experienced and skillful experts for consultation. So feel free to communicate with us and schedule a free consultation now.
How to Choose Best Mobile Game Development Company

With the rapid growth in the use of smartphones, the mobile market is shooting up. Many companies are coming up with new ideas to develop gaming mobile applications in android and iOS. So companies are searching for a well-experienced app development company to convert their ideas into an engaging game app to blast in the market.

I understand, you have awesome ideas to develop mobile games but don’t know how to make them successful.

In this article, I will share the best tips to select the right mobile game app development company and the list of top mobile app development companies.

Before that let’s have a quick look at the below information,

Number of smartphone users on a global basis –

Smartphones Users In million Global(Source – mordorintelligence.com)

Gaming market growth by regions –

Global gaming market Gaming Market(Source – mordorintelligence.com)

Worldwide consumers spending on games –

World wide mobile game consumers(Source- sea.mashable.com)

Weekly mobile games downloads by regions –

(Source – sea.mashable.com)Weekly Mobile Game Download(Source – sea.mashable.com)

Here are the tips to choose the right mobile game app development company,

1. Experienced Company with a dedicated mobile app developer

It’s always important to consider the industry experience of a company’s in-game mobile app development. Developing innovative, engaging, and fun games is not a small task for mobile app developers. Technology expertise and creative thinking are much needed for the desired output. One experienced company with dedicated mobile app developers can deliver quality solutions on time. Also, you need to check and consider the market reputation and customer reviews of that company.

2. Mobile Game Development Portfolio

Before going for consultation or hiring a mobile app development company you need to check the services they are offering and what they have done in the near past on game mobile app development.

Typically, a good game development company offers a wide range of services for android, iOS, and hybrid platforms. They must be familiar with developing various types of games like playing, adventure, family, puzzle games, action educational games, and many more.

Andolasoft has developed a Christmas tree puzzle game by our android developers. Your kids would like it for sure!

3. Comprehensive Mobile App Development Process

A smooth and comprehensive development process is another point of consideration when choosing the right game mobile app development company. You need to check each and every step of your development and app developers must include you in every stage so that your idea can be implemented in the right way. The app development company or the developer must be comfortable discussing each and every step of your app development from scratch to the app launch.

4. Quick Turnaround and Development Cost

We understood every good thing needs time to shape up but mobile app development should be a faster and quick turnaround to avoid market competition. The faster you complete and launch the app in the market the more there is a chance of generating more revenue. So you should discuss the same at the beginning and they should commit to going with a fast turnaround, without compromising on quality.

 Andolasoft is a leading web and mobile app development company offering custom app development services at a cost-effective price. It has long experience in developing and delivering world-class mobile application development solutions that empower your business, and enhance your business growth. Its dedicated mobile app developers are familiar with developing mobile apps using AI and ML technologies. They develop user-friendly and custom mobile applications on iOS and Android platforms and also have expertise in developing cross-platform mobile applications in platforms like Flutter, Xamarin, PhoneGap, etc.

Andolasoft has developed so many gaming apps and the Christmas tree puzzle is one of them

Conclusion:

Mobile games have higher market value but the development is a little challenging. The game industry has changed a lot to bring innovative, engaging, and unique games to the market to generate more revenue. So developing a game mobile application needs unique and high-tech skills to develop the app according to the market demand and satisfy the customers. At Andolasoft we have highly skilled dedicated mobile app developers to develop your game mobile application in different categories. Hire Us now

Django Workflow and Architecture

What is Django?

Django is a free and open-source web application framework written in Python. A framework is nothing over a group of modules that create development easier. They’re sorted along, and permit you to make applications or websites from associated existing supplies, rather than from scratch.

When you are building a website, you mostly would like the same set of components: how to handle user authentication (signing up, signing in, sign language out), a management panel for your website, forms, how to transfer files, etc.

Frameworks exist to save lots of you from having to reinvent the wheel and to assist alleviate a number of the overhead once you’re building a replacement website and the Django framework is one of all them.

The official project website describes Django as “a high-level Python net framework that encourages fast development and clean, pragmatic style. It takes care of a lot of effort of net development, thus you’ll be able to target writing your app with no need to reinvent the wheel. It’s free and open supply.”

Django offers an enormous assortment of modules that you’ll be able to use on your own. Primarily, frameworks exist to save lots of developers tons of wasted time and headaches and Django isn’t any totally different.

Django Architecture

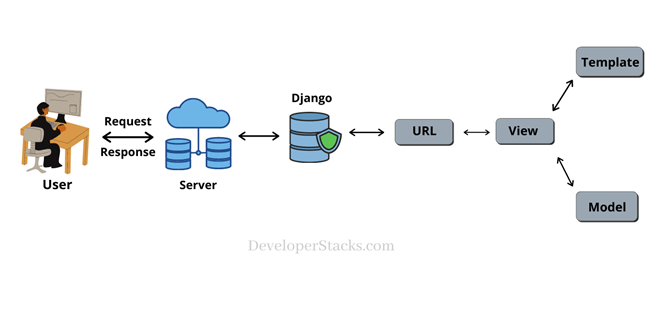
Django follows the MVT framework for architecture.

  • M stands for Model
  • V stands for View
  • T stands for Template

MVT is generally very similar to that MVC which is a Model, View, and Controller. The distinction between MVC and MVT here is that Django itself will do the work done by the controller half within the MVC design. Django will do this work of the controller by victimization templates. Precisely, the template file may be a mixture of hypertext markup language half and Django example Language conjointly referred to as DTL.

DijangoBenefits of Django Architecture

The Django Framework is predicated on this design and it really communicates between these 3 elements without having to put in writing complicated code. That’s why Django is gaining quality.

This design of Django has numerous blessings like:

1. Rapid Development:

Django design that separates in different components makes it easy for multiple developers to work on different aspects of the same application simultaneously. That’s additionally one among the options of Django.

2. Loosely Coupled:

Django has totally different elements that need one another at bound elements of the application, at each instant, that will increase the safety of the general website. Because the model file can currently solely save on our server instead of saving on the webpage.

3. Ease of Modification:

This can be a crucial fact of development as there is a unit of totally different elements in Django design. If there’s a modification in numerous elements, we tend not to modify it in alternative elements. This can be really one of the special options of Django, as here it provides us a way with more ability of our website than alternative frameworks.

4. Security:

When building high-end internet applications, security becomes a really crucial facet to reflect on. Django understands this concern and provides its best defender to avoid wasting your efforts. Using click-jacking, cross-site scripting, and SQL injections Django builds a robust wall for the application’s safety. User authentication is additionally a crucial feature to securely manage user accounts and passwords that Django provides.

5. Scalable:

Scalability can be understood as an ability of an application to work well when the size or volume of the platform increases. Django works effortlessly during this issue. Websites created with Django have the capability to handle multiple users at one time. Some well-liked websites victimization Django embody Spotify, Netflix, YouTube, Mozilla, Quora, etc.

Creating a New Project in Django

To start a new Django project, run the command below:

[code language=”css”]
django-admin startproject myproject
[/code]

After we run the command above, it will generate the base folder structure for a Django project.

Right now, our myproject directory looks like this:

[code language=”css”]
myproject/ <– higher level folder
|– myproject/ <– django project folder
| |– myproject/
| | |– __init__.py
| | |– settings.py
| | |– urls.py
| | |– wsgi.py
| +– manage.py
[/code]

  • manage.py: a shortcut to use the django-admin command-line utility. It’s used to run management commands related to our project. We will use it to run the development server, run tests, create migrations, and much more.
  • __init__.py: this empty file tells Python that this folder is a Python package.
  • settings.py: this file contains all the project’s configurations. We will refer to this file all the time!
  • urls.py: this file is responsible for mapping the routes and paths in our project. For example, if you want to show something in the URL /about/, you have to map it here first.
  • wsgi.py: this file is a simple gateway interface used for deployment.

Now everything is set up and we can run the server using the below command

[code language=”css”]
python manage.py runserver
[/code]

Now open the URL in a Web browser: http://127.0.0.1:8000 and you should see the success page, which means the server is running correctly.

Creating Django Apps

Django project contains many apps within it. An app can’t run without a project. You can create app by the following command

[code language=”css”]
django-admin startapp articles
[/code]

This will give us the following directory structure:

[code language=”css”]
myproject/
|– myproject/
| |– articles/ <– our new django app!
| | |– migrations/
| | | +– __init__.py
| | |– __init__.py
| | |– admin.py
| | |– apps.py
| | |– models.py
| | |– tests.py
| | +– views.py
| |– myproject/
| | |– __init__.py
| | |– settings.py
| | |– urls.py
| | |– wsgi.py
| +– manage.py
+– venv
[/code]

So, let’s first explore what each file does:

  • migrations: here Django stores some files to keep track of the changes you create in the py file, and to keep the database and the models.py synchronized.
  • admin.py: this is a configuration file for a built-in Django app called Django Admin.
  • apps.py: this is a configuration file of the app itself.
  • models.py: here is where we define the entities of our Web application. The models are translated automatically by Django into database tables.
  • tests.py: this file is used to write unit tests for the app.
  • views.py: this is the file where we handle the request/response cycle of our Web application.

Now that we created our first app, let’s configure our project to use it. Open settings.py file and find installed_apps block.

settings.py

[code language=”css”]
INSTALLED_APPS = [
‘django.contrib.admin’,
‘django.contrib.auth’,
‘django.contrib.contenttypes’,
‘django.contrib.sessions’,
‘django.contrib.messages’,
‘Django.contrib.staticfiles’,
‘articles’
]
[/code]

Here we have added ‘articles’ in the installed apps section. Now the app is ready to run with the Django project.

Configuring Database

By default Django project comes with sqlite3 database but you can customize it to use MySQL or Postgresql as per the requirements.

settings.py

[code language=”css”]
DATABASES = {
‘default’: {
‘ENGINE’: ‘django.db.backends.postgresql_psycopg2’,
‘NAME’: ‘blog’,
‘USER’: ‘postgres’,
‘PASSWORD’: ‘**********’,
‘HOST’: ‘localhost’,
‘PORT’: 5432,
}
}
[/code]

Now your project is connected with Postgres database and ready to run.

So now, we have learned how the MVT pattern works and the structure of the Django application along with the database configuration.

Service Oriented Architecture in NodeJS

What is Service-oriented Architecture in NodeJS?

Service-oriented architecture is a way to build backend applications consisting of multiple independent services. A service can be any business logic that completes an action and provides a specified result to the endpoint user.

Each service in SOA is a complete business function in itself.

For an Example

Let’s discuss this at a grocery store.

The owner adds the product details to the inventory. The owner searches to find data about a unique product. And the backend application database query should be inside the service section by leveraging the data access layer. Then it securely fetches data and gives the response to the owner.

Layers in Service-oriented Architecture

  1. Router layer
  2. Service layer
  3. Data access layer

How SOA Works

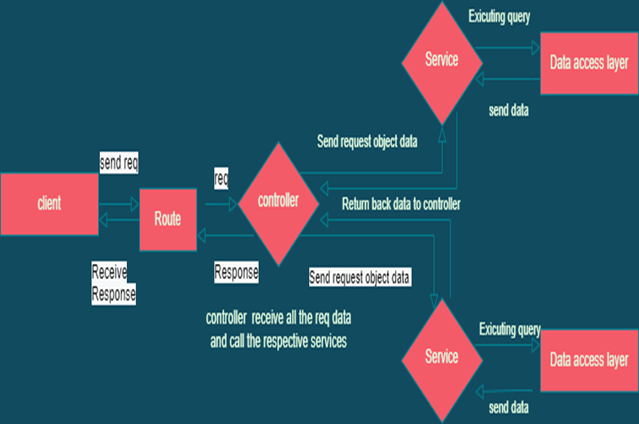
  • Here first when the API call, in the node app first it faces the router section where all the authentication and validation occur through the middleware function. Then control moves toward the controller section which work is collect the incoming data related to API requests. Here all the business logic to access data is combined inside a service. So the controller invokes that service and service leverage data access layer to connect with database and calculation. Then services return the data to the controller. After that controller gives the response to the endpoint user.
  • The most important benefit of SOA is as all the services are independent and small chunks so whenever we want to change our programing language it should be very fast and easy in the development process.

Flow chart diagram:

SOA Flow Daigram

SOA Advantages

  • Reliable– Even though service-oriented architecture has small and independent services, it becomes easier to debug code as it checks small chunks instead of checking a large codebase
  • Independent of location– Services can be accessed through URL therefore change in location doesn’t affect customer experience
  • Scalable– Service-oriented architecture can run on multiple platforms and can operate various servers within the given environment
  • Reusability– The SOA uses its services in multiple applications independently without disturbing other services
  • Easy maintenance– SOA is an independent unit therefore updating becomes easy as it is a single entity
  • Agile– Due to reusable components and services, it helps developers to integrate and build applications quickly according to requirements and consequently increases the agility of service-oriented architecture.

Now the question is why we shouldn’t do this directly inside the controller.

As the router is built with express so it is combined with req and res objects. So when we put our business logic inside the controller then at the testing we have to write a mock for the test with a response mock.

The problem is when we try to only test our business logic we can’t do that but when we combined that inside service we can test that service without req, res object.

Code Example:

In this example, we create a service that resists a user in the database for sign-up API.

In user.js controller receive all the requested data and call the user service

[code language=”css”]
// controllers/user.js
const UserService = require( "../services/UserService" );
const UserServicesec = new UserService();

async function makeUser ( req, res ) {
try {
let bodyData = req.body;
const makeUser = await UserServicesec.create( bodyData );
return res.send( makeUser );
} catch ( err ) {
res.
status( 500 ).
send( err );
}
}

module.exports = { makeUser };
[/code]

Then in the user service folder import the data access layer and database model then service used that data access layer and executes the query in the database

[code language=”css”]
// services/UserService.js
// Data Access Layer
const MongooseService = require( "./MongooseService" );
const userModel = require( "../models/user" );
class UserService {
constructor () {
this.MongooseService = new MongooseService( userModel );
}
async create ( createUser ) {
try {
const result = await this.MongooseService.create( createUser );
return { success: true, body: result };
} catch ( err ) {
return { success: false, error: err };
}
}
}
module.exports = UserService;
[/code]

Conclusion:

The main aim of service-oriented architecture is to allow users to mix large chunks of functionalities into one in order to build an application and services by combining services. This architectural design of node backend application is considered a best practice in industrial labels.

Angular 13: Top New Features and Updates

Angular 13, the latest version of the TypeScript-based web framework was released. The release has brought several essential updates that can be useful for Angular development.

1. TypeScript 4.4 support

TypeScript 4.4 support is now available in Angular 13. It means now we can use many fantastic language features. Moreover, they stopped supporting TypeScript 4.2 and 4.3 also. One breaking change in TypeScript 4.4 that is advantageous for Angular apps is that it no longer implements setters and getters to get a similar type.

The significant highlights of TypeScript 4.4 are:

  • Improved detection of type guards.
  • Default catch variables.
  • Faster incremental builds.
  • The control flow of conditions can be analyzed
  • Symbol and template string pattern index signatures.

2. Version 7.4 of RxJS

The Angular 13 update adds RxJS, a reactive extension for JavaScript, and includes all versions of RxJS up to and including version 7.

For apps created with ng new, RxJS 7.4 has become the default.

Existing RxJS v6.x apps will need to be manually updated with the npm install rxjs@7.4 command. You can always rely on RxJS 7 for new project creation. As for migrations, existing projects should keep on RxJS 6.

3. 100% Ivy and No More Support for View Engine

The legacy View Engine is no longer supported. Now that there is no View engine-specific metadata or older output formats, it eliminates the codebase complicacy and maintenance costs. Ivy is now the only view engine supported by Angular. Ivy can now compile individual components independently of one another, which significantly improves performance and accelerates development times.

By removing the View Engine, Angular can reduce its reliance on ngcc too. There is no more requirement of using ngcc (Angular compatibility compiler) for the libraries created using the latest APF version. The development team can expect quicker compilation as there is no more requirement for metadata and summary files.

4. IE 11 Support Removed

This stands out to be one of the significant Angular 13 features. Angular 13 no longer supports IE11. CSS code paths, build passes, polyfills, special JS, and other parameters that were previously required for IE 11 have now been completely dropped off.

As a result, Angular has grown faster, and it is now easier for Angular to use new browser features like CSS variables and web animations using native web APIs.

During project migration, running the ng update will automatically remove these IE-specific polyfills and reduce the bundle size.

5. Angular CLI Improvements

The Angular CLI is one of the key components of the Angular Puzzle. Angular CLI helps standardize the process of handling the complexities of the modern web development ecosystem by minimizing these complexities on a large scale.

With the release of Angular 13, this framework now includes a persistent build cache as a default feature, which saves built-in results to disk. As a result, the development process will be accelerated. Furthermore, you have complete control over enabling or disabling this feature in current Angular apps.

6. Improvements to Angular testing

The Angular team has made some notable changes to TestBed, which now correctly tears down test environments and modules after each test.

As the DOM now experiences cleaning after tests, developers can anticipate more optimized, less interdependent, less memory-intensive, and quicker tests.

7. Changes to the Angular Package Format (APF)

The Angular Package Format (APF) defines the format and structure of Angular Framework packages and View Engine metadata. It’s an excellent strategy for packaging every third-party library in the web development environment.

Older output formats, including some View Engine-specific metadata, are removed with Angular 13. The updated version of APF will no longer necessitate the use of ngcc. As a result of these library changes, developers can expect faster execution.

8. TestBed updates

The latest Angular update improves the TestBed significantly, as the DOM is cleaned after every test.  In addition to this, the TestBed tears down test modules and environments in a more effective manner.

Therefore, developers using Angular 13 will get faster, less interdependent, memory-intensive, and optimized tests.

9. Creating dynamic components

One Ivy-enabled API update in Angular 13 is a more streamlined method for dynamically constructing a component. ViewContainerRef.create component no longer requires an instantiated factory to construct a component (no longer need to use ComponentFactoryResolver).

Due to the improved ViewContainerRef.createComponent API, it is now possible to create dynamic components with less boilerplate code. Following is an example of creating dynamic components using previous versions of Angular.

[code language=”css”]
@Directive({ … })
export class Test {
constructor(private viewContainerRef: ViewContainerRef,
private componentFactoryResolver:
ComponentFactoryResolver) {}
createMyComponent() {
const componentFactory = this.componentFactoryResolver.
resolveComponentFactory(MyComponent);
this.viewContainerRef.createComponent(componentFactory);
}
}
[/code]

In Angular 13, this code can become as follows.

[code language=”css”]
@Directive({ … })
export class Test {
constructor(private viewContainerRef: ViewContainerRef) {}
createMyComponent() {
this.viewContainerRef.createComponent(MyComponent);
}
}
[/code]

10. NodeJS Support

Node versions older than v12.20.0 are no longer supported by the Angular framework. Web developers might face certain issues while installing different packages if working with older versions.

16.14.2 is the current stable version of NodeJS. For ensuring seamless deployment of your project, it is recommended to install the latest versions of NodeJS.

Conclusion

The Angular team tries to release a new version update every six months. Now that you know the significant updates and features of the all-new Angular 13. Apart from delivering on the Ivy everywhere promise made in Angular 12 and removing the View Engine altogether, Angular 13 has many impressive features and updates. The framework has become more efficient with inline support for fonts, simplified API, components, and CLI improvements.

The release of Angular 13 enhances the web development process so that the Angular developer can create awesome apps to meet modern web development standards.  If you’re still using Angular 12, it’s time to upgrade your next project with new features.

At Andolasoft, we have expert Angular developers who can help you migrate your existing applications, and also create new web and mobile applications with the best quality. Feel free to book a free consultation with our experts.

How to Develop an App for Internet of Things (IoT)

IoT (Internet of Things) is a medium of connection and communication that helps to connect one device with another through the internet. Besides smartphones, computers, and laptops, we can use it in other smart devices.

Also, read “how IoT creates an impact on mobile app development

Both businesses and individuals are showing their interest in IoT applications to take advantage of the latest technology and the number is growing every day.

As the demand is growing day by day, developers and companies are building applications that are compatible with various types of devices with IoT systems and servers.

The main objective of Internet Of Things technology is to clarify the data, analyze it, and create technology that will be faster and more useful for the user.

Why Develop a Custom Internet of Things application?

The Internet of Things market is huge, the annual growth rate of IoT is more than 30%, and this figure is increasing every time.

As a result, big marketing giants such as Apple, Google, Microsoft and Facebook, and more are investing heavily in IoT technology-based applications and solutions.

“The total installed base of Internet of Things (IoT) connected devices worldwide is projected to amount to 30.9 billion units by 2025, a sharp jump from the 13.8 billion units that are expected in 2021.”

How to Develop an App for the Internet of Things

Our Products
orangescrum
Wakeupsales

We transform your ideas into engaging Web and Mobile Apps

andolasoft

Conclusion

The future of mobile app development is a little challenging to enter in the digital space. Internet Of Things has brought smart and unique business solutions which connect multiple devices seamlessly and securely.

It is an advanced technology and keeps growing globally. More and more companies are trying to jump and secure their positions in verticals like retail or healthcare.

Internet Of Things has great potential to provide solutions within a short time.

We at Andolasoft agree that IoT application development is a promising way to take your business to the next level.

Over the last couple of years, we have developed some IoT applications for our customers and in-house products.

If you are planning to develop a new IoT application for yourself or want to add new features to your existing one then get in touch with us today. We have experienced developers to help you…