Way to Using Closures in PHP With Code Examples

Closure is an anonymous function (a function without name. Ex- function (){}) assigned to a variable. When using closure one can use the variable from the immediate parent scope or the variable declared inside the global scope.

It’s essentially employed in coding to reduce the verbosity when writing functions that accept other functions as arguments.

Reducing the size of your code with ‘Closure’ will allow your PHP scripts to load faster and take up less disk space. You may also find that coding in Closure results in programs that are easier to understand and debug. Closure anonymous function makes it possible by reducing complexity, which can be challenging when dealing with dynamic languages like PHP.

Using functions closure in PHP can help to make code more succinct, expressive, and safer.

What are the Uses of Closure?

  • Closures are small use-once functions which are useful as parameters for callback functions like array_walk, array_map, etc.
  • Using closure functions in PHP can help to make code more succinct, expressive, and safer.
  • Closures can access private data of an object.
  • Closures can be used in Lazy loading

There are several ways to implement closures in PHP.

The above statement can be executed with the use language construct inside the function.

 Syntax:

[code language=”css”]
function() use ($variable) { /* code to be executed */ }
[/code]

What is a Closure?

A Closure is a function that can call itself, even when it has finished executing. In other words, Closure is a function that can access variables outside its own scope. This is made possible through a process in which the function remembers and “closes over” its surrounding variables, even after it has finished executing.

Never miss an update from us. Join 10,000+ marketers and leaders.

When a function is said to be “closed over” a certain set of variables, what this means is that those variables are in fact “closed” and are no longer in their original scope, but instead exist in the new scope of the function that captured them.

A closure is a function that captures its non-global variables (known as “free variables”) from the execution environment in which it was created. The closure remembers and can use those variables as if it were still executing in that environment. This is a very powerful feature that can greatly increase the expressive power of a programming language.

How to Pass a Variable inside the Closure:

There are two ways to pass a variable inside the closure.

  1. Pass by value.
  2. Pass by reference.

Pass By Value:

By passing a variable by value we cannot overwrite the value inside the closure scope.

Example:

[code language=”css”]
<?php
$value&nbsp; = ‘this is a car’;

function myFunc()
{
$value = ‘this is a bus’;
$func&nbsp; = function() use ($value)
{
echo $value;
};
$func();
}

myFunc();// this will print this is a bus.
?>
[/code]

If we overwrite a value inside the closure scope it can’t be resigned because the variable is passed by its value.

Example:

[code language=”css”]
<?php
$value&nbsp; = ‘this is a car’;

function myFunc()
{
$value = ‘this is a bus’;
$func&nbsp; = function() use ($value)
{
$value = ‘I have a bus’;

};
$func();
echo $value; // prints this is a bus!
}
myFunc();
?>
[/code]

To overcome such situations one can pass the variable by reference.

Pass By Reference:

By passing a variable by reference, the variable can be overwritten inside the closure scope.

Example:

[code language=”css”]
<?php
$value&nbsp; = ‘this is a car’;

function myFunc()
{
$value = ‘this is a bus’;
$func&nbsp; = function() use (&amp;amp;$value)
{
$value = ‘I have a bus’;

};
$func();
echo $value; // prints I have a bus!
}
myFunc();
?>
[/code]

What is the Difference Between an Anonymous Function and Closure?

An anonymous function or lambda function, and closure are both the instances of Closure class but there is a subtle difference between them. The difference between an anonymous function and closure is that a closure can access a variable outside of its scope by using the keyword.

Advantages of Closure:

The simple advantages of using closure is that when the outer function executes all of its variables still remain in memory until the function completed its execution but in case of closures, the variables declared inside will be released as soon as the closure completed its execution.

Disadvantages of Closure:

As long as closures are active, this memory cannot be garbage collected. Therefore, closures can lead to memory leaks if not used well.

Conclusion

One of the most important aspects of programming is the ability to abstract your code, making it more general and reusable.

Are you looking for a PHP developer

Contact Us

Closures make it possible to write more concise and expressive code, which can help make your code more reusable.

Closures are a powerful tool that can make your code more expressive and easier to read, especially when you have nested functions or lots of logic. This can make it difficult to read and follow the code in certain scenarios.

Closures are a very useful programming tool, but they can also be powerful enough to be dangerous if not used correctly. If you’re not sure how to use them, then please contact us to get clarification or if you just want to make sure you’re using them the right way, then make sure you cross check them before continuing.

Seasoned web developers at Andolasoft leverage PHP programming language using coding best practices that results in creating highly-functional and intuitive web apps for our global customer base.

ECMAScript 6: What You Need to Know

ES6 is the latest version of JavaScript. While ES5 and ES2015 are still widely used today, ES6 is a significant update from both of them. The ES6 specification was finalized in June 2015, and it’s now supported by all major browsers with some minor exceptions.

ES6 is designed to be easier to read and write than previous versions of JavaScript. Let’s take a look at some of the new features implemented in ES6 that are more intuitive and cleaner than their predecessors.

What is ECMA?

European Computer Manufacturers Association (ECMAScript) or (ES) is a standard for scripting languages like JavaScript, ActionScript and JScript.

It was initially created to standardize JavaScript, which is the most popular implementation of ECMAScript.

What is ECMAScript?

ECMAScript (ES) is a scripting language specification standardized by ECMAScript International.

It is used by applications to enable client-side scripting.

The specification is influenced by programming languages like Self, Perl, Python, and Java etc. Languages like JavaScript, Jscript and ActionScript are governed by this specification.

ECMA Script6’s new features −

  • Support for constants
  • Block Scope
  • Arrow Functions
  • Template Literals
  • Extended Literals
  • Enhanced Object Properties
  • Destructuring
  • Modules
  • Classes
  • Iterators
  • Generators
  • Collections
  • New built in methods for various classes
  • Promises

ECMAScript Versions

ECMAScript Versions

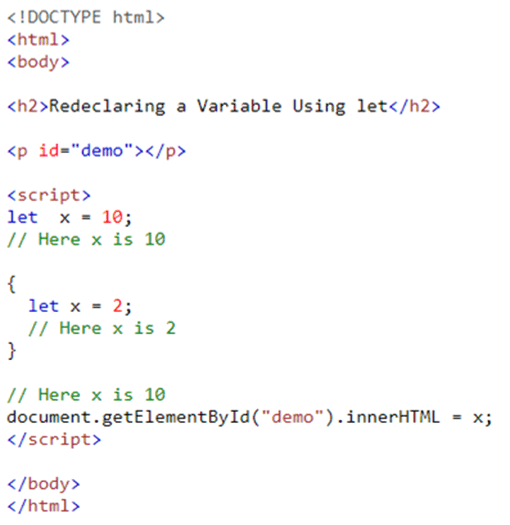
JavaScript let

The let keyword allows you to declare a variable with block scope.

Let and const basically replace var.

You use let instead of var, const instead of var if you plan on never re-assigning this “variable”.

JavaScript let

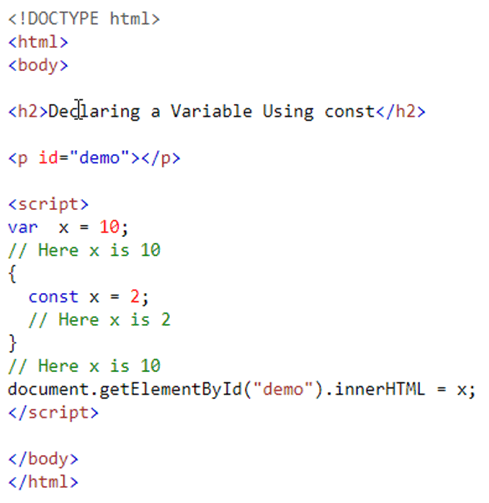
JavaScript const

The const keyword allows you to declare a constant (a JavaScript variable with a constant value).

Constants are similar to let variables, except that the value cannot be changed.

JavaScript const

Arrow Functions

Arrow functions allows a short syntax for writing function expressions.

This is a different way of creating functions in JavaScript. Besides a shorter syntax, they offer advantages when it comes to keeping the scope of the keyword.

Arrow function syntax may look strange but it’s actually simple.

Arrow Functions

Normal function syntax as below:

Function callMe (name){

console.log(name);

}

Arrow function syntax may look as below:

const callMe = (name) => {

console.log (name);

}

Arrow Functions

When having no arguments, you have to use empty parentheses in the function declaration:

const callMe = () => {

console.log (‘Max!’);

}

When having exactly one argument, you may omit the parentheses:

const callMe = name => {

console.log (name);

}

Arrow Functions

When just returning a value, you can use the following shortcut:

const returnMe = name => name

That’s equal to:

const returnMe = name => {

return name;

}

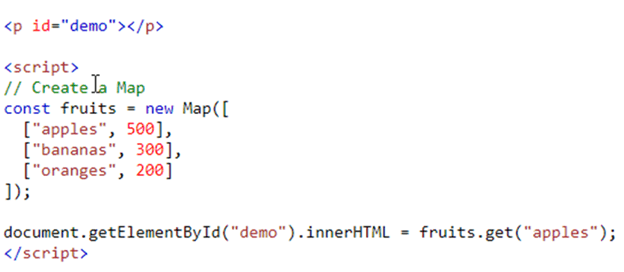
JavaScript Maps

  • A Map holds key-value pairs where the keys can be any data type.
  • A Map remembers the original insertion order of the keys.
  • A Map has a property that represents the size of the map.

JavaScript MapsJavaScript Sets

  • A JavaScript Set is a collection of unique values.
  • Each value can only occur once in a Set.
  • A Set can hold any value of any data type.

JavaScript Classes

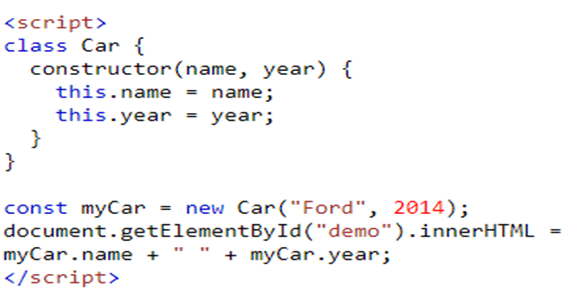
Classes are a feature which basically replace constructor functions and prototypes. You can define blueprints for JavaScript objects with them. Use the keyword class to create a class. Always add a method named constructor ():

JavaScript Classes

Ans: Ford 2014

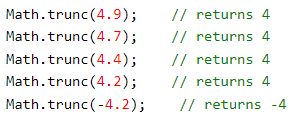
Math Methods in ES6

ES6 added the following methods to the Math object:

Math.trunc ()

Math.sign ()

Math.cbrt ()

Math.log2 ()

Math.log10 ()

Math Methods

Math Methods

Math Methods

Math Methods

Math Methods

Spread Operator

The spread and rest operators actually use the same syntax: …  Yes, that is the operator – just three dots.

Its usage determines whether you’re using it as the spread or rest operator.

Using the Spread Operator:

The spread operator allows you to pull elements out of an array (=> split the array into a list of its elements) or pull the properties out of an object.

Here are two examples:

const old Array = [1, 2, 3];

const new Array = […old Array, 4, 5]; // This now is [1, 2, 3, 4, 5];

Spread Operator

Here’s the spread operator used on an object::

const oldObject = { name: ‘Max’  };

const newObject = { …oldObject, age: 28 };

new Object would then be

{

name: ‘Max’,

age: 28

}

The spread operator is extremely useful for cloning arrays and objects. Since both are reference types (and not primitives), copying them safely can be tricky.

With the spread operator you have an easy way of creating a clone of the object or array.

Rest Operator

The rest parameter (…) allows a function to treat an indefinite number of arguments as an array.

E.g:

Function sum (…args) {

let sum = 0;

for (let arg of args) sum += arg;

return sum;

}

let x = sum(4, 9, 16, 25, 29, 100, 66, 77);

Ans: 326

Destructuring

Destructuring allows you to easily access the values of arrays or objects and assign them to variables.

Here’s an example for an array:

const array = [1, 2, 3];

const [a, b] = array;

console.log(a); // prints 1

console.log(b); // prints 2

console.log(array); // prints [1, 2, 3]

Destructuring

Example for an object:

const myObj = {

name: ‘Max’,

age: 28

}

con         st {name} = myObj;

console.log(name); // prints ‘Max’

console.log(age); // prints undefined console.log(myObj); // prints {name: ‘Max’, age: 28}

Destructuring

Destructuring is very useful when working with function arguments.

E.g:

const printName = (personObj) => {

console.log(personObj.name);

}

printName({name: ‘Max’, age: 28});

//prints ‘Max’

Here, we only want to print the name in the function but we pass a complete person object to the function. Of course this is no issue but it forces us to call personObj.name inside of our function

Destructuring

We can condense this code with destructuring:

E.g:

const printName = ({name}) => {

console.log(name);

}

printName({name: ‘Max’, age: 28});

//prints ‘Max’

We get the same result as above but we save some code. By destructuring, we simply pull out the name property and store it in a variable/ argument named name which we then can use in the function body

Conclusion:

ES6 is a newer version of JavaScript that has some useful new features. It’s cleaner and easier to read, and it has a few new syntax features that make coding easier. There are also a lot of new functions that are built into the language that make coding easier.

The main highlight of ES6 is that it makes syntax cleaner, its scope is more restricted, and there are also a lot of new functions built into the language that make coding easier and libraries like Underscore or Lodash unnecessary.

If you want to start using ES6, then you can use a code transpiler like Babel to convert your code to the older ES. Andolasoft has highly experienced JavaScript developers who has expertise in ES6 latest version of JavaScript. Book a free consultation now to get solution on your queries.

No-Code Development: Everything You Need To Know to Get Started

‍No-code development is a new approach to software creation that allows users to build applications without coding skills or even developer resources. Instead, users can use drag-and-drop interfaces and point-and-click wizards to create apps with little to no knowledge of traditional coding languages like Java, C#, Python, etc. While no-code development is still an emerging trend in the software world, it’s growing at an impressive rate.

A report by New Voice Therapeutics and VentureRadar estimates that the no-code market will be worth over 17 billion by 2024. That’s why it’s important for businesses to understand what no-code development is and how they can leverage this technology to streamline their app creation processes. Some other statistics are below for your knowledge,

  • By 2030, the global low-code/no-code development platform market is expected to produce $187 billion in revenue. It will account for more than 65% of application development activity by 2024.
  • The mixture of low-code/no-code and conventional innovation is projected to be adopted by 75% of businesses.
  • The global low-code/no-code market is projected to total $13.8 billion in 2021.
  • The global low-code/no-code market size was valued at USD 11.45 billion in 2019 and is expected to grow at a compound annual growth rate (CAGR) of 22.7% from 2020 to 2027.

(Source – Userguiding)

Average forecasted market size

(Source – Spreadsheetweb)

What Is No-Code Development?

No-code development is a type of development that does not require coding. It is a way to create software applications without having to write code. The term can also refer to low-code development, which is a type of development that uses visual programming languages and tools to allow for the rapid development of applications with less code than traditional methods.

No-code development platforms, sometimes called application platforms, provide a way to build software without coding. These platforms typically include a visual interface that allows users to drag and drop elements to create an application. Some no-code development platforms also include pre-built templates and components that can be used to speed up the development process. No-code development platforms are often used to create simple applications or prototypes. However, some no-code development platforms are powerful enough to create complex enterprise applications.

Low-code development platforms are similar to no-code development platforms, but they typically include more features and allow for more complex applications to be built. Low-code development platforms are often used by enterprises to build mission-critical applications. No-code and low-code development platforms can be used to build web, mobile, and desktop applications. Some platforms can also be used to build server less applications, IoT applications, and AI applications.

Why Is No-Code Development Becoming So Popular?

No-code development is gaining in popularity because of its low barriers to entry. No-code development gives any user the ability to create software without having to learn coding languages like Java or C#. This makes it easy for those with no development experience to build apps with little to no knowledge of traditional coding languages.

Additionally, no-code development tools allow you to spend less time on manual tasks that typically take hours and instead focus more on the core logic of your app. You don’t have to use code or a developer resource or any other advanced skills. Some might be worried that if they don’t know how traditional programming languages work, they’ll get lost or confused when using a no-code development platform.

But it doesn’t have to be complicated at all! With drag-and-drop interfaces and point-and-click wizards, you can quickly generate API calls, web pages, and more with little to no time spent learning how traditional programming languages work. That means you can create an app with just your imagination and creativity!

What Are The Benefits of No-Code Development?

No-code development provides many benefits for businesses, but the most important benefit is that it removes the coding requirement from app creation.

No-code development eliminates a major barrier to entry for those who want to create web and mobile apps without traditional developer skills.

One of the main reasons no-code is valuable is because it makes it easy for someone to create an app without a lot of upfront preparation. By not having to learn about coding languages like C++, Java, Python, etc., you can use no-code development without any prior knowledge of software programming language.

This will save you time and money on hiring developers or other professionals in order to build your app. plus, when you’re ready to hire someone else to do the coding work for you, there’s a no-code application library with all the necessary resources needed for building an app like user interface elements and functionality code libraries.

Which Platforms Can You Use for No-Code Development?

There are a few platforms you can use for no-code development. Some examples include: –

  • AppSheet which allows users to create android, iOS, and web apps without coding skills
  • UXPin which provides an intuitive interface that users can use to design wire frames and prototypes
  • Corona SDK which features an analytics dashboard that tracks usage and revenue of your app
  • Google App Maker– which allows users to create Android apps with the ability to edit code in HTML

How to Choose a No-Code Framework for Your Business?

The first step in any no-code development project is selecting a framework to use. The most popular frameworks are as follows: – AppSheet, Appian, Single File Websites, Bootstrap, and Webflow

Should Your Business Use No-Code Development?

No-code development is an important trend in the world of software creation, and it has a lot to offer. The most obvious advantage of this method is that you don’t need to have any coding knowledge to create an application.

For businesses without developers on staff, this is especially useful as they can use no-code development as a way to quickly create an app without having to spend time and money searching for a developer.

Another advantage of no-code development is the speed at which it can work. Because it no needs any coding knowledge, apps can built faster than other traditional methods. This makes no-code development a great option for businesses who need an app quickly but don’t have the resources or experience in coding to create one on their own. In some cases, it can create in less than six hours!

Conclusion

No-code development is a new type of platform that allows business owners to build their own applications without any coding. If you are looking for a new way to create an application for your business and save time and money, no-code development is the solution for you. No-code platforms are a new and different way to build applications for your business. Andolasoft is one of the trusted no-code application development company.

Instead of learning a programming language and spending time learning how to code, which is time-consuming and expensive, no-code development lets you build an application with drag-and-drop tools.

No-code development is useful for many businesses, but it isn’t right for everyone. It’s important to keep in mind that while no-code development can save you time and money, it doesn’t offer the same control as coding. So let’s have a quick discussion on your project idea to develop no code applications in a cost effective price.

How To Manage API Request with AXIOS on a React Native App

APIs can make your life a whole lot easier. With an API, you can send requests to other services and get responses without having to build those requests and responses yourself. But building an API isn’t as simple as it sounds. It requires careful planning, testing, and debugging.

If you’re building an API for the first time, it can feel like an impossible mountain to climb. That’s where APIs like Axios come in. It has a great API and lots of helpful features. Here in this article you’ll understand how to use Axios to manage API requests in your React Native app.

What is AXIOS?

Axios is one of the easiest HTTP clients to learn and use. Making an API request is as simple as passing a configuration object to Axios or invoking the appropriate method with the necessary arguments. You will learn the basics of Axios in this section.

Configuring Axios

Type following command on terminal window to install Axios:

NPM Install Axios

How to make requests to an API using Axios

Making a call to an API using Axios, you can pass a configuration object to Axios or invoke a method for the corresponding CRUD operations.

Never miss an update from us. Join 10,000+ marketers and leaders.

For example, you can make a GET request to the /api/users endpoint in one of the following two ways:

[code language=”css”]</pre>
import axios from ‘axios’;
const baseUrl = ‘https://reqres.in’;
// Passing configuration object to axios
axios({
method: ‘get’,
url: `${baseUrl}/api/users/1`,
}).then((response) => {
console.log("<<<<<< Passing configuration object to axios >>>>>>", response.data.data);
});

// Invoking get method to perform a GET request
axios.get(`${baseUrl}/api/users/1`).then((response) => {
console.log("<<<<<< Invoking get method to perform a GET request >>>>>>", response.data.data);
});
[/code]

There are several other fields such as baseURL, transformRequest, transformResponse, and headers, among others, which you can include in the configuration object you pass to Axios.

[code language=”css”]</pre>
// Passing configuration object to axios
const fetchUserFirst = async () => {
const configurationObject = {
method: ‘get’,
url: `${baseUrl}/api/users/1`,
};
const response = await axios(configurationObject);
console.log("<<<<<< Fetch User First >>>>>>", response.data.data);
};

// Invoking get method to perform a GET request
const fetchUserSecond = async () => {
const url = `${baseUrl}/api/users/2`;
const response = await axios.get(url);
console.log("<<<<<< Fetch User Second >>>>>>", response.data.data);
};
[/code]

How to make multiple concurrent API requests using Axios

We can use the Promise.all or Promise.allSettled method of the Promise API with Axios to make multiple concurrent API requests from a React Native application.

[code language=”css”]
const concurrentRequests = [
axios.get(`${baseUrl}/api/users/1`),
axios.get(`${baseUrl}/api/users/2`),
axios.get(`${baseUrl}/api/users/3`),
];
// Using Promise.all
Promise.all(concurrentRequests)
.then((result) => {
console.log(result);
})
.catch((err) => {
console.log(err);
});
// Using Promise.allSettled
Promise.allSettled(concurrentRequests)
.then((result) => {
console.log(result);
})
.catch((err) => {
console.log(err);
});
[/code]

How to abort network request in Axios

Axios provides functionality for aborting network requests. A typical use case of this feature in React Native is the cancellation of network requests in the use effect hook when a component is unmounted while data is still in flight.

[code language=”css”]
useEffect(() => {
const source = axios.CancelToken.source();
const url = `${baseUrl}/api/users/${userId}`;
const fetchUsers = async () => {
try {
const response = await axios.get(url, { cancelToken: source.token });
console.log(response.data);
} catch (error) {
if(axios.isCancel(error)){
console.log(‘Data fetching cancelled’);
}else{
// Handle error
}
}
};
fetchUsers();
return () => source.cancel("Data fetching cancelled");
}, [userId]);
[/code]

How to create an instance of Axios

You can also create an instance of Axios with a custom configuration. Axios will merge the configuration object passed while creating the instance with the configuration passed to the instance method:

[code language=”css”]
const axiosInstance = axios.create({ baseURL: ‘https://reqres.in/’ });
axiosInstance.get(‘api/users/1’).then((response) => {
console.log(response.data);
});
[/code]

How to make GET request using Axios in React Native

Make a GET request to the /api/users endpoint to retrieve a user and store the user ID in state as shown in the code snippet below. You can change the user ID inside the onPress event handler attached to the Load User button. Changing the user ID will trigger a GET request to the API inside the useEffect hook.

After triggering a network request, we display a loading indicator on the screen. If we fetch the data successfully, we update state and remove the loading indicator. If we fail to retrieve the data for some reason, we stop the loading indicator and display an appropriate error message.

We abort the network request in the clean-up function if the user decides to close the app before getting a response from the server. Check the return value of the effect function in the useEffect hook. Following is the code in the App.js component:

[code language=”css”]
import axios from "axios";
import React, { useState, useEffect } from "react";
import {
StyleSheet,
Text,
ScrollView,
View,
Button,
Image,
Platform,
} from "react-native";
import Constants from "expo-constants";
const baseUrl = "https://reqres.in";
function User({ userObject }) {
return (
<View>
<Image
source={{ uri: userObject.avatar }}
style={{ width: 128, height: 128, borderRadius: 64 }}
/>
<Text style={{ textAlign: "center", color: "white" }}>
{`${userObject.first_name} ${userObject.last_name}`}
</Text>
</View>
);
}
export default function App() {
const [userId, setUserId] = useState(1);
const [user, setUser] = useState(null);
const [isLoading, setIsLoading] = useState(false);
const [hasError, setErrorFlag] = useState(false);
const changeUserIdHandler = () => {
setUserId((userId) => (userId === 3 ? 1 : userId + 1));
};
useEffect(() => {
const source = axios.CancelToken.source();
const url = `${baseUrl}/api/users/${userId}`;
const fetchUsers = async () => {
try {
setIsLoading(true);
const response = await axios.get(url, { cancelToken: source.token });
if (response.status === 200) {
setUser(response.data.data);
setIsLoading(false);
return;
} else {
throw new Error("Failed to fetch users");
}
} catch (error) {
if(axios.isCancel(error)){
console.log(‘Data fetching cancelled’);
}else{
setErrorFlag(true);
setIsLoading(false);
}
}
};
fetchUsers();
return () => source.cancel("Data fetching cancelled");
}, [userId]);
return (
<ScrollView contentContainerStyle={styles.container}>
<View style={styles.wrapperStyle}>
{!isLoading && !hasError && user && <User userObject={user} />}
</View>
<View style={styles.wrapperStyle}>
{isLoading && <Text> Loading </Text>}
{!isLoading && hasError && <Text> An error has occurred </Text>}
</View>
<View>
<Button
title="Load user"
onPress={changeUserIdHandler}
disabled={isLoading}
style={styles.buttonStyles}
/>
</View>
</ScrollView>
);
}
const styles = StyleSheet.create({
container: {
flex: 1,
backgroundColor: "dodgerblue",
alignItems: "center",
justifyContent: "center",
marginTop: Platform.OS === "ios" ? 0 : Constants.statusBarHeight,
},
wrapperStyle: {
minHeight: 128,
},
buttonStyles: {
padding: 100,
},
});
[/code]

How to make a POST request

POST is the HTTP method you use to send data to the server for updating or creating a resource. Making a POST request in Axios is similar to making a GET request. Most of the time, POST requests are made with user-generated data submitted using a form. Data requires validation on the client side before it is submitted.

Two main React packages for managing forms are Formik and React Hook Form. React Native form for the user’s full name and email in the code snippet below. Both TextInput components are controlled components.

After clicking the submit button, the TextInput fields and the submit button are disabled before you display a message to show you are creating the resource. Disabling the submit button ensures the user doesn’t make multiple submissions. After successfully submitting a POST request, you display a success message to the user:

[code language=”css”]
import axios from "axios";
import React, { useState, useEffect } from "react";
import {
StyleSheet,
Text,
ScrollView,
View,
Button,
Image,
Platform,
} from "react-native";
import Constants from "expo-constants";
const baseUrl = "https://reqres.in";
function User({ userObject }) {
return (
<View>
<Image
source={{ uri: userObject.avatar }}
style={{ width: 128, height: 128, borderRadius: 64 }}
/>
<Text style={{ textAlign: "center", color: "white" }}>
{`${userObject.first_name} ${userObject.last_name}`}
</Text>
</View>
);
}
export default function App() {
const [userId, setUserId] = useState(1);
const [user, setUser] = useState(null);
const [isLoading, setIsLoading] = useState(false);
const [hasError, setErrorFlag] = useState(false);
const changeUserIdHandler = () => {
setUserId((userId) => (userId === 3 ? 1 : userId + 1));
};
useEffect(() => {
const source = axios.CancelToken.source();
const url = `${baseUrl}/api/users/${userId}`;
const fetchUsers = async () => {
try {
setIsLoading(true);
const response = await axios.get(url, { cancelToken: source.token });
if (response.status === 200) {
setUser(response.data.data);
setIsLoading(false);
return;
} else {
throw new Error("Failed to fetch users");
}
} catch (error) {
if(axios.isCancel(error)){
console.log(‘Data fetching cancelled’);
}else{
setErrorFlag(true);
setIsLoading(false);
}
}
};
fetchUsers();
return () => source.cancel("Data fetching cancelled");
}, [userId]);
return (
<ScrollView contentContainerStyle={styles.container}>
<View style={styles.wrapperStyle}>
{!isLoading && !hasError && user && <User userObject={user} />}
</View>
<View style={styles.wrapperStyle}>
{isLoading && <Text> Loading </Text>}
{!isLoading && hasError && <Text> An error has occurred </Text>}
</View>
<View>
<Button
title="Load user"
onPress={changeUserIdHandler}
disabled={isLoading}
style={styles.buttonStyles}
/>
</View>
</ScrollView>
);
}
const styles = StyleSheet.create({
container: {
flex: 1,
backgroundColor: "dodgerblue",
alignItems: "center",
justifyContent: "center",
marginTop: Platform.OS === "ios" ? 0 : Constants.statusBarHeight,
},
wrapperStyle: {
minHeight: 128,
},
buttonStyles: {
padding: 100,
},
});
[/code]

How to make a DELETE request

DELETE requests using Axios the same way you make POST and PUT requests. DELETE request will delete a resource from the server side. You can replace the onSubmitFormHandler of the code for making a POST request with the event handler below to make a DELETE request.

[code language=”css”]
const onSubmitFormHandler = async (event) => {
if (!fullName.trim() || !email.trim()) {
alert("Name or Email is invalid");
return;
}
setIsLoading(true);
try {
const response = await axios.delete(`${baseUrl}/api/users/2`, {
fullName,
email,
});
if (response.status === 204) {
alert(` You have deleted: ${JSON.stringify(response.data)}`);
setIsLoading(false);
setFullName(”);
setEmail(”);
} else {
throw new Error("Failed to delete resource");
}
} catch (error) {
alert("Failed to delete resource");
setIsLoading(false);
}
};
[/code]

How to make a PUT request

Updating a resource requires either the PUT or PATCH method. If a resource exists, using the PUT method completely overwrites it, and creates a new resource if it doesn’t. PATCH makes partial updates to the resource if it exists and does nothing if it doesn’t.

Making a PUT request to an API is similar to making a POST request. The only difference is the configuration object passed to Axios, or the HTTP method needed to invoke to make a PUT request to the API. Replace the onSubmitFormHandler of the POST request with the code below to make a PUT request.

[code language=”css”]</pre>
const onSubmitFormHandler = (event) => {
if (!fullName.trim() || !email.trim()) {
alert("Name or Email is invalid");
return;
}
setIsLoading(true);
const configurationObject = {
url: `${baseUrl}/api/users/2`,
method: "PUT",
data: { fullName, email },
};
axios(configurationObject)
.then((response) => {
if (response.status === 200) {
alert(` You have updated: ${JSON.stringify(response.data)}`);
setIsLoading(false);
setFullName("");
setEmail("");
} else {
throw new Error("An error has occurred");
}
})
.catch((error) => {
alert("An error has occurred");
setIsLoading(false);
});
};
[/code]

How to handle errors

React-error-boundary (Simple reusable React error boundary component) is a simple reusable component based on React error boundary API that provides a wrapper around your components and automatically catches all errors from the children’s components hierarchy, and also provides a great way to recover your component tree. Create an Errorhandler component like the following code snippet.

[code language=”css”]</pre>
import * as React from "react";
import { ErrorBoundary } from "react-error-boundary";
import { View, StyleSheet, Button } from "react-native";
import { Text } from "components";
const myErrorHandler = (error: Error) => {
// Do something with the error
function ErrorFallback({ resetErrorBoundary }) {
return (
<View style={[styles.container]}>
<View>
<Text> Something went wrong: </Text>
<Button title="try Again" onPress={resetErrorBoundary} />
</View>
</View>
);
}
export const ErrorHandler = ({ children }: { children: React.ReactNode }) => (
<ErrorBoundary FallbackComponent={ErrorFallback} onError={myErrorHandler}>
{children}
</ErrorBoundary>
);
const styles = StyleSheet.create({
container: {
flex: 1,
flexDirection: "column",
alignItems: "stretch",
justifyContent: "center",
alignContent: "center",
paddingHorizontal: 12,
},
});
[/code]

Here you can find the sample code in this Github repository

Best Practices for using AXIOS

Global config

Set up a global configuration that handles all application requests using a standard configuration that is set through a default object that ships with Axios. This object contains:

    • baseURL: A relative URL that acts as a prefix to all requests, and each request can append the URL
    • headers: Custom headers that can be set based on the requests
    • Timeout: The point at which the request is aborted, usually measured in milliseconds. The default value is 0, meaning it’s not applicable.
    • With Credentials: Indicates whether or not cross-site Access-Control requests should be made using credentials. The default is false.
    • Response Type: Indicates the type of data that the server will return, with options including json (default), arraybuffer, document, text, and stream.
    • Response Encoding: Indicates encoding to use for decoding responses. The default value is utf8.
    • xsrfCookieName: The name of the cookie to use as a value for XSRF token, the default value is XSRF-TOKEN.
    • xsrfHeaderName: The name of the HTTP header that carries the XSRF token value. The default value is X-XSRF-TOKEN.
    • maxContentLength: Defines the max size of the HTTP response content in bytes allowed
    • maxBodyLength: Defines the max size of the HTTP request content in bytes allowed

Most of the time, only be using baseURL, header, and maybe timeout. The rest of them are less frequently needed as they have smart defaults, but it’s nice to know they are there in case you need to fix up requests.

Are you looking for a React Native developer

Contact Us

This is the DRYness at work. For each request, we don’t have to repeat the baseURL of our API or repeat important headers that we might need on every request.

Custom instance

Setting up a “custom instance” is similar to a global config, but scoped to specified components so that it’s still a DRY technique, but with hierarchy. Set up a custom instance in a new file (Ex: authAxios.js) and import it into the “concern” components.

[code language=”css”]
// authAxios.js
import axios from ‘axios’;
const customInstance = axios.create ({
baseURL : ‘https://axios-app.firebaseio.com’
})
customInstance.defaults.headers.post[‘Accept’] = ‘application/json’
// Or like this…
const customInstance = axios.create ({
baseURL : ‘https://axios-app.firebaseio.com’,
headers: {‘Accept’: ‘application/json’}
})
[/code]

Then import this file into the “concern” components:

[code language=”css”]

// form.js component import from our custom instance
import axios from ‘./authAxios’;
export default {
methods : {
onSubmit () {
axios.post(‘/users.json’, formData)
.then(res => console.log(res))
.catch(error => console.log(error))
}
}
}
[/code]

Axios Verbs

Group the Axios HTTP verbs, like GET, POST, DELETE, and PATCH, in the base config file, as below.

[code language=”css”]</pre>
export function getRequest(URL) {

return axiosClient.get(`/${URL}`).then(response => response);

}

export function postRequest(URL, payload) {

return axiosClient.post(`/${URL}`, payload).then(response => response);

}

export function patchRequest(URL, payload) {

return axiosClient.patch(`/${URL}`, payload).then(response => response);

}

export function deleteRequest(URL) {

return axiosClient.delete(`/${URL}`).then(response => response);
<pre>}
[/code]

Now import the custom functions directly wherever needed to make an API request, as in the code below.

[code language=”css”]</pre>
import { getRequest } from ‘axiosClient’;

async function fetchUser() {

try {

const user = await getRequest(‘users’);

} catch(error) {

//Log errors

}
<pre>}
[/code]

Interceptors

  • Interceptors helps with cases where the global config or custom instance might be too generic, in the sense that if you set up a header within their objects, it applies to the header of every request within the affected components. Interceptors have the ability to change any object properties on the fly. For instance, we can send a different header based on any condition we choose within the interceptor.
  • Interceptors can be in the main.js file or a custom instance file. Requests are intercepted after they’ve been sent out and allow us to change how the response is handled.

[code language=”css”]
// Add a request interceptor
axios.interceptors.request.use(function (config) {
// Do something before request is sent, like we’re inserting a timeout for only requests with a particular baseURL
if (config.baseURL === ‘https://axios-app.firebaseio.com/users.json’) {
config.timeout = 4000
} else {
return config
}
console.log (config)
return config;
}, function (error) {
// Do something with request error
return Promise.reject(error);
});
// Add a response interceptor
axios.interceptors.response.use(function (response) {
// Do something with response data like console.log, change header, or as we did here just added a conditional behaviour, to change the route or pop up an alert box, based on the reponse status
if (response.status === 200 || response.status 201) {
router.replace(‘homepage’) }
else {
alert(‘Unusual behaviour’)
}
console.log(response)
return response;
}, function (error) {
// Do something with response error
return Promise.reject(error);
});
[/code]

Conclusion

For most of your HTTP communication needs, Axios provides an easy-to-use API in a compact package.

There are some alternative libraries for HTTP communication, such as ky, a tiny and elegant HTTP client based on window.fetch; superagent, a small, progressive client-side HTTP request library based on XMLHttpRequest.

But Axios is a better solution for applications with a lot of HTTP requests and for those that need good error handling or HTTP interceptions.

We at Andolasoft has long expertise on API Request solution with AXIOS on a React Native App. We have highly experienced React Native and React developers to help you for the same. Book a free consultation on your issues.

How To Improve Your Application Performance

Applications are the lifeblood of any business. They have become the driving force of the digital age. As the demand for applications has grown, so has the complexity of these apps. With ever-increasing traffic and user numbers, application performance has becoming a major issue for businesses. To keep up with this demand, businesses need to know how to improve their application performance.

What Is Application Performance?

Application performance is the number of transactions completed in a period of time. In other words, it is how fast your app is performing.

There are two types of application performance:

– First-time user experience – How easy your application is to use on the first-time visit. You want to be sure that new users find it easy to navigate and discover all the features they need without any obstacles.

– Return visitor experience – How easy your application is for return visitors after they leave. They should be able to immediately access their previous information and accomplish what they originally set out to do with no wait time or delays in functionality.

Never miss an update from us. Join 10,000+ marketers and leaders.

Different Types Of Applications

Before deep dive to know how to improve your application performance, you need to understand the different types of applications.

There are five different types of applications:

  • Web apps
  • Desktop apps
  • Mobile apps
  • Back-end (server) apps
  • Cloud applications

Most Common Performance Issues

Are you struggling to improve application performance? If so, these are some of the most commonly seen performance issues.

1. High Latency

High latency can be a big problem as it causes your application to be more difficult to use and results in higher abandonment rates. It also impacts user satisfaction and experience.

2. Bandwidth Consumption

As your application’s traffic grows, so does the amount of bandwidth it consumes. If you don’t keep up with the demand, your app will slow down dramatically or even crash due to lack of resources. This could cause customers to abandon your app altogether.

3. Server Limitations

If you have no room left on your server for more incoming requests, then your website may have trouble fulfilling current requests leading to abandonment or slower response time for new visitors who come back later on.

4. Application Crashes

Application crashes are a common issue when trying to optimize an application’s performance because they affect the user experience and engagement negatively leading people to abandon or lose interest in the app altogether often resulting in high abandonment rates and low conversion rates of visitors into customers.

How To Improve Your Application’s Performance

The key to improving application performance is making sure the application is constantly being monitored. When your application is constantly being monitored, you will be able to identify bottlenecks and optimize the system accordingly.

Another important step is always maintaining an up-to-date backup of your database so that if something does go wrong with your server, you will have a safe copy of the data in case it needs to be restored. Finally, make sure your website has good uptime by implementing redundancy measures and monitoring your website during peak hours.

Never miss an update from us. Join 10,000+ marketers and leaders.

To improve performance of an application we have to perform performance testing.

Performance Testing is a software testing process used for testing the speed, response time, stability, reliability, scalability and resource usage of a software application under a particular workload.

The main purpose of performance testing is to identify and eliminate the performance bottlenecks in the software application. It is a subset of performance engineering and also known as “Performance Testing”.

The focus of Performance Testing is checking a software programs

  • Speed – Determines whether the application responds quickly
  • Scalability – Determines the maximum user load the software application can handle.
  • Stability – Determines if the application is stable under varying loads

Various types of performance testing are there like, Load testing, Stress Testing, Volume testing etc.

Conclusion

Application Performance is the speed at which your application performs. It includes the speed of your website, app, and any other software or service you may be using. Whether you’re using a web application, a mobile application, or a software system, it’s important to keep in mind the impact of poor performance.

We at Andolasoft, testing applications using Jmeter tool to check their load. The objective is to identify performance bottlenecks before the software application goes live.

I’ve worked with the team at Andolasoft on multiple websites. They are professional, responsive, & easy to work with. I’ve had great experiences & would recommend their services to anyone.

Ruthie Miller, Sr. Mktg. Specialist

Salesforce, Houston, Texas

LEARN MORE

When we perform stress testing involves testing an application under extreme workloads to see how it handles high traffic or data processing. The objective is to identify the breaking point of an application.

When we perform volume testing large no. of. Data is populated in a database and the overall software system’s behavior is monitored. The objective is to check software application’s performance under varying database volumes.

At Andolasoft we have experienced testing professional to do various types of performance testing in latest technology. Hire us now to improve your website and application performance and engagement.

How To Promote Your WordPress Website The Actionable Tips

Developing a WordPress website is not enough but to achieve more traffic and more revenue according to your expectation should be the prime objective. In your WordPress development, your WordPress developer has implemented all necessary latest features, use of premium theme and customization to engage with your target audience, and all the necessary plugins for smooth operation.

You get all excited with your, as you are finally fleshing out the long-held dream to run your online business. You are all ready to open your shop.

In simple terms, your WordPress website is completed and you are ready to rock the party. But you get aero customers.

Even after doing hours of hard work you are not getting customers as you except earlier. After some research and analysis you came to know that the main problem is customers are not able to found your website. Nobody know about your website and you’re offered service. In other words you can say there is lack of visibility of your website.

So, what will be the solution for that and what can you do to get your website visibility?

There are so many questions comes to mind if you will deep drive in to this. But there is one solution for all your questions and that is “Marketing”.

Marketing Strategy

Marketing the one medicine for all your pains. A well marketing plan and strategy can help you to grow your online business and get visibility on your target audiences.

Normally it’s very difficult to find your website and business in the comparative market where thousands of website and business are going live daily. In this situation marketing has great role for your services or product.

To get effective results you need to promote your website. Marketing your website is always the best result to create an audience for your brand and product.

With marketing you are conveying your message to a large group of people. But you need to follow an effective marketing strategy.

Before discussing more about marketing let me tell you some basic things which helps your marketing to reach the goal, like choosing a web development technology, user-friendly and engaging web layout and design and SEO friendliness of website.

If we will talk about technology then, I will recommend “WordPress” for all of you. WordPress is the best CMS platform with custom plugins and best for marketing of any type of websites. Let me share in details

Also Read- Reasons Why Choose WordPress for Web Development

Why WordPress is best for Marketing?

WordPress is basically search engine friendly and that helps your website to gets more traffic.

A WordPress site gets an average of 23 billion page views each month. The number grows each passing day.

There are 75 billion websites that run on WordPress.

You can set your entire marketing strategy with the WordPress dashboard using the plugin and integration when needed.

And the best thing is you don’t have to become an expert in coding.

Also Read – How Much Does A WordPress Website Cost?

Let’s come to the main topic,

How to Market your WordPress Website?

Any marketer can develop posts, manage calendars, increase search traffic, and post the content directly into WordPress.

So, here are a few marketing tips you can follow to market your WordPress website.

Never miss an update from us. Join 10,000+ marketers and leaders.

1. Develop Mobile Responsive WordPress Theme:

Now a days all the marketing activities results are completely depends upon the bid daddy Google. Google keeping eye on every websites activities and resulting those websites which has good content, layout and user centric information. Here website contents also play a great role in marketing.

Google loves mobile-friendly websites. So you need to make your WordPress site optimized with your mobile.

Go for the themes that are marked as mobile-friendly. Most of them are optimized to some level but not all of them are completely optimized.

2. Develop Quality content and never forget to Market your Content:

Good content is important for achieving success on your website. By content, it refers to both visual and textual form. If the website is a blog or magazine, then it’s obvious that the main focus will be on text.

If you have a portfolio site, then visual content should be put on the maximum level.

Quality content refers to:

  • Longform
  • Informative
  • Shareable
  • Engaging
  • Relevant to your niche and to the topic content
  • Well written
  • Competent

It is important to keep your content unique and fresh. This will create more traffic to your website.

It is also important to have a captivating image with a catchy headline along with a caption that describes the post and attracts more traffic to your website.

Do you want a WordPress website but don’t know how to create one? We will install and setup WordPress for you, absolutely free of cost!

When you offer your audience something valuable to read or view creates trust and a strong relationship with your audience.

How to get the most from Content Marketing?

Filling up 100 papers or flooding your page with videos and images doesn’t add any value. Content marketing needs to be properly put up and approached as any other marketing collateral strategy.

Content Marketing(Source – mekshq.com)

  • Develop a Content Calendar: A content calendar helps you to be on track by publishing daily with content pushed back to any particular goal or theme.To remain on a particular schedule, develop and follow the content calendar. Maximize the content marketing efforts by scheduling posts to share on social media.
  • Make different types of content: Don’t just stick to a particular form of content rather focus on various types of content. Always develop fresh blogs and follow the trend.

3. Develop an XML Sitemap:

Website crawling and indexing is important factor to come in the search results of major search engines. So before coming to search result your website must be crawl and index by search engine like Google. XML sitemap helps the web pages to crawl by search engines.

WordPress automatically develops the sitemap for you, but those are not optimized. One can easily and quickly optimize the sitemap with a plugin like Google XML Sitemap Generator. It is a handy tool that not only helps you to maintain your track on the index pages but it also tells Google about your update.

Whenever you post any new blog or create any changes, it notifies Google to re-crawl your website. This helps to improve the ranking of your site in the search results.

4. Customized Permalinks:

Your content can be optimized by ensuring the URLs of the blog post have relevant keywords. With WordPress you can create more permalink, but before you push it live make sure it is rich in keywords and readable.

You need to optimize these permalink that reflects the content easily to your visitors.

5. SEO

The first page of Google has become a refined and crucial part, in comparison to the second and other pages. From the second page and beyond it is considered as the dark web for some. Hence a strong SEO presence is important in the present day.

Also, you can go for the paid search campaign, but put more focus on the organic SEO.

According to a report by Business2community.com 70%-80% users don’t follow paid advertising.

How to gain more from SEO?

When someone hears about the term “SEO“, it leads them to think about the experts and the obscurities. But the only secret to success is time and consistency. It states you can do it on your own by following some best practices.

Good SEO helps to generate leads. You need to put the information in the marketing database. So you can later push the content.

  • Include image: Whenever you add an image to your content, it helps in visitor engagement and that tend to increases the search engine ranking.
  • Repurpose Content: Rather than developing new content every time, you can create some changes to the old content. Make the most from your old one, all you need to do is update and republish the last blogs. This increases visitor traffic.
  • Email Marketing: For any business, email marketing is an effective way to stay connected with prospects. You also need to address their contact and behavioral information.

To capture this information, you have to gain attention in new ways so you can get more people to website.

Rich snippets are an effective way to increase search traffic. But many times they are ignored by marketers as they require some coding to create.

I’ve worked with the team at Andolasoft on multiple websites. They are professional, responsive, & easy to work with. I’ve had great experiences & would recommend their services to anyone.

Ruthie Miller, Sr. Mktg. Specialist

Salesforce, Houston, Texas

LEARN MORE

FAQ:

What is the importance of a website?

If you want to market your business online you need to have a website and a well-planned online presence strategy. A website is important as it helps to gain credibility as a business.

A website most probably provides a map and directions to your office, shops to your customers, and visitors to reach you easily.

How to market your website?

You need to market your business to gain more customers and traffic to9 your website.

  • Website SEO
  • Email Marketing
  • Quality content and Content Marketing

Why do you need to update your website?

Keeping your website up-to-date helps to gain trust between you and your customers. As many times customers rely on websites for useful information on whatever business you are in. The updated information helps to build domain authority.

Why is website promotion important?

Websites are an important medium for customer communication. A website helps to generate more customers. With the internet, it has become easier to get feedback/opinions from customers on newly updated products and services. Promoting a website helps to get maximum attention from your targeted customers.

Conclusion:

Marketing is a creative job and you can do a lot with your WordPress website if you prepare the right marketing strategy and use the right marketing tools. With the WordPress dashboard you can handle any kind of task that is essential for marketing with the help of plugins within a very less time like SEO, image optimization, Social Media sharing, and many more.

More and more businesses are moving towards digitized mode of business, and you are still following the old method of business. Noting gone away now. This is the right time to start new things.

Let Andolasoft help you in your WordPress website development and online promotion of your business.

Andolasoft is one of the trusted web and mobile app development company has long expertise in all technology like WordPress and digital promotion of product and services. We have helped many businesses on their tech development and business growth. Our case studies will tell more about this.

Contact us have a free consultation about your business ideas or issues and hire our dedicated developers and marketing experts to take your business to next level.