Tips To Increase Your App Download Through App Store Optimization

App Store Optimization (ASO) is the process of improving the visibility of a mobile app (such as an iPhone, iPad, Android, or Windows Phone app) in an app store (such as iTunes or Google Play or windows marketplace).

App store optimization is just like search engine optimization to improve the app findings by users in an app store.

App store optimization includes the process of ranking highly in an app store’s search results and top charts rankings.

Ranking higher in search results and top charts will help in more downloads for an app

On-Page optimization:

  • App Title:

    It plays a vital role in ASO. The app title should clearly describes the app and what it does, but it should be short.

    Too long app titles are get truncated, this kills user experience.

  • App Description:

    This is the second most important part of ASO. This is the place where you sell your app based on the great features!Make sure to keep this section short and concise.

    As it is going to use in user’s cell phones and not on their desktop monitors.

  • App Logo:

    This is the way you can express what your app is all about.

    So the app logo should be designed by a professional designer to create a stunning app logo. This part should not be overlooked.

  • App Screenshot:

    Screenshots should be clear and with high resolution. You should highlight the best parts of your app with multiple screenshots.

    If possible add short text/explanation to the screenshots.

  • Category:

    Make sure to categorize your app appropriately. As a lot of searchers jump straight into specific categories if they are looking for something.

    There is also a  secondary category option in which your app fits into two categories, but the primary category does act as the most important.

  • Keywords:

    You need to know which keywords are relevant and used very often by your targeted users,  to improve your search rankings. It is very useful to monitor the other competitors.

Off-Page Optimization:

  • Overall App Ratings:

    This is an important factor for ASO. If most of the people who downloaded the app gave 5 out of 5 stars, then it must be a great app.

    Ratings are also a direct reflection of your app’s performance measurement – a great app will get great ratings. The front page placement likely to rely on a combination of downloads, ratings, reviews and Google pluses.

  • App Reviews:

    Like ratings, reviews play an important role in ASO. You want as many app users to leave out genuine reviews of your app.

    The conversion rate will grow depending upon the number of the favorable reviews your app receives.

    Always keep track of the users’ reviews and try to improve your app based on the feedbacks.

  • Total App Downloads:

    This certainly affects searcher physcology. If the app has good download number, it creates the impression of being popular, then the chances download of the particular app will be higher.

Verdict

Around 63% of apps are discovered via app store searches. ASO is the most used method for discovering and downloading new apps from the app stores.

So to boost your app’s search ranking and downloading make sure to follow these quick tips of ASO. ASO is just like a secret weapon to increase your app’s visibility, ranking and overall success.

Also See: How to monetize your Android application through In-App Billing?

You can also check out some of our free apps.

How did you like this blog? Please send me your comments, if any.

What’s new in Android 4.4 ‘KitKat’ for Developers

Google released the latest version of Android (version 4.4), known as KitKat on 31st Oct 2013. It is designed to work on a wide variety of devices. The new version of Android has got a lot of exciting features for both users and developers.


KitKat

Some of the new features in the latest version of Android for developers to learn and explore are:

Screen Recording

The screen recording feature of Android 4.4 lets you capture video of your app and save it as an MP4 file. The recording can done at any device-supported resolution and then shared directly from the device to a computer for post-production.

Full Screen Immersive Mode

Full-screen immersive mode in KitKat allows any app to go truly full-screen, hiding both the navigation and status bars and takes advantage of every last pixel on the screen of a smartphone or tablet. You simply need to do a swipe from the top or bottom of the screen, in order to display the system bars again. Basically, developers can hide the entire system’s interface while the user is engaged in their apps(like e-reader and other media apps and games).

Scene Transitions

Android 4.4’s new transitions framework allows app developers to define how one screen animate to another scene. Developers can use predefined transition types called TransitionManager that animate the properties that matters the most to your app.

Storage Access Framework

With the release of Android 4.4 KitKat, users now have a smoother way of accessing and creating documents in an app from a variety of cloud storage providers. Developers can add their own storage devices to Android without having to do it on a specific vendor by vendor basis.

New WebView & Chromium Features

KitKat includes new implementation of WebView based on Chrome for Android 3.0. It allows developers to use the latest compatibility features, performance standards and support in WebView to access their Web-based content. Chromium WebView supports many aspects of HTML5 as well as CSS3 and JavaScript.

New Near Field Communications Platform Support

One of the new features in Android 4.4 is Host Card Emulation (HCE) to support Near Field Communications (NFC) transactions. Apps can also act in a new “Reader Mode” to receive NFC functionality (like payment processing, building access, tickets etc.) as it uses an Application Identifier (AID) to route the different NFC function from the hardware in a device to the app.

Low-Power Sensors

Android 4.4 support for hardware sensor batching, a new optimization that can dramatically reduce power consumed by ongoing sensor activities. It can makes your app more efficient and it lets you track sensor events continuously.

RenderScript Takes Advantage of Device Hardware

RenderScript can now be accessed in kitkat 4.4 by a new C++ api in the android native developer kit. High hardware consuming tasks can now be integrated into an apps native code and it allow for support from multiple smartphone CPU and GPU cores.

Andolasoft has a team of experienced android developers who are skilled to develop innovative apps for all versions of android devices. We have developed Android Apps like KurrentJobs, EstateMobz and many more.

How to use ‘Contextual Action’ bar in ‘ListView’ page

Android_list_item

Introduction:

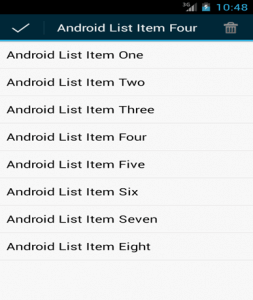
‘Android.View.ActionMode’ is an Android API that is used to set up contextual actionbar with the help of xml. When an app enables this action mode by selecting an item, a contextual action bar is displayed at the header of the page. Here, users are enabled to perform on the currently chosen item.

The contextual action bar disappears when the user selects other action icon (in this case ‘delete’ icon), or selects the ‘Done’ action on the left side of the action bar.

Note: The contextual action bar works independently and overtakes the action bar position.

Steps to create a contextual action bar with the delete action:

1. In the main activity, implement the ‘ActionMode.Callback’ interface and override all implemented methods as per application requirements:

  • public boolean onActionItemClicked(ActionMode mode, MenuItem item)
  • public boolean onCreateActionMode(ActionMode mode, Menu menu)
  • public void onDestroyActionMode(ActionMode arg0)
  • public boolean onPrepareActionMode(ActionMode arg0, Menu arg1)

2. For selecting list item, implement the ‘setOnItemLongClickListener’ method on ‘ListView ‘object and call ‘this.startActionMode()’ to start ‘actionmode’ by passing ‘ActionMode.Callback’ object.

Example of Main-Activity:

[sourcecode]package com.example.contextualactionbardemo;

import java.util.ArrayList;

import android.os.Bundle;
import android.app.AlertDialog;
import android.app.ListActivity;
import android.content.DialogInterface;
import android.util.Log;
import android.view.ActionMode;
import android.view.Menu;
import android.view.MenuInflater;
import android.view.MenuItem;
import android.view.View;
import android.widget.AdapterView;
import android.widget.ArrayAdapter;
import android.widget.ListView;
import android.widget.AdapterView.OnItemLongClickListener;

public class MainActivity extends ListActivity {
protected Object mActionMode;
private static int selectedItem = -1;
private ArrayList list;
private String listItem = "";
private ArrayAdapter adapter;

@Override
protected void onCreate(Bundle savedInstanceState) {
super.onCreate(savedInstanceState);
ListView listView = (ListView) findViewById(R.id.listview);
String[] values = new String[] { "Android List Item One",
"Android List Item Two",
"Android List Item Three",
"Android List Item Four",
"Android List Item Five",
"Android List Item Six",
"Android List Item Seven",
"Android List Item Eight"
};

list = new ArrayList();
for (int i = 0; i < values.length; ++i) {
list.add(values[i]);
}
adapter = new ArrayAdapter(this,
android.R.layout.simple_list_item_1, android.R.id.text1, list);
setListAdapter(adapter);

listView = getListView();
listView.setOnItemLongClickListener(new OnItemLongClickListener() {

public boolean onItemLongClick(AdapterView<?> arg0, View arg1,
int pos, long id) {
Log.v("long clicked","pos"+" "+pos);
if (mActionMode != null) {
return false;
}
selectedItem = -1;
selectedItem = pos;
listItem = list.get(selectedItem);
mActionMode = MainActivity.this.startActionMode(mActionModeCallback);
arg1.setSelected(true);
return true;
}
});

}

private ActionMode.Callback mActionModeCallback = new ActionMode.Callback() {
@Override
public boolean onActionItemClicked(ActionMode mode, MenuItem item) {
switch (item.getItemId()) {
case R.id.action_delete:
AlertDialog.Builder alertDialog = new AlertDialog.Builder(MainActivity.this);
// Setting Dialog Title
alertDialog.setTitle("Confirm Delete…");
// Setting Dialog Message
alertDialog.setMessage("Are you sure you want to delete?");
alertDialog.setPositiveButton("YES", new DialogInterface.OnClickListener() {
public void onClick(DialogInterface dialog,int which) {
adapter.remove(listItem);
adapter.notifyDataSetChanged();
}
});
// Setting Negative "NO" Button
alertDialog.setNegativeButton("NO", new DialogInterface.OnClickListener() {
public void onClick(DialogInterface dialog, int which) {
dialog.cancel();
}
});
// Showing Alert Message
alertDialog.show();
mode.finish();
return true;
default:
return false;
}
}

@Override
public boolean onCreateActionMode(ActionMode mode, Menu menu) {
mode.setTitle(listItem);
MenuInflater inflater = mode.getMenuInflater();
inflater.inflate(R.menu.deletemenu, menu);
return true;
}

@Override
public void onDestroyActionMode(ActionMode arg0) {
// TODO Auto-generated method stub
mActionMode = null;
selectedItem = -1;
}

@Override
public boolean onPrepareActionMode(ActionMode arg0, Menu arg1) {
// TODO Auto-generated method stub
return false;
}
};
}[/sourcecode]

Example of /res/menu/deletemenu.xml:

Conclusion:

Contextual action mode is useful in following cases:

  • To show customize menu display with icon of edit, rename, delete
  • To display dynamic customize menu over the action bar

Have something to add to this topic? Share it in the comments.

How to show Captured Images dynamically in “GridView” Layout

There are numerous camera apps in the market which displays shopping items (i.e. image view). In these camera apps we need to arrange each photo items in a list view, basically a ‘Grid View’.

In such cases, ‘table layout’ would be easier to use; but it is difficult to arrange large number of items in

gridview_sample-253x300

side scroll view. As ‘table view’ is just a layout manager, it doesn’t allow direct interaction with each item to the users.

In order to tackle such development issues, it would be smart to implement ‘Grid View’ Layout.

What is “Grid View” Layout?

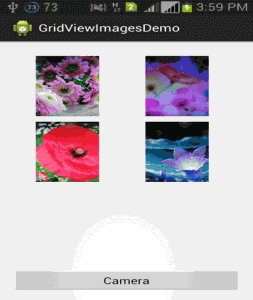
Grid View (android.widget.Grid View) is a layout that is implemented to show two-dimensional view with scrollable structure.

With the help of ‘List’ adapter, we can add images dynamically to a ‘Grid View’ layout by customizing the number of columns.

Let me tell you the process to show your Android Smartphone captured images dynamically in “Grid View” layout with some example.

Example of Layout xml

[sourcecode]<RelativeLayout xmlns:android="http://schemas.android.com/apk/res/android"
xmlns:tools="http://schemas.android.com/tools"
android:layout_width="match_parent"
android:layout_height="match_parent"
android:paddingBottom="@dimen/activity_vertical_margin"
android:paddingLeft="@dimen/activity_horizontal_margin"
android:paddingRight="@dimen/activity_horizontal_margin"
android:paddingTop="@dimen/activity_vertical_margin"
tools:context=".MainActivity" >

<RelativeLayout
android:id="@+id/RelativeGridLayout"
android:layout_width="wrap_content"
android:layout_height="fill_parent" >

<GridView
android:id="@+id/gridviewimg"
android:layout_width="wrap_content"
android:layout_height="fill_parent"
android:gravity="center"
android:numColumns="2"
android:scrollbarStyle="outsideInset"
android:smoothScrollbar="true"
android:verticalSpacing="10dp"
android:paddingBottom="50dp"
android:paddingTop="10dp"
/>
</RelativeLayout>

<RelativeLayout
android:id="@+id/RelativeLayout01"
android:layout_width="fill_parent"
android:layout_height="40dp"
android:layout_alignBottom="@+id/RelativeGridLayout"
>

<Button
android:id="@+id/capture_btn1"
android:layout_width="fill_parent"
android:layout_height="wrap_content"
android:layout_alignParentTop="true"
android:layout_centerHorizontal="true"
android:text="Camera" />
</RelativeLayout>

</RelativeLayout>[/sourcecode]

Example of Main form Activity class

1.MainActivity.java

[sourcecode]package com.example.gridviewimagesdemo;

import java.io.File;
import java.io.FileInputStream;
import java.io.FileNotFoundException;
import java.io.FileOutputStream;
import java.io.IOException;
import java.text.DateFormat;
import java.text.SimpleDateFormat;
import java.util.ArrayList;
import java.util.Arrays;
import java.util.Date;
import java.util.List;

import android.net.Uri;
import android.os.Bundle;
import android.os.Environment;
import android.provider.MediaStore;
import android.app.Activity;
import android.content.ActivityNotFoundException;
import android.content.Context;
import android.content.Intent;
import android.graphics.Bitmap;
import android.graphics.BitmapFactory;
import android.util.Log;
import android.view.Menu;
import android.view.View;
import android.view.ViewGroup;
import android.view.View.OnClickListener;
import android.widget.BaseAdapter;
import android.widget.Button;
import android.widget.GridView;
import android.widget.ImageView;
import android.widget.Toast;

public class MainActivity extends Activity implements OnClickListener {

Button captureBtn = null;
final int CAMERA_CAPTURE = 1;
private Uri picUri;
private DateFormat dateFormat = new SimpleDateFormat("yyyy-MM-dd HH:mm:ss");
private GridView grid;
private  List<String> listOfImagesPath;

public static final String GridViewDemo_ImagePath = Environment.getExternalStorageDirectory().getAbsolutePath() + "/GridViewDemo/";

@Override
protected void onCreate(Bundle savedInstanceState) {
super.onCreate(savedInstanceState);
setContentView(R.layout.activity_main);

captureBtn = (Button)findViewById(R.id.capture_btn1);
captureBtn.setOnClickListener(this);
grid = ( GridView) findViewById(R.id.gridviewimg);

listOfImagesPath = null;
listOfImagesPath = RetriveCapturedImagePath();
if(listOfImagesPath!=null){
grid.setAdapter(new ImageListAdapter(this,listOfImagesPath));
}
}

@Override
public boolean onCreateOptionsMenu(Menu menu) {
// Inflate the menu; this adds items to the action bar if it is present.
getMenuInflater().inflate(R.menu.main, menu);
return true;
}

@Override
public void onClick(View arg0) {
// TODO Auto-generated method stub
if (arg0.getId() == R.id.capture_btn1) {

try {
//use standard intent to capture an image
Intent captureIntent = new Intent(MediaStore.ACTION_IMAGE_CAPTURE);
//we will handle the returned data in onActivityResult
startActivityForResult(captureIntent, CAMERA_CAPTURE);
} catch(ActivityNotFoundException anfe){
//display an error message
String errorMessage = "Whoops – your device doesn’t support capturing images!";
Toast toast = Toast.makeText(this, errorMessage, Toast.LENGTH_SHORT);
toast.show();
}
}

}

protected void onActivityResult(int requestCode, int resultCode, Intent data) {
if (resultCode == RESULT_OK) {
//user is returning from capturing an image using the camera
if(requestCode == CAMERA_CAPTURE){
Bundle extras = data.getExtras();
Bitmap thePic = extras.getParcelable("data");
String imgcurTime = dateFormat.format(new Date());
File imageDirectory = new File(GridViewDemo_ImagePath);
imageDirectory.mkdirs();
String _path = GridViewDemo_ImagePath + imgcurTime+".jpg";
try {
FileOutputStream out = new FileOutputStream(_path);
thePic.compress(Bitmap.CompressFormat.JPEG, 90, out);
out.close();
} catch (FileNotFoundException e) {
e.getMessage();
} catch (IOException e) {
e.printStackTrace();
}
listOfImagesPath = null;
listOfImagesPath = RetriveCapturedImagePath();
if(listOfImagesPath!=null){
grid.setAdapter(new ImageListAdapter(this,listOfImagesPath));
}
}
}
}

private List<String> RetriveCapturedImagePath() {
List<String> tFileList = new ArrayList<String>();
File f = new File(GridViewDemo_ImagePath);
if (f.exists()) {
File[] files=f.listFiles();
Arrays.sort(files);

for(int i=0; i<files.length; i++){
File file = files[i];
if(file.isDirectory())
continue;
tFileList.add(file.getPath());
}
}
return tFileList;
}

public class ImageListAdapter extends BaseAdapter
{
private Context context;
private List<String> imgPic;
public ImageListAdapter(Context c, List<String> thePic)
{
context = c;
imgPic = thePic;
}
public int getCount() {
if(imgPic != null)
return imgPic.size();
else
return 0;
}

//—returns the ID of an item—
public Object getItem(int position) {
return position;
}

public long getItemId(int position) {
return position;
}

//—returns an ImageView view—
public View getView(int position, View convertView, ViewGroup parent)
{
ImageView imageView;
BitmapFactory.Options bfOptions=new BitmapFactory.Options();
bfOptions.inDither=false;                     //Disable Dithering mode
bfOptions.inPurgeable=true;                   //Tell to gc that whether it needs free memory, the Bitmap can be cleared
bfOptions.inInputShareable=true;              //Which kind of reference will be used to recover the Bitmap data after being clear, when it will be used in the future
bfOptions.inTempStorage=new byte[32 * 1024];
if (convertView == null) {
imageView = new ImageView(context);
imageView.setLayoutParams(new GridView.LayoutParams(ViewGroup.LayoutParams.MATCH_PARENT, ViewGroup.LayoutParams.MATCH_PARENT));
imageView.setPadding(0, 0, 0, 0);
} else {
imageView = (ImageView) convertView;
}
FileInputStream fs = null;
Bitmap bm;
try {
fs = new FileInputStream(new File(imgPic.get(position).toString()));

if(fs!=null) {
bm=BitmapFactory.decodeFileDescriptor(fs.getFD(), null, bfOptions);
imageView.setImageBitmap(bm);
imageView.setId(position);
imageView.setLayoutParams(new GridView.LayoutParams(200, 160));
}
} catch (IOException e) {
e.printStackTrace();
} finally{
if(fs!=null) {
try {
fs.close();
} catch (IOException e) {
e.printStackTrace();
}
}
}
return imageView;
}
}
}[/sourcecode]

Example of Manifest.xml file content:

Example of AndroidManifest.xml

[sourcecode]<?xml version="1.0" encoding="utf-8"?>
<manifest xmlns:android="http://schemas.android.com/apk/res/android"
package="com.example.gridviewimagesdemo"
android:versionCode="1"
android:versionName="1.0" >

<uses-sdk
android:minSdkVersion="8"
android:targetSdkVersion="17" />

<uses-permission android:name="android.permission.WRITE_EXTERNAL_STORAGE" />

<application
android:allowBackup="true"
android:icon="@drawable/ic_launcher"
android:label="@string/app_name"
android:theme="@style/AppTheme" >
<activity
android:name="com.example.gridviewimagesdemo.MainActivity"
android:label="@string/app_name" >
<intent-filter>
<action android:name="android.intent.action.MAIN" />

<category android:name="android.intent.category.LAUNCHER" />
</intent-filter>
</activity>
</application>

</manifest>[/sourcecode]

Conclusion:

So, a ‘Grid view’ implementation would result in following features and benefits:

  • In ‘GridView’ layout items would be listed in a static grid, defined in layout xml file.
  • ‘Gridview’ extends android.widget.Adapter, so it could be used where large amount of data is managed in a single page frame.
  • Enhanced data source binding capabilities (Direct interaction with SQLite Data Source)
  • Built-in support for sorting and paging mechanism
  • Additional Column types (ImageField)

I would like to recommend you to go through my previous article on where I have clearly narrate the process to display your iPhone captured images in Grid View layout.

I hope you find this useful. If you want to develop android or iPhone mobile app for you or for your organization, then you can hire single or group of developers from the pool of skilled and accomplished android specialists. Drop me a line below with your thoughts, thanks.

How to Import CSV Configuration File to Device’s SQLite db

Much like web applications, certain Android apps necessitate configuration adjustments to facilitate app testing and deployment across various environments.

Managing configurations for devices has become a critical task. One efficient way to handle configurations is by uploading them to an SQLite database within the device. This approach offers a structured and easily accessible repository for storing and retrieving configurations.

Incorporating distinct web services APIs, we employ the same Android APK to access data from both developmental and staging servers. Additionally, we exercise control over the integrated camera configuration within the Android APK.

Furthermore, seamless operationality demands the implementation of diverse configuration settings within the APK, dynamically applied without necessitating alterations to the source code during runtime.

  • We used different web services API to access data on server, so we need to use same android APK to access data in dev server as well as stager server.
  • We need to control the camera configuration integrated in android APK
  • Similarly, we need different configuration settings to set dynamically in APK without changing the source code at run-time.

Considering the above scenario, the best thing is to use CSV files, such as the properties files used in Java and .NET platform. In Android, we put CSV file in the device’s phone storage (in this example, the file path is “/storage/sdcard0/Android/data/com.example/”).

We have to write codes to read the CSV file and then spilt the data programmatically using separator. Then it has to be inserted in to a SQLite table (in this example uses ‘appconfigtbl‘).

The sample program in this blog will perform the below mentioned steps to achieve the above mentioned initialization of configuration value inside android app:

  • Check if the CSV file exists in the device with proper file path location defined in the APK
  • Use the asynchronous task that runs in the background of the app and initialize the CSV content to the targeted table.
  • While the data is imported from the CSV file to database, the user will see the progress bar of data being uploaded. In case of larger data, the progress bar dialog will be shown with the value of %completed.
  • Since the data is stored in a config-table, the app can retrieve the record from this table and use it in appropriate section.

Benefits:

  • The APK will be re-initialized with basic configuration data at any time.
  • No need to re-write the APK and compile it again.
  • Easier to setup and run inside the device. We get the changed configuration data at run time.
  • APK can be set up to a different configuration data base when required and can be deployed with different config data (CSV file) at different location easily.

Example of CSV File contents (appconfig.csv)

[sourcecode]
Config ID,Config Name,Config Value
validate_url,http://50.56.70.140/
webservice_url,http://50.56.70.140:8080/HOSTAPP/resources/inspection
camera_resolution_hight,800
camera_resolution_width,600
camera_flashlight_mode,auto
long_password,abc123
[/sourcecode]

Example of Layout xml

[sourcecode]
xmlns:tools="http://schemas.android.com/tools"
android:layout_width="match_parent"
android:layout_height="match_parent"
android:paddingBottom="@dimen/activity_vertical_margin"
android:paddingLeft="@dimen/activity_horizontal_margin"
android:paddingRight="@dimen/activity_horizontal_margin"
android:paddingTop="@dimen/activity_vertical_margin"
tools:context=".MainActivity" >

<TextView
android:id="@+id/showResult"
android:layout_width="wrap_content"
android:layout_height="wrap_content"
android:text="" />

[/sourcecode]

Example of  Main form Activity class

1. MainActivity.java

[sourcecode]
package com.example.csvdemo;

import java.io.BufferedReader;
import java.io.File;
import java.io.FileReader;
import java.util.Date;

import android.os.AsyncTask;
import android.os.Bundle;
import android.os.Environment;
import android.app.Activity;
import android.app.AlertDialog;
import android.app.Dialog;
import android.app.ProgressDialog;
import android.content.DialogInterface;
import android.content.Intent;
import android.content.SharedPreferences;
import android.content.res.Resources;
import android.database.Cursor;
import android.util.Log;
import android.view.Menu;
import android.widget.TextView;

public class MainActivity extends Activity {

private boolean isCsvFileNeedToInitialize = true;
private static final int DIALOG_DOWNLOAD_PROGRESS = 0;
private DBHelper mDbHelper;
private ProgressDialog mProgressDialog;
private static int totalRowsUpdate = 0;

public static final String external_sd = Environment.getExternalStorageDirectory().getAbsolutePath();
public static final File sdCard = Environment.getExternalStorageDirectory();
public static final String sdcardBaseDir = sdCard.getAbsolutePath();
public static final String externalPath = "/Android/data/com.example/";
public static final String csvFileName = "appconfig.csv";

@Override
protected void onCreate(Bundle savedInstanceState) {
super.onCreate(savedInstanceState);
setContentView(R.layout.activity_main);

mDbHelper = new DBHelper(this);
mDbHelper.open();
totalRowsUpdate = 0;

// create empty directory if not exist
File appDir = new File(sdcardBaseDir + externalPath);
if(!appDir.exists())
appDir.mkdirs();

File externalResourceFile = new File(sdcardBaseDir + externalPath + csvFileName);
isCsvFileNeedToInitialize = externalResourceFile.exists();
TextView lableResult = (TextView) findViewById(R.id.showResult);

if(isCsvFileNeedToInitialize)
{
new InitializeCSVFileAsync().execute("");

lableResult.setText( totalRowsUpdate + " fetched from ‘appconfig.csv’ into database successfully.");

} else {
lableResult.setText("’appconfig.csv’ not found!");
PopIt("Exit Application", "’appconfig.csv’ not found!");
}
}

public static void setTotalRecord(int ctr) {
totalRowsUpdate = ctr;
}

private void PopIt( String title, String message ){
AlertDialog.Builder alertbox = new AlertDialog.Builder(this);
alertbox.setTitle(title);
alertbox.setMessage(message);
alertbox.setPositiveButton("Ok", new DialogInterface.OnClickListener() {
public void onClick(DialogInterface arg0, int arg1) {
finish();
}
});
alertbox.show();
}

@Override
public boolean onCreateOptionsMenu(Menu menu) {
// Inflate the menu; this adds items to the action bar if it is present.
getMenuInflater().inflate(R.menu.main, menu);
return true;
}

@Override
protected Dialog onCreateDialog(int id) {
Resources res = getResources();
String reader = "";
int ctr = 0;
try {
File f = new File(sdcardBaseDir + externalPath + csvFileName);
BufferedReader in = new BufferedReader(new FileReader(f));
while ((reader = in.readLine()) != null) { ctr++; }
setTotalRecord(ctr);
}catch(Exception e) {    e.getMessage();  }

switch (id) {
case DIALOG_DOWNLOAD_PROGRESS:
mProgressDialog = new ProgressDialog(this);
mProgressDialog.setProgressDrawable(res.getDrawable(R.drawable.initialize_progress_bar_states));
mProgressDialog.setMessage("Initializing…");
mProgressDialog.setMax(ctr);
mProgressDialog.setProgressStyle(ProgressDialog.STYLE_HORIZONTAL);
mProgressDialog.setCancelable(false);
mProgressDialog.show();
return mProgressDialog;
default:
return null;
}
}

// Display Initialize progress bar for uploading CSVFiles to database
class InitializeCSVFileAsync extends AsyncTask<String, String, String>
{
@Override
protected void onPreExecute() {
super.onPreExecute();
mDbHelper.deleteCongigTableOldRecord();
if(isCsvFileNeedToInitialize)
showDialog(DIALOG_DOWNLOAD_PROGRESS);
}
@Override
protected String doInBackground(String… aurl) {
try {
float total = 0F;
float fctr = 1F;
String reader = "";
int ctr = 0;
boolean skipheader = true;
File f = new File(sdcardBaseDir + externalPath + csvFileName);
BufferedReader in = new BufferedReader(new FileReader(f));

while ((reader = in.readLine()) != null) {
// skip header column name from csv
if(skipheader) {
skipheader = false;
continue;
}
String[] RowData = reader.split(",");
mDbHelper.insertDB(RowData);
total += fctr;
publishProgress(""+(int)total);
//publishProgress((int)(total*100/lenghtOfFile));
}
in.close();
} catch(Exception e) {
e.getMessage();
}
return null;
}
protected void onProgressUpdate(String… progress) {
//Log.d("ANDRO_ASYNC",progress[0]);
mProgressDialog.setProgress(Integer.parseInt(progress[0]));
}
@Override
protected void onPostExecute(String unused) {

File f = new File(sdcardBaseDir + externalPath + csvFileName);
boolean result = f.delete();
if(isCsvFileNeedToInitialize)
dismissDialog(DIALOG_DOWNLOAD_PROGRESS);
mDbHelper.close();
//fillAllList();
}
protected void onDestroy() {
if (mDbHelper != null) {
mDbHelper.close();
}
}
}
}
[/sourcecode]

Example of  Helper class for sqlite database interaction:
Example of AbstractDbAdapter java

[sourcecode]
package com.example.csvdemo;

import android.content.Context;
import android.database.SQLException;
import android.database.sqlite.SQLiteDatabase;
import android.database.sqlite.SQLiteOpenHelper;

public abstract class AbstractDbAdapter {

protected static final String TAG = "ExampleDbAdapter";
protected DatabaseHelper mDbHelper;
protected SQLiteDatabase mDb;

protected static final String CONFIG_TABLE_CREATE =
"create table appconfigtbl (_id integer primary key," + "config_name text not null," + "config_value text," + " createdAt text, " + " updatedAt text);";

protected static final String DATABASE_NAME = "example";
protected static final int DATABASE_VERSION = 2;

protected final Context mCtx;

protected static class DatabaseHelper extends SQLiteOpenHelper {

DatabaseHelper(Context context) {
super(context, DATABASE_NAME, null, DATABASE_VERSION);
}
@Override
public void onCreate(SQLiteDatabase db) {
db.execSQL(CONFIG_TABLE_CREATE);
}
@Override
public void onUpgrade(SQLiteDatabase db, int oldVersion, int newVersion) {
db.execSQL("DROP TABLE IF EXISTS CONFIG_TABLE_CREATE");
onCreate(db);
}
}

public AbstractDbAdapter(Context ctx) {
this.mCtx = ctx;
}

public AbstractDbAdapter open() throws SQLException {
mDbHelper = new DatabaseHelper(mCtx);
mDb = mDbHelper.getWritableDatabase();
return this;
}

public void close() {
if (mDbHelper != null) {
mDbHelper.close();
}
//mDbHelper.close();
}
}
[/sourcecode]

Example of DBHelper java

[sourcecode]
package com.example.csvdemo;

import java.io.File;
import java.io.FileOutputStream;
import java.io.IOException;
import java.io.InputStream;
import java.io.OutputStream;
import java.sql.SQLException;
import java.util.ArrayList;
import java.util.Date;
import java.util.Hashtable;
import java.util.Vector;

import android.content.ContentValues;
import android.content.Context;
import android.database.Cursor;
import android.util.Log;

public class DBHelper extends AbstractDbAdapter{

public static final String KEY_ROWID = "_id";
public static final String KEY_CONFIG_NAME = "config_name";
public static final String KEY_CONFIG_VALUE = "config_value";
public static final String KEY_POSTED_DATE = "createdAt";
public static final String KEY_EDITED_DATE = "updatedAt";
public int maxLevelOnCurrentMenu = 1;

public int getMaxLevelOnCurrentMenu() {
return maxLevelOnCurrentMenu;
}

public void setMaxLevelOnCurrentMenu(int maxLevelOnCurrentMenu) {
this.maxLevelOnCurrentMenu = maxLevelOnCurrentMenu;
}

public static final String DATABASE_TABLE = "appconfigtbl";

public DBHelper(Context ctx) {
super(ctx);
}

public long insertDB(String config_name,String config_value, String createdAt, String updatedAt) {
ContentValues initialValues = new ContentValues();
initialValues.put(KEY_CONFIG_NAME, config_name);
initialValues.put(KEY_CONFIG_VALUE, config_value);
initialValues.put(KEY_POSTED_DATE,createdAt);
initialValues.put(KEY_EDITED_DATE,updatedAt);
return mDb.insert(DATABASE_TABLE, null, initialValues);
}

public long insertDB(String[] RowData)
{
long result = 0;
ContentValues values = new ContentValues();
values.put(KEY_CONFIG_NAME, RowData[0]);
values.put(KEY_CONFIG_VALUE, RowData[1]);
values.put(KEY_POSTED_DATE, "");
values.put(KEY_EDITED_DATE, "");
result = mDb.insert(DATABASE_TABLE, null, values);
return result;
}

public boolean deleteList(long rowId) {

return mDb.delete(DATABASE_TABLE, KEY_ROWID + "=" + rowId, null) > 0;
}

public boolean deleteCongigTableOldRecord() {

return mDb.delete(DATABASE_TABLE,  null, null) > 0;
}

}
[/sourcecode]

Example of initialize_progress_bar_states.xml [Used to show progressbar UI %progress value]

[sourcecode]

<gradient
android:startColor="#98887b"
android:centerColor="#ddd7c9"
android:centerY="0.95"
android:endColor="#0d1522"
android:angle="270"
/>

<corners
android:bottomRightRadius="7dp" android:bottomLeftRadius="7dp"
android:topLeftRadius="7dp" android:topRightRadius="7dp"/>

<gradient
android:startColor="#74c43f"
android:centerColor="#4a9c14"
android:centerY="0.85"
android:endColor="#06101d"
android:angle="270"
/>
<corners
android:bottomRightRadius="7dp" android:bottomLeftRadius="7dp"
android:topLeftRadius="7dp" android:topRightRadius="7dp"/>

[/sourcecode]
Example of Webview Layouts and How to use in Android

clip_image002-176x300

What is WebView class?

The WebView class is a subclass of “android.view” class that facilitates to fetch external URL running in web server and display it in device’s screen. It is specifically useful for displaying dynamic contents from the web server application. However, it will show only the contents, not the features of a fully html based web browser functionality.

In the WebView app, we implemented following steps to display the web content on device and also enabling the app to upload file to the web page contents:

  1. Verify the availability of device’s network connection
  2. Add progress bar logic for on click event of hyper-link in web page
  3. Add ability to upload file from local file storage on device through webview.

The only Requirement is…

External website URL should have UI contents compatible with the android device’s screen resolution.

Example of xml for activity

[sourcecode]
android:orientation="vertical"
android:layout_width="fill_parent"
android:layout_height="fill_parent"
>

android:id="@+id/webview1"
android:layout_width="fill_parent"
android:layout_height="fill_parent"
/>

[/sourcecode]

Example of Main Activity class

[sourcecode]1.MainClass.java
=======================
package com.webviewdemo;
import java.security.KeyManagementException;
import java.security.NoSuchAlgorithmException;
import java.security.SecureRandom;
import javax.net.ssl.HttpsURLConnection;
import javax.net.ssl.SSLContext;
import javax.net.ssl.TrustManager;
import android.app.Activity;
import android.app.AlertDialog;
import android.app.ProgressDialog;
import android.content.Context;
import android.content.DialogInterface;
import android.content.Intent;
import android.graphics.Bitmap;
import android.net.ConnectivityManager;
import android.net.Uri;
import android.net.http.SslError;
import android.os.Bundle;
import android.view.KeyEvent;
import android.view.View;
import android.view.Window;
import android.webkit.SslErrorHandler;
import android.webkit.ValueCallback;
import android.webkit.WebChromeClient;
import android.webkit.WebSettings;
import android.webkit.WebView;
import android.webkit.WebViewClient;
import android.widget.ProgressBar;
import android.widget.Toast;
public class MainClass extends Activity {

WebView webview;
ProgressDialog  progressBar;
ProgressBar progressBar1;
MainClass _activity;
AlertDialog alertDialog;
boolean loadingFinished = true;
boolean redirect = false;
private ValueCallback mUploadMessage;
private final static int FILECHOOSER_RESULTCODE = 1;
/** Called when the activity is first created. */
@Override
public void onCreate(Bundle savedInstanceState) {
super.onCreate(savedInstanceState);
progressBar = null;
this.getWindow().requestFeature(Window.FEATURE_PROGRESS);
_activity = this;
setContentView(R.layout.main );
webview = (WebView) findViewById( R.id.webview1 );
WebSettings settings = webview.getSettings();
settings.setJavaScriptEnabled(true);
settings.setSupportZoom(true);
settings.setBuiltInZoomControls(true);
settings.setCacheMode(WebSettings.LOAD_NO_CACHE);
webview.setScrollBarStyle(WebView.SCROLLBARS_OUTSIDE_OVERLAY);
webview.setWebChromeClient(new WebChromeClient()
{
//The undocumented magic method override
//Eclipse will swear at you if you try to put @Override here
public void openFileChooser(ValueCallback uploadMsg) {
mUploadMessage = uploadMsg;
Intent i = new Intent(Intent.ACTION_GET_CONTENT);
i.addCategory(Intent.CATEGORY_OPENABLE);
i.setType("image/*");
MainClass.this.startActivityForResult(Intent.createChooser(i,"File Chooser"), FILECHOOSER_RESULTCODE);
}
});
if(checkInternetConnection(_activity)==true){
if(savedInstanceState==null)
webview.loadUrl("https://www.andolasoft.com/");
else
webview.loadUrl("https://www.andolasoft.com/");
alertDialog = new AlertDialog.Builder(this).create();
progressBar = ProgressDialog.show(MainClass.this, "Please wait…", "Loading…");
webview.setWebViewClient(new WebViewClient() {
@Override
public boolean shouldOverrideUrlLoading(WebView view, String urlNewString) {
if (!loadingFinished) {
redirect = true;
}
loadingFinished = false;
webview.loadUrl(urlNewString);
return true;
}
public void onReceivedSslError (WebView view, SslErrorHandler handler, SslError error) {
handler.proceed() ;
}
@Override
public void onPageFinished(WebView view, String url) {
if(!redirect){
loadingFinished = true;
}
if(loadingFinished && !redirect){
//HIDE LOADING IT HAS FINISHED
if (progressBar != null && progressBar.isShowing()) {
progressBar.hide();
}
} else{
redirect = false;
}
}
@Override
public void onPageStarted(WebView view, String url, Bitmap favicon) {
super.onPageStarted(view, url, favicon);
loadingFinished = false;
progressBar.show();
}});
}
else{
AlertDialog.Builder builder = new AlertDialog.Builder(_activity);
builder.setMessage("Please check your network connection.")
.setCancelable(false)
.setPositiveButton("OK", new DialogInterface.OnClickListener() {
public void onClick(DialogInterface dialog, int id) {
Intent intent = new Intent(Intent.ACTION_MAIN);
intent.addCategory(Intent.CATEGORY_HOME);
intent.setFlags(Intent.FLAG_ACTIVITY_NEW_TASK);
startActivity(intent);
finish();
}
});

AlertDialog alert = builder.create();
alert.show();
}
}

public static boolean checkInternetConnection(Activity _activity) {
ConnectivityManager conMgr = (ConnectivityManager) _activity.getSystemService(Context.CONNECTIVITY_SERVICE);
if (conMgr.getActiveNetworkInfo() != null
&& conMgr.getActiveNetworkInfo().isAvailable()
&& conMgr.getActiveNetworkInfo().isConnected())
return true;
else
return false;
}
@Override
protected void onActivityResult(int requestCode, int resultCode,
Intent intent) {
if (requestCode == FILECHOOSER_RESULTCODE) {
if (null == mUploadMessage)
return;
Uri result = intent == null || resultCode != RESULT_OK ? null
: intent.getData();
mUploadMessage.onReceiveValue(result);
mUploadMessage = null;

}
}
@Override
public boolean onKeyDown(int keyCode, KeyEvent event) {
if (keyCode == KeyEvent.KEYCODE_BACK){
if(webview.canGoBack()){
webview.goBack();
return true;
}
}
return super.onKeyDown(keyCode, event);
}
}
[/sourcecode]

Example of User’s permission mentioned in androidmanifest.xml

[sourcecode]

[/sourcecode]

WebView is really helpful in creating quick Mobile UI without using complex Views/Layouts of Android. A HTML developer can easily build a web page with dynamic contents using CSS/HTML tags. Generally, we can run everything on WebView i.e., in android browser we can run jQuery, Flash enabled app while replicating the web based platform to mobile based smaller screen.

Benefits:

WebView are useful in following cases:

  • Since the web contents are dynamically updated at server side, the android app will display the updated contents just by fetching from site through WebView.
  • Web apps can be easily integrated to native application through WebView controls.