The world of eCommerce business is evolving at a rapid pace. Business owners can choose from various technologies to develop their online store.
However, with the availability of open source technology, CakePHP eCommerce development is on the rise.
With its robust features and flexibility, CakePHP stands out as a reliable framework for developing dynamic and efficient eCommerce websites.
In this guide, we’ll take you through the step-by-step process of developing eCommerce web apps using CakePHP framework.
“CakePHP offers a well-structured and organized framework that streamlines development. It’s impressive how it balances ease of use with powerful features.”
Matt Mullenweg, Founder of WordPress
Why Developers Choose CakePHP for eCommerce Development?
Choosing the right framework for developing an eCommerce app is crucial for ensuring efficiency, scalability, and maintainability.
CakePHP is one of the best frameworks for eCommerce app development due to its numerous advantages and little disadvantages.
Here are the top 10 reasons to consider CakePHP for your eCommerce app:
-
Rapid Development:
CakePHP follows the convention over configuration (CoC) principle, reducing the need for manual setup.
This accelerates development by providing pre-defined conventions and tools, enabling developers to focus on building features rather than writing boilerplate code.
-
MVC Architecture:
CakePHP development facilitates Model-View-Controller (MVC) architecture which promotes a clear separation of concerns.
This allows CakePHP developers to work on different aspects of the app independently, enhancing code organization and maintainability.
-
Code Reusability:
CakePHP emphasizes reusable components and plugins.
This is invaluable in eCommerce development, where features like shopping carts, payment gateways, and user authentication can be developed once and integrated across the app.
-
Security Features:
CakePHP integrates security practices by default, helping to mitigate common vulnerabilities like SQL injection and cross-site scripting (XSS).
It also provides tools for handling input validation and form tampering protection.
-
ORM and Database Abstraction:
CakePHP’s Object-Relational Mapping (ORM) system simplifies database interactions.
Developers work with PHP objects instead of SQL queries, reducing the risk of errors and improving code readability.
-
Built-in Validation:
CakePHP application development facilitates built-in validation methods, making it easier to enforce data integrity and validate user inputs.
This is crucial for maintaining accurate product information and ensuring a smooth checkout process in an eCommerce app.
-
Community and Documentation:
The framework boasts an active and supportive community.
The official documentation is comprehensive, making it easier to learn the framework, troubleshoot issues, and stay up-to-date with best practices.
-
Plugin Ecosystem:
The CakePHP plugin ecosystem offers a wide range of ready-made solutions for common eCommerce functionalities.
This saves development time and effort by allowing you to integrate existing plugins for features like user management, payment gateways, and SEO optimization.
-
Flexible Theming:
eCommerce apps require appealing and responsive designs.
CakePHP’s theming capabilities allow you to separate design and logic, making it easy to create visually engaging and user-friendly storefronts.
-
Scalability and Performance:
Its well-structured architecture and caching mechanisms contribute to improved performance and scalability.
As your eCommerce app grows, CakePHP programmers help maintain a high level of performance without sacrificing user experience.
“CakePHP has played a significant role in shaping modern PHP frameworks. Its conventions and code generation tools have been an inspiration for frameworks like Laravel.”
Taylor Otwell, Creator of Laravel
Why Do Business Owners Choose CakePHP for eCommerce Development?
-
Cost-Effective:
eCommerce Business owners appreciate CakePHP for its cost-effectiveness.
The framework’s open-source nature means that there are no licensing fees, making it a suitable choice for startups and small to medium-sized businesses.
Additionally, the rapid development capabilities enable CakePHP developers with shorter development cycles, reducing overall development costs.
-
Providing Customized User Experience:
It empowers business owners to create a tailored user experience for their customers.
The framework’s flexibility allows developers to build customized features and functionalities that align with the business’s unique needs and latest ecommerce trends.
Whether it’s a dynamic product catalog, personalized recommendations, or interactive user interfaces, CakePHP programmers make it possible to craft a user-centric experience.
-
Strong Security:
Security is paramount in today’s digital landscape, especially for businesses handling sensitive customer data.
CakePHP’s built-in security features, including input validation, data sanitization, and protection against common vulnerabilities like SQL injection and cross-site scripting (XSS), provide a strong foundation for developing secure eCommerce applications.
-
Community Support:
The CakePHP community is vibrant and active, offering a wealth of resources and support to business owners and developers alike.
With an extensive documentation repository, forums, tutorials, and user-contributed plugins, business owners can tap into a network of expertise to troubleshoot issues, share insights, and continuously improve their applications.
-
Analytics:
Business owners understand the importance of data-driven decision-making.
CakePHP’s integration capabilities with analytics tools enable businesses to gather valuable insights into user behavior, sales trends, and other key metrics.
By leveraging analytics, business owners can refine their strategies and optimize their web applications for better performance.
“CakePHP’s architecture promotes scalability and maintainability. It’s reassuring to see a framework that values clean code and sensible defaults.”
Jeffrey Zeldman, Web Designer and Entrepreneur
What are the Modules to Include While Developing an eCommerce Store?
(Image source: www.webmynesystems.com)
Let’s delve deeper into each of the modules to include in a CakePHP eCommerce development:
-
Admin Panel:
The admin panel is the command center of your eCommerce site, where administrators and store managers control various aspects of the store’s operations.
Using CakePHP, you can create an admin panel that allows authorized users to perform tasks like managing products, orders, customers, and more.
Implement authentication and authorization to ensure only authorized personnel access the admin functionalities.
-
Product Management:
Product management is essential for adding, editing, and updating the products available in your store’s inventory.
With CakePHP web app development, you can create a user-friendly interface in the admin panel that allows administrators to add new products, edit existing ones, set prices, add images, and manage product descriptions.
-
Categories Management:
Categories help organize products and make navigation easier for customers. Using CakePHP, you can design a module that lets administrators create, edit, and delete product categories.
Each category can have a name, description, and possibly an image to visually represent it.
-
Product Attributes:
Product attributes define specific characteristics of a product, such as size, colour, and material.
In CakePHP ecommerce development, you can develop a system where administrators can define attributes and values for each product, enhancing the customization options for customers.
-
Retailers:
If your eCommerce store involves partnerships with retailers, you can develop a module to manage retailer information.
This could include retailer profiles, contact details, product distribution, and orders associated with specific retailers.
-
Orders Management:
This module handles the processing of customer orders. Administrators can view, update, and fulfil orders using the admin panel.
CakePHP can help you create an intuitive order management system that provides real-time order tracking and communication with customers regarding their orders.
-
Coupon Codes Facility:
Creating and managing coupon codes is a great way to offer discounts and promotions to customers.
Using CakePHP, you can build a coupon code management module that allows administrators to generate, set conditions for, and track the usage of coupon codes.
-
Shipping Modules for Delivery Rates:
Developing a shipping module involves integrating with shipping carriers to calculate accurate shipping rates based on factors like destination, weight, and shipping method.
In CakePHP development, you can implement a shipping module that fetches real-time shipping rates from carriers’ APIs and presents them to customers during checkout.
-
Customers Management:
This module deals with customer profiles and information.
Administrators can manage customer accounts, view their order history, update contact details, and address any customer inquiries or issues.
-
General Enquiries Module:
For customer inquiries that don’t necessarily fall under orders or products, you can develop a module to handle general enquiries.
Customers can submit questions or concerns, and administrators can respond and manage these inquiries from the admin panel.
-
User Management:
Apart from customers, your site might have different user roles like administrators, store managers, and customer support.
CakePHP development features authentication and authorization capabilities which allow developers to manage user roles and access permissions effectively.
-
Front Store:
The front store is the public-facing part of your website where customers browse and shop for products.
Using CakePHP, you can create a visually appealing and user-friendly interface that showcases products, categories, and special offers.
-
Products Display:
This module displays products on the front store, allowing customers to browse and search through the product catalog.
Implement pagination and filtering options to enhance the shopping experience.
-
Product Detail Page:
When a customer selects a product, they’re directed to the product detail page.
This page provides in-depth information about the product, including images, descriptions, prices, attributes, and customer reviews.
-
Shopping Cart Management:
The shopping cart module keeps track of the items customers have added for purchase.
With CakePHP, you can create a dynamic shopping cart that allows customers to add, remove, and update quantities of products before proceeding to checkout.
-
Checkout:
The checkout module guides customers through the final steps of purchasing.
It collects shipping and billing information, offers shipping options, and presents the order summary before payment.
-
Payment via PayPal:
CakePHP enables you to integrate payment gateways like PayPal.
The PayPal integration module handles secure payment processing, ensuring customer payment information is handled safely and transactions are completed seamlessly.
-
Order Management:
On the customer side, order management lets users view their order history, track order statuses, and possibly request returns or refunds.
On the admin side, this module enables administrators to process orders, update statuses, and communicate with customers regarding their orders.
“As a developer, CakePHP has been a reliable tool for building robust applications quickly. The framework’s commitment to following best practices sets a high standard for PHP development.”
Rachel Andrew, Web Developer and Co-Founder of Perch CMS
What are the Challenges of Using CakePHP for eCommerce?
-
Steep Learning Curve:
CakePHP development has a structured and convention-based approach, which can result in a steeper learning curve for developers who are new to the framework.
Learning and adhering to CakePHP’s conventions might take time initially, especially if developers are accustomed to different coding patterns.
-
Limited Flexibility for Complex Customizations:
While CakePHP’s conventions can speed up development, they may limit flexibility when dealing with highly complex customizations.
In scenarios where unique and unconventional features are required, working within the framework’s conventions might become challenging.
-
Performance Overhead:
While CakePHP offers caching mechanisms and performance optimization tools, some applications may experience performance overhead, especially under heavy loads.
Fine-tuning the application’s performance might require additional effort.
-
Smaller Community Compared to Other Frameworks:
While the CakePHP community is active and supportive, it may not be as extensive as some other popular PHP frameworks.
This could mean that finding solutions to less common issues might take more time or rely more on self-guided exploration.
-
Dependency on Updates:
Keeping the framework up-to-date is important for security and performance reasons.
However, updates to CakePHP might require adjustments to your application, particularly if it relies on certain features or plugins that have undergone changes.
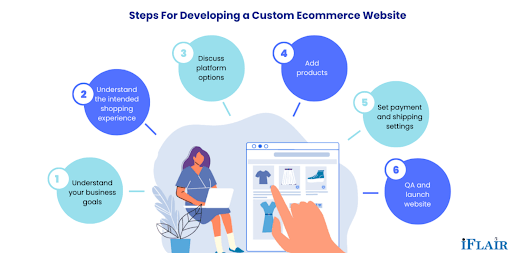
What are the Steps to Develop eCommerce using CakePHP?
(Image source: www.iflair.com)
Step 1: Setting the Foundation
Environment Setup:
Ensure you have PHP and a web server (like Apache) installed on your machine. Additionally, download and install Composer, a PHP dependency manager, to easily integrate libraries and plugins.
CakePHP Installation:
Use Composer to install CakePHP by running the command composer create-project –prefer-dist cakephp/app my_store.
Step 2: Database Configuration
Database Creation:
Create a new database for your eCommerce store using tools like phpMyAdmin or the command line.
Configuration:
Configure your database settings in config/app.php under the ‘Datasources‘ array.
Creating Tables:
Use CakePHP’s powerful schema generation tools to create your database tables. Run the command bin/cake bake migration CreateProducts to create a migration file.
Modify the migration file to define your product fields, then run bin/cake migrations to apply the changes to the database.
Step 3: Designing Your Store
Layouts and Views:
CakePHP uses a template system that separates logic from presentation. Create layout templates and views for your store’s pages, like the homepage, product listing, and product details.
Adding Styles and Assets:
Integrate CSS frameworks like Bootstrap to enhance the visual appeal of your store. Utilize CakePHP’s asset management to efficiently load CSS, JavaScript, and image files.
Step 4: Implementing eCommerce Features
Adding Products:
Create a controller and views to handle product management. Use CakePHP’s FormHelper for creating forms to add new products.
Product Listing:
Display products dynamically using CakePHP’s query builder to retrieve data from the database. Implement pagination to manage large product catalogs.
Shopping Cart:
Build a shopping cart system using sessions or database storage to keep track of selected products. Allow users to add, remove, and adjust quantities of items in their cart.
Checkout Process:
Design a multi-step checkout process. Implement form validation and user authentication for a seamless purchasing experience.
Payment Integration:
Integrate payment gateways like PayPal or Stripe to securely process payments. Leverage CakePHP’s plugin ecosystem to simplify the integration process.
Step 5: User Management
User Registration and Login:
Create user authentication using CakePHP’s built-in tools or third-party plugins. Allow users to register accounts and log in securely.
Step 6: Security and Performance
Data Validation:
Utilize CakePHP’s validation features to ensure data integrity and prevent malicious input.
Security Measures:
Implement security best practices like CSRF protection, input sanitation, and secure authentication to safeguard user data.
Step 7: Testing and Deployment
Unit Testing:
CakePHP comes with testing tools. Write unit tests to ensure the functionality of your application.
Deployment:
Choose a reliable hosting provider and deploy your application. Configure your server to meet CakePHP’s requirements.
Cal Evans, PHP Community Advocate:
“CakePHP’s influence on the PHP community has been undeniable. It’s contributed to the advancement of PHP frameworks and has helped developers produce quality code.”
Top Things to Consider when Hiring CakePHP Developers for eCommerce Development
Expertise and Experience:
Look for a CakePHP development company with expertise in the framework particularly for eCommerce projects.
Review their portfolio to assess the complexity and quality of their previous work. Experience in creating custom eCommerce solutions is essential to ensure that your specific needs are met.
eCommerce Domain Knowledge:
An understanding of eCommerce nuances is vital.
Ensure that the CakePHP development agency is familiar with eCommerce processes such as product management, cart functionality, payment gateways, shipping, and order processing.
Their experience in developing user-friendly and conversion-focused eCommerce experiences is crucial.
Technical Proficiency:
Verify the company’s technical expertise in CakePHP, as well as other related technologies like HTML, CSS, JavaScript, and database management.
Their ability to integrate third-party APIs and tools, such as payment gateways and analytics, is also important.
Customization Capabilities:
eCommerce websites often require unique features. Assess the company’s ability to customize CakePHP applications according to your business requirements.
They should be able to strike a balance between using CakePHP’s conventions and implementing tailor-made solutions.
Security Practices:
Given that eCommerce sites handle sensitive customer data, security is paramount.
Inquire about the company’s approach to security, including measures to prevent vulnerabilities, protect customer information, and ensure compliance with data protection regulations.
Quality Assurance and Testing:
A reputable development company should have a rigorous quality assurance process in place.
Ask about their testing methodologies, including unit testing, integration testing, and user acceptance testing, to ensure a bug-free and reliable eCommerce application.
Communication and Collaboration:
Effective communication is key to a successful project.
Ensure that the company maintains open lines of communication and is responsive to your queries.
Look for their ability to collaborate with your team, share progress updates, and discuss project milestones.
Scalability and Performance:
As your eCommerce business grows, your website needs to scale efficiently.
Discuss the company’s approach to ensuring optimal performance, handling increased traffic, and maintaining a seamless user experience as your store expands.
Project Management and Timeline:
A well-organized project management approach is crucial for meeting deadlines.
Understand how the CakePHP development company plans and manages projects, including how they handle milestones, iterations, and client feedback.
Post-Launch Support and Maintenance:
A reliable CakePHP development company should provide ongoing support after the project’s launch.
Inquire about their post-launch services, including bug fixes, updates, and technical support.
Client References and Testimonials:
Request references from previous clients and read testimonials to gain insights into the company’s work ethics, communication, and the overall client experience.
Cost and Budget Alignment:
While cost should not be the sole factor, ensure that the company’s pricing aligns with your budget.
Discuss the project scope, pricing structure, and any potential additional costs.
Phil Sturgeon, API Design Expert and Developer Advocate:
“CakePHP has continuously evolved to meet the demands of modern web development. Its focus on conventions and reusability has made it a favorite among developers.”
Who are the top 5 CakePHP Development Companies in the World?
Andolasoft:
Andolasoft is a software development company known for its expertise in CakePHP eCommerce development.
Apart from CakePHP the company offers web, mobile and cloud development services using a wide range of technologies.
The company has technology expertise on PHP, Python, Laravel, NodeJS, Ruby on Rails, VueJS, ReactJS, AngularJS, JavaScript etc.
With a focus on innovation and client satisfaction, Andolasoft has delivered solutions across various industries, helping businesses achieve their digital goals.
Top CakePHP Development Services Offered by Andolasoft
- CakePHP eCommerce development services
- CakePHP template design services
- CakePHP CMS development services
- CakePHP migration services
- CakePHP plugin development services
- CakePHP custom website development services
- CakePHP maintenance and support services
Top 3 CakePHP Projects Developed by Andolasoft
- D&B Auto Rental
Technologies used – PHP 5.6, Apache, jQuery, jQuery UI, AWS, Bootstrap
The web app is developed to provide reliable car rental services. It is designed with a focus on customer experience, intuitive interface and easy data handling.
- In4Mng
Technologies used – PHP, jQuery, jQuery UI, Bootstrap
Are you looking for a CakePHP developer
In4Mng is an entertainment application which is based in Nigeria. The app aggregates content from both print and electronic media into a single platform. The app adds additional content such as giveaways, games and puzzles to make information engaging and interesting to consume.
Technologies used – CakePHP, jQuery, jQuery UI, DataTables, Bootstrap
Orangescrum is a versatile project management software designed to streamline project planning, execution, and collaboration for individuals and teams. It offers a comprehensive set of tools and features to help businesses manage tasks, track progress, and achieve project goals efficiently.
- Orases:
Orases is a full-service digital agency that specializes in CakePHP development.
They provide end-to-end solutions, including web and mobile app development, UI/UX design, and digital marketing.
With a commitment to delivering exceptional user experiences and innovative solutions, Orases has established a reputation for helping businesses thrive in the digital landscape.
Hyperlink InfoSystem:
Hyperlink InfoSystem is a global technology solutions provider offering CakePHP development among its array of services.
They have a vast portfolio of successful projects spanning web and mobile apps, blockchain, IoT, and more.
With a global clientele, Hyperlink InfoSystem is recognized for its technical expertise and dedication to delivering cutting-edge solutions.
DotSquares:
DotSquares is a technology company that offers a comprehensive suite of services, including CakePHP development.
With a focus on delivering tailored solutions to meet client objectives, they have worked on diverse projects ranging from eCommerce platforms to business applications.
DotSquares has a global presence and a track record of delivering high-quality software solutions.
illuminz:
illuminz is a software development agency with a strong focus on CakePHP development.
They provide end-to-end solutions including web and mobile app development, UI/UX design, and digital marketing services.
With a commitment to delivering scalable and innovative solutions, illuminz collaborates with businesses to bring their visions to life in the digital realm.
What are top questions to ask a CakePHP development company before hiring?
-
What is your experience with CakePHP development?
Ask about the company’s experience specifically with CakePHP projects. Inquire about their past projects, complexities they’ve handled, and the size of the eCommerce platforms they’ve developed.
-
Can you provide references or case studies from previous CakePHP projects?
Request references or case studies from clients who have hired the company for CakePHP development. This can give you insights into their work quality, reliability, and client satisfaction.
-
How do you approach security in CakePHP development for eCommerce applications?
Security is critical in eCommerce. Ask about their practices for securing sensitive customer data, implementing encryption, preventing SQL injection, and handling payment information securely.
-
What testing procedures do you follow to ensure the quality of CakePHP projects?
Testing is crucial to deliver a bug-free application. Ask about their testing practices, including unit testing, integration testing, and user acceptance testing, to ensure the final product meets your expectations.
-
How do you handle post-launch support and maintenance?
An eCommerce site requires ongoing support to address issues, implement updates, and ensure smooth operations. Discuss their approach to post-launch support and the availability of maintenance services.
-
What happens in case of scope changes or unexpected challenges during development?
Projects can encounter changes or challenges. Ask how they handle scope changes and unexpected issues, and how they communicate such matters to you.
-
What differentiates you from other CakePHP development companies?
This question can help you understand the company’s unique strengths, values, and offerings that set them apart in the market.
Conclusion
eCommerce business owners choose CakePHP for its cost-effectiveness, ability to provide customized user experiences, strong security features, community support, and integration capabilities with analytics tools.
This framework empowers business owners to develop eCommerce applications that not only meet their specific needs but also provide a competitive edge in the digital market.
By harnessing the benefits of CakePHP, businesses can create scalable, secure, and engaging eCommerce apps that resonate with their target audience and drive success.
FAQs
Q1: How can you implement personalized shopping experiences using CakePHP?
Utilize CakePHP’s session management and user authentication to track customer behavior and preferences.
Based on this data, one can implement personalized product recommendations, wish lists, and targeted promotions, enhancing the overall shopping experience.
Q3: What are some strategies for integrating popular payment gateways into a CakePHP eCommerce application?
Integrating payment gateways like PayPal, Stripe, or Square involves utilizing their APIs within the CakePHP eCommerce application.
You can create dedicated components or plugins to handle payment processing, ensuring that sensitive financial information is securely transmitted and stored.
Q4: What are the key features of CakePHP that make it suitable for eCommerce development?
CakePHP offers features like MVC architecture, ORM (Object-Relational Mapping), built-in security features, CRUD (Create, Read, Update, Delete) operations, scaffolding, and data validation. These features streamline eCommerce development by providing a solid foundation and reducing manual coding efforts.


