SSL Authentication Using Security Component In CakePHP

We can achieve SSL authentication in CakePHP by writing own methods like ‘forceSSL’ and ‘unforceSSL’. Also there is an in-built Security Component in CakePHP to achieve SSL authentication.

  • Using Security Component we can integrate tighter security in our application.
  • Like all components it needs configurations through several parameters.
  • We can get CSRF and form tampering protection using Security Component.
  • CsrfExpires controls the form submission.

Example:

All SSL URLs will redirect to a sub-domain ‘https://app.andolacrm.com/’ and the non SSL URL will redirect to a sub-domain ‘http://www.andolacrm.com’

How To Use Security Component

  • Include the security component in you AppControler.php
  •  Like as below

[sourcecode]class AppController extends Controller {
public $components =array( ‘Acl’,’Session’,’Email’,’Security’,’Cookie’ );

}[/sourcecode]

  • There are 3 configurable variable for which you need to set the values as per the requirement of your application in the beforeFilter functions of AppController.php
  • validatePost:

This variable basically used to validate your post data. Set false if you want skip validating you post data or in case data coming from 3rd party Services. Default its true.

  • csrfCheck :

CSRF(Cross-Site_Request_Forgery)  Used for form protection   . Set to false to skip CSRF protections.

  • CsrfUseOnce :

This is used for CSRF token.If it is set as false then it will user one csrf token through out the application else it will generate new token for each form submissions.

Sample Code :

[sourcecode]function beforeFilter() {
// Codes added for SSL security
$this->Security->validatePost=false;
$this->Security->csrfCheck=false;
$this->Security->csrfUseOnce=false;
}[/sourcecode]

  • In the ‘AppController.php’ you need to define the list of URLs that doesn’t need to be checked for SSL

[sourcecode]$sslnotallowed_url=array(‘beta_user’,’terms’,’privacy’,’security’,’display’,’faq’);[/sourcecode]

  • Code to be written in your ‘beforeFilter()’ of ‘AppController.php’

[sourcecode]function beforeFilter() {
// Codes added for SSL security
$this->Security->validatePost=false;
$this->Security->csrfCheck=false;
$this->Security->csrfUseOnce=false;
$sslnotallowed_url  = array(‘beta_user’,’terms’,’privacy’,’security’);
$this->Security->blackHoleCallback = ‘forceSSL’;
if(!in_array($this->params[‘action’],$sslnotallowed_url)){
$this->Security->requireSecure(‘*’);
}
}[/sourcecode]

ForceSSL Method

[sourcecode]function forceSSL() {
$this->redirect(‘https://app.andolacrm.com’ . $this->here);
}[/sourcecode]

NOTE: Security Component can only be used for the forms create using FormHelper.

Conclusion:

Using the steps as described above would facilitate you to successfully implement the SSL in CakePHP. But you need to be more careful while using security component for your application. It may cause ‘blackhole’ error if there is any kind of security hole in your application. However, you could avoid such errors by setting above described variable to ‘false’.

How To Integrate PayPal In PHP

To accept online payments through your website you would need a payment gateway. There are numerous payment gateways that can be implemented to your website; however you will need to choose the best for your PHP application. “PayPal” is one of the most renowned payment platforms that offers the best in class services as well as secure payment transaction. One of the best features of PayPal is that it facilitates developers to check-out the integration on merchant sites.

From a developer’s point of view, PayPal API is a simple, user friendly and versatile which facilitates them to avoid the PCI burden of having credit card details to be passed through their servers. PayPal is also the most secure platform that takes care of all the money transactions for the users.

Integrating PayPal in Your Website

The first thing we need is a Sandbox Credential and API Credentials. This can be availed using the following steps:

  • Create a Business account in “https://developer.paypal.com/” in order to access the Sandbox account.
  • Log into your business account; move to the ‘Application Tab’ and create a Sandbox test account for developers to check-out the PayPal integration.
  • For PayPal payment pro services, you can use this Sandbox Credentials for logging into “https://www.sandbox.paypal.com/”
  • If you want to login to your sandbox account you have to first log into your developer account.

Steps to Implement ‘the work’ in Your Site

  • In PayPal payment pro ‘the work’ is done through API call.
  • In your code you will have to implement a function i.e. ‘PPHttpPost(methodname,str);’
  • ‘methodname’ specifies the name of the API you want to call i.e. ‘CreateRecurringPaymentsProfile’, ‘GetTransactionDetails’ etc.

There are numerous other methods for the integration which can be availed form the PayPal developer site:  https://developer.paypal.com/webapps/developer/docs/classic/api/

Under ‘Merchant’ API you would find a list of functions that can be performed by PayPal website pro.
Clicking on NVP link of each function you can view the methods and the required parameters for that method.

Second Parameter in the string; which is passed to the API, is for getting the response. It includes all the parameters that have to be passed e.g.

[sourcecode]$str = "&TOKEN = $token&AMT = $paymentAmount&CURRENCYCODE = $currencyID&PROFILESTARTDATE =
$startDate";[/sourcecode]


[sourcecode]$nvpStr  .= "&BILLINGPERIOD = $billingPeriod&BILLINGFREQUENCY = $billingFreq&CREDITCARDTYPE = $CREDITCARDTYPE&ACCT = $ACCT&EXPDATE = $EXPDATE&CVV2 = $CVV2&EMAIL = $EMAIL&STREET = $STREET&CITY = $CITY&STATE = $STATE&COUNTRYCODE = $COUNTRYCODE&ZIP = $ZIP&FIRSTNAME = $FIRSTNAME&LASTNAME = $LASTNAME&DESC = $DESC&FAILEDINITAMTACTION = $FAILEDINITAMTACTION&INITAMT = $INITAMT";[/sourcecode]

Note: This string might differ for different methods but the structure is similar.

  • This function returns an array having one key as ACK.
  • The value of this key specifies the FAILURE and SUCCESS of the function.

If ACK is a failure then the returned array contains following error message.

[sourcecode]function PPHttpPost($methodName, $nvpStr_) {

$APIUserName = urlencode(‘API USERNAME’);

$APIPassword = urlencode(‘API PASSWORD’);

$APISignature = urlencode(‘API SIGNATURE’);

$APIEndpoint = "https://api-3t.sandbox.paypal.com/nvp"; //sandbox url.

$version = urlencode(‘51.0’);

//setting the curl parameters.

$choice = curl_init();

curl_setopt($choice, CURLOPT_URL, $APIEndpoint);

curl_setopt($choice, CURLOPT_VERBOSE, 1);

//turning off the server and peer verification(TrustManager Concept).

curl_setopt($choice, CURLOPT_SSL_VERIFYPEER, FALSE);

curl_setopt($choice, CURLOPT_SSL_VERIFYHOST, FALSE);

curl_setopt($choice, CURLOPT_RETURNTRANSFER, 1);

curl_setopt($choice, CURLOPT_POST, 1);

//NVPRequest for submitting to server

$nvprequest = "METHOD=$methodName&VERSION=$version&PWD=$APIPassword&USER=$APIUserName&SIGNATURE=$APISignature";

// setting the nvprequest as POST FIELD to curl

curl_setopt($choice, CURLOPT_POSTFIELDS, $nvprequest);

//getting response from server

$httpResponse = curl_exec($choice);

if(!$httpResponse) {

exit("$methodName failed: ".curl_error($choice).'(‘.curl_errno($choice).’)’);

}

// Here Extract the RefundTransaction response details

$httpResponseArr = explode("&", $httpResponse);

$httpParsedResponseArr = array();

foreach ($httpResponseArr as $i => $value) {

$tmpAr = explode("=", $value);

if(sizeof($tmpAr) > 1) {

$httpParsedResponseArr[$tmpAr[0]] = $tmpAr[1];
}
}

if((0 == sizeof($httpParsedResponseArr)) || !array_key_exists(‘ACK’, $httpParsedResponseArr)) {
exit("Invalid HTTP Response for POST request($nvprequest) to $APIEndpoint.");
}
return $httpParsedResponseArr;
}[/sourcecode]

Setting of IPN URL

IPN stands- Instant Payment Notification

Under the Profile tab of the sandbox site there is an ‘Instant Payment Notification preference’ link. Set the IPN URL from the link.

Conclusion:

This notification is sent from server to server when any transaction is done in PayPal. To capture this transaction we can set URL in Instant Payment Notification preferences page and manage those transaction information.

Why Implement Fat Model And Skinny Controller in CakePHP

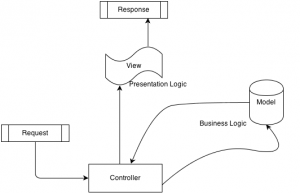
Fat Model and Skinny Controller in CakePHP framework encourages developers to include as much business logic into the application models and the controllers should translate the requests, instantiating classes, getting data from the domain objects and passing it to the view.

  • This development methodology is not new but rarely adopted among the developers. Developers should focus on creating model behaviors rather than creating controller components.
  • It is a simple and powerful concept to implement is offers numerous convenient features to the developers.
  • Controller is responsible for handling & executing the actions routed through the router, it should be lightweight and agile in nature.
  • It is not about counting the lines in controller, rather putting codes in the right place.

Why Fat Model and Skinny Controller:

After developing for a while, when you look back at your code you’ll realize how hard it is to keep track of all these things. When you have a Fat Controller, it can get pretty messy even with a proper formatting.
Put as much of your code that deals with data manipulation in your Model and it solve the problem.

  • When we need some actions repeatedly in different controller, we can have them in Model.
  • We can reduce the use of requestAction() in CakePHP sites with fat models.
  • It’s easier to find out what went wrong when your methods are smaller and specific. Because, model methods are more specific than controller methods.

How To use?

Code-you should put in Controllers

  1. Usually the only functions you should have in controllers are the view functions.
  2. “before” functions, Index, Login, Signup, Add, Edit, View, Delete.

Everything else can go to your model.

Code-you should put in Models

  1. You should put the code and functions in your model that relates to Model and its data.
  2. Formatting, Retrieving, Searching, Pagination are few examples.
  3. Keep all your business logic in the models (try to write generalized methods whenever possible). Call your generalized methods from controller by passing the required parameters.
  4. Using this you will end up writing self-documented code.
  5. It is absolutely fine if your view contains some PHP code which deals with the presentation logic.
  6. You can use the Model’s callback methods like: beforeFind, afterFind, beforeValidate, beforeSave, afterSave, beforeDelete, afterDelete, onError

Skinny_Controller_logic

Example with Sample Code

Below is the example of a listing page using CakePHP paginate, search, sorting with the concept of Fat Model and Skinny Controller.

Let’s get the User list,

  • In your Controller’s Action

[sourcecode]$limit = 10;
$this->paginate = $this->User->_Pagination($limit,$_GET[‘search’]);

//To write your business logic, lets call another Model method
$listdata = $this->User->formatListing($this->paginate(‘User’));

$this->set(‘listdata’, $listdata);[/sourcecode]

  • In Your corresponding Model

[sourcecode]public function _Pagination($limit = 30,$search){
$conditions = array(‘User.is_active’=>1);
if(isset($search) && trim($search)) {
$search = urldecode(trim($search));
$conditions[‘User.name LIKE’] = ‘%’.$search.’%’;
}
$params = array(
‘conditions’ => $conditions,
‘fields’ => array(‘id’,’name’,’email’,’created’),
‘limit’ => $limit,
‘order’ => array(‘User.name’=>’asc’,’User.created’ => ‘desc’),

);

return $params;
}
public function formatListing($userList){
$listdata = array();
foreach($userList as $ukey=>$data) {
$listdata[$ukey][‘id’] = $data[‘User’][‘id’];
$listdata[$ukey][’email’] = $data[‘User’][’email’];
$listdata[$ukey][‘name’] = $data[‘User’][‘name’];
$listdata[$ukey][‘created’] = date(‘M d, Y’,strtotime($data[‘User’][‘created’]));
}
return $listdata;

}[/sourcecode]

Why FAT Model and why not Components?

  • Components should have the logic that can be shared across multiple controllers.
  • Logic should be placed inside the Components to get the data for the view. If the logic includes manipulating of the data, then it should be in a model.

Note these Check points while implementing above steps:

  • When you need to call controller methods inside a model then you are obviously doing something wrong and need to re-examine your code.
  • CakePHP will create an automatic model (instance of AppModel) when there is a table but no model file. When you create a model with wrong model file name, still CakePHP will access auto-model. Hence, it results in different behaviors and all your validations and custom functions will not work.

Too much eating may cause gaining weight, once you’re overweight; it’s too hard to lose that extra weight.
If you don’t want to end up with overweight controllers which eventually will require surgical intervention, just follow the basics and that’s Fat Model and Skinny Controller

CakePHP_fat_models


Suggest me if I am somewhere wrong. Any suggestions are welcome.

CakePHP is Faster Development Of Next Generation Web Application

There are numerous PHP frameworks available such as Zend, CodeIgniter, Akelos etc. CakePHP on the other hand is the most popular framework among them and reduces significant coding time and investment. It is an open source web application development tool. It helps to build the web pages and applications faster and simpler.

Some features of CakePHP framework

  • Compatible with almost all PHP versions
  • Facilitates code scaffolding for faster development of prototypes
  • Doesn’t require any complex configuration
  • This framework is safe and secure:  It provides in-built tools for input validation, XSS prevention, SQL prevention for secure application development.
  • It provides built-in view helpers for AJAX, JavaScript, HTML etc.
  • It offers faster and flexible tempting features as well as data validation features

Never miss an update from us. Join 10,000+ marketers and leaders.

These features make installation and use of CakePHP easy which in turn makes PHP more manageable. As it is an open source, it can be customized according to the needs of specific business requirements. It provides the CakePHP developers with MVC framework, Class inheritance, re-usability, Ajax support and many more to make the development process easier and effortless.  It assists the PHP developers at all levels and provide the ability to manage every part of project development.

Conclusion

It has a lot of advantages over other PHP frameworks, such as less code, less maintenance, and more scalability. CakePHP team works tirelessly to make sure that programmers who want to use CakePHP can do so in an easy and enjoyable way. CakePHP itself is easy to use, and the framework has many features to make life easier for developers who need to create applications that work well and scale to large numbers of users.

Our CakePHP development team is highly experienced to deliver robust, logical, most reliable and effective solutions to our global clients. Our expertise in CakePHP development helps us for building cost effective apps that too matching customer budget with quick turn-around time.

The Ultimate Guide To Facebook Login Migration Using PHP SDK (v3.0.0)

Facebook is the world’s largest social network with more than 2 billion monthly active users. There are so many users because it is a convenient way for people to connect with friends. The login process is smooth and simple, which makes it very easy for users to sign up and log in.

That’s why different websites such as blogs, news outlets, businesses, organizations, etc. have been integrating Facebook Login into their website by using Facebook Login API. There are more than 500 million people who log into their apps or websites using the same credentials they use on Facebook. It just makes things easier for them and more importantly, it helps businesses build trust among their users by giving them the option to sign in via their existing Facebook account.

Never miss an update from us. Join 10,000+ marketers and leaders.

If you are doing a migration from v2.2.x to v3.0.0

You Need To Do the Following Changes.

  • Download SDK: https://github.com/facebook/facebook-php-sdk
  • Keep the two classes base_facebook.php and facebook.php with the certificate fb_ca_chain_bundle.crt
  • Include facebook.php in your PHP file.
  • If you’re currently using the PHP SDK (v2.2.x) for authentication, you will recall that the login code looked like this:
include_once("facebook.php"); OR include_once("base_facebook.php");
$facebook = new Facebook(…);
$session = $facebook->getSession();
if ($session) {
// proceed knowing you have a valid user session
} else {
// proceed knowing you require user login and/or authentication
}
  • The login code is now:
include_once("facebook.php");
$facebook = new Facebook(…);
$user = $facebook->getUser();
if ($user) {
// proceed knowing you have a logged in user who's authenticated
} else {
// proceed knowing you require user login and/or authentication
}

I hope you like this post and if you want to get such type of updates then please subscribe to our email. You can also visit our PHP/CakePHP portfolio page to see all our apps developed on PHP or CakePHP platform.