How To Enhance Image Processing With Core Image In IOS Apps

Core Image is a powerful framework for image processing and analysis technology designed to provide real-time processing for still and video images. This helps you easily apply filters to images, such as modifying the hue, exposure or vibrant. It uses the GPU or CPU rendering path to process the image data very fast.

Core Image can be chained with multiple filters to an Image or video frame at once by creating custom effects. Core Image provides us more than 90 built-in filters on iOS and over 120 on OS X. You can set up filters by supplying key-value pairs for a filter’s input parameters. You can use the output of one filter as the input of another filter, to create amazing effects.

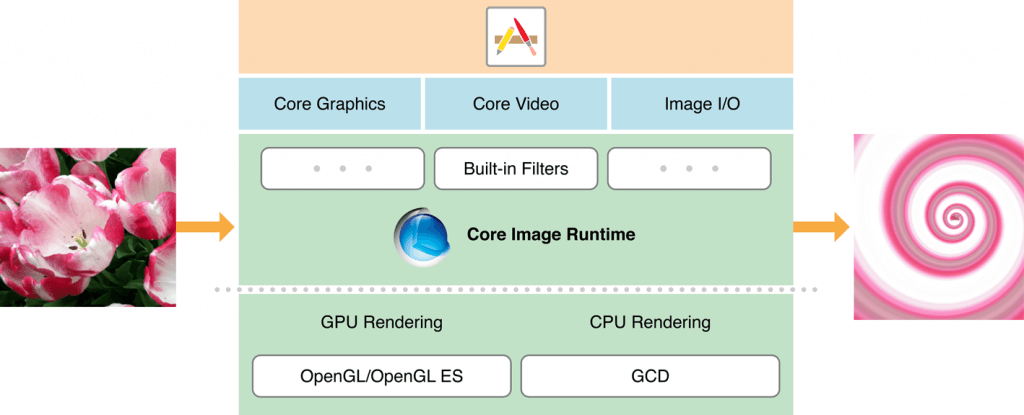
Here is how the Core Image is related to the iOS operating system

core-image-1024x415

Before going into Core Image, let’s know about the classes used in the Core Image framework:

CIContext:

The CIContext is a class which provides an evaluation context for rendering a CIImage object. CIContext class is used to take advantage of the built-in Core Image filters while processing an image.

CIImage:

The CIImage is a class which represent an image or holds an image data which may be created from a UIImage, from an image file, or from pixel data.

CIFilter:

The CIFilter class produces a CIImage object as output. A filter takes one or more images as input. The filter class has a dictionary that defines the attributes,so the parameters of a CIFilter object are set and retrieved through the use of key-value pairs. This helps us to add some beautiful effect on the input image.

Sample example:

In this example local image path is used in resource file to apply effects.

// 1 Retrieving the localimage.png path from resource bundle

NSString *filePath =
  [[NSBundle mainBundle] pathForResource:@"localimage" ofType:@"png"];
NSURL *fileNameAndPath = [NSURL fileURLWithPath:filePath];

// 2 Converting the normal image to CIImage object by passing the URL of original localimage.png

CIImage *beginImage =
  [CIImage imageWithContentsOfURL:fileNameAndPath];

// 3 Adding the filter SepiaTone effect to the localimage.png

CIFilter *filter = [CIFilter filterWithName:@"CISepiaTone"
                              keysAndValues: kCIInputImageKey, beginImage,
                    @"inputIntensity", @0.8, nil];
CIImage *outputImage = [filter outputImage];

// 4 showing the output image in the UIImageView

IImage *newImage = [UIImage imageWithCIImage:outputImage];
self.imageView.image = newImage;

Note : Here we can change the value of the CIFilter value which is given 0.8 by using a slider which min value is 0 and max value is 1.

Here we have not used the CIContext to perform an CIFilter as said earlier. It helps us to make it easier.

Lets change the above code to include the CIContex:

CIImage *beginImage =
[CIImage imageWithContentsOfURL:fileNameAndPath];
 
// 1
CIContext *context = [CIContext contextWithOptions:nil];
 
CIFilter *filter = [CIFilter filterWithName:@"CISepiaTone"
keysAndValues: kCIInputImageKey, beginImage,
@"inputIntensity", @0.8, nil];
CIImage *outputImage = [filter outputImage];
 
// 2
CGImageRef cgimg =
[context createCGImage:outputImage fromRect:[outputImage extent]];
 
// 3
UIImage *newImage = [UIImage imageWithCGImage:cgimg];
self.imageView.image = newImage;
 
// 4
CGImageRelease(cgimg);

Let’s see what happened here:

Here we set up the CIContext object. The CIContext takes an NSDictionary that specifies options including the color format and whether the context should run on the CPU/GPU. Here the default values are fine and so you passed as nil for that argument.

Here we used an method on the context object to draw a CGImage. Calling this method createCGImage:fromRect: on the context with the supplied CIImage will give us an output as CGImageRef.

Next, we converted the CGImage to UIImage using “imageWithCGImage”.

At last we release the CGImageRef as CGImage. CGImage is a C API which need to free memory even it runs with ARC.

Note: To know about all available filters write the following code and call the method in viewDidLoad / onLaunch. The filters are written on the console log.

-(void)logAllFilters {
NSArray *properties = [CIFilter filterNamesInCategory:
kCICategoryBuiltIn];
NSLog(@"%@", properties);
for (NSString *filterName in properties) {
CIFilter *fltr = [CIFilter filterWithName:filterName];
NSLog(@"%@", [fltr attributes]);
}
}

Like this blog? I’d love to hear about your thoughts on this. Thanks for sharing your comments.

How To Make Static Framework IOS Device Independent?

In our previous post, we had mentioned the steps to create a Static Library or Framework for iOS. Here, we will illustrate the steps to make it device independent, i.e. the library can be used to develop app for all iOS devices, instead of recreating the code for each device.

Step 1: Create an Aggregate Target

  • Click File >> New Target and create a new Aggregate target in Other menu.

  • Name your aggregate target – like ‘Framework’

xcode_image

 Step 2: Adding the Static Library as a Dependent Target

  • Add the static library target to the ‘Target Dependencies’.

framework-image

Step 3: Build the ‘Other’ Platform

  • To build the ‘Other’ platform, use a ‘Run Script’ phase.

  • Add a new ‘Run Script’ build phase to your ‘Aggregate’ target and paste the following code.
set -e
 
set -e
 
set +u
 
# Avoid recursively calling this script.
 
if [[ $SF_MASTER_SCRIPT_RUNNING ]]
 
then
 
   exit 0
 
fi
 
set -u
 
export SF_MASTER_SCRIPT_RUNNING=1


SF_TARGET_NAME=${PROJECT_NAME}
 
SF_EXECUTABLE_PATH="lib${SF_TARGET_NAME}.a"
 
SF_WRAPPER_NAME="${SF_TARGET_NAME}.framework"


# The following conditionals come from
 
# https://github.com/kstenerud/iOS-Universal-Framework


if [[ "$SDK_NAME" =~ ([A-Za-z]+) ]]
 
then
 
   SF_SDK_PLATFORM=${BASH_REMATCH[1]}
 
else
 
   echo "Could not find platform name from SDK_NAME: $SDK_NAME"
 
   exit 1
 
fi


if [[ "$SDK_NAME" =~ ([0-9]+.*$) ]] then
 
   SF_SDK_VERSION=${BASH_REMATCH[1]}
 
else
 
   echo "Could not find sdk version from SDK_NAME: $SDK_NAME"
 
   exit 1
 
fi


if [[ "$SF_SDK_PLATFORM" = "iphoneos" ]]
 
then
 
   SF_OTHER_PLATFORM=iphonesimulator
 
else
 
   SF_OTHER_PLATFORM=iphoneos
 
fi


if [[ "$BUILT_PRODUCTS_DIR" =~ (.*)$SF_SDK_PLATFORM$ ]]
 
then
 
   SF_OTHER_BUILT_PRODUCTS_DIR="${BASH_REMATCH[1]}${SF_OTHER_PLATFORM}"
 
else
 
   echo "Could not find platform name from build products directory: $BUILT_PRODUCTS_DIR"
 
   exit 1
 
fi


# Build the other platform.
 
xcodebuild -project "${PROJECT_FILE_PATH}" -target "${TARGET_NAME}" -configuration "${CONFIGURATION}" -sdk ${SF_OTHER_PLATFORM}${SF_SDK_VERSION} BUILD_DIR="${BUILD_DIR}" OBJROOT="${OBJROOT}" BUILD_ROOT="${BUILD_ROOT}" SYMROOT="${SYMROOT}" $ACTION


# Smash the two static libraries into one fat binary and store it in the .framework
 
lipo -create "${BUILT_PRODUCTS_DIR}/${SF_EXECUTABLE_PATH}" "${SF_OTHER_BUILT_PRODUCTS_DIR}/${SF_EXECUTABLE_PATH}" -output "${BUILT_PRODUCTS_DIR}/${SF_WRAPPER_NAME}/Versions/A/${SF_TARGET_NAME}"


# Copy the binary to the other architecture folder to have a complete framework in both.
 
cp -a "${BUILT_PRODUCTS_DIR}/${SF_WRAPPER_NAME}/Versions/A/${SF_TARGET

Step 4: Build to verify

  • Now  you have set up an environment to build a distributable <project_name>.framework

  • Build the ‘Aggregate’ target

  • Expand the Products group in X-Code, right click the static library and click ‘Show in Finder’

Note: If this doesn’t open Finder to show the static library, then try opening

~/Library/Developer/Xcode/DerivedData/<project name>/Build/Products/Debug-iphonesimulator/.

  • In this folder you will find your <project_name>.framework folder.

You can now share the <project_name>.framework among other iOS app developers.

How To Use “UIActionSheet” As A Pop-over View In Your IOS Apps

iOS-destructive_button

What is UIActionSheet

The action sheet in iOS contains a title and one or more buttons. Each of the buttons is associated with separate actions. It can be presented from a toolbar; tab bar, button bar item or from a view, however the title can be optional.

Why use UIActionSheet?

UIActionSheet is used in the following cases:

  • To show an option for a given task
  • To prompt the user to confirm an action
  • To get user input

Action sheet is dismissed by touching anywhere outside the pop-over.

How to use it?

  • Extend the UIActionSheetDeleagte in the .h header file of the ViewController
  • Then add a method named as”showActionSheet”

Example

[sourcecode]@interface MyViewController : UIViewController {

}

-(IBAction)showActionSheet:(id)sender;
@end[/sourcecode]

Initializing the UIActionSheet takes 5 following parameters

  •  initWithTitle
  • delegate
  • cancelButtonTitle
  • destructiveButtonTitle
  • otherButtonTitles

Add the following code in the .m file of viewcontroller.

Example

[sourcecode]-(IBAction)showActionSheet:(id)sender {
UIActionSheet *popupQuery = [[UIActionSheet alloc] initWithTitle:@"Set your title" delegate:self cancelButtonTitle:@"Cancel" destructiveButtonTitle:@"Destructive Button" otherButtonTitles:@"Rename",@"Delete", nil];

popupQuery.actionSheetStyle = UIActionSheetStyleBlackOpaque;
[popupQuery showInView:self.view];
[popupQuery release];
}[/sourcecode]

How to know which button was clicked by user?

There is a delegate method named as “actionSheet clickedButtonAtIndex” in which you can get the action.

[sourcecode]-(void)actionSheet:(UIActionSheet *)actionSheet clickedButtonAtIndex:(NSInteger)buttonIndex {

switch (buttonIndex) {
case 0:
NSLog(@”%@”,Destructive Button Clicked);
break;
case 1:
NSLog(@”%@”,Rename Button Clicked);
break;
case 2:
NSLog(@”%@”,Delete Button Clicked);
break;
case 3:
NSLog(@”%@”,Cancel Button Clicked);
break;
}
}[/sourcecode]

Conclusion:

UIActionSheet gives additional choices to the users for a particular action & gives a cleaner look to the app.

New iPhone 5 Is Big With A Small Wow Factor

Apple has unveiled its most awaited iPhone, the iPhone 5 in the launch event at Yerba Buena Center for the Arts in San Francisco. As soon as Apple CEO Tim Cook winded up his updated product metrics talk on the stage. Marketing chief Phil Schiller went up to introduce the new product and its features.

With iPhone application development on the rise and Apple winning the recent patent case, iPhone 5 has gained enough hype among iPhone lovers around the world.

As you try to find the differences between iPhone 5 and iPhone 4S, you’ll find a lot. The iPhone 5 is much bigger and more than 15% thinner than the iPhone 4S.

Never miss an update from us. Join 10,000+ marketers and leaders.

With the body of Glass and Aluminum, its now much lighter weighing about 3.95 ounces in total. Some of the key features which are improved in this new iPhone are:

  • Retinal display stretched from 3.5 inches to 4 inches which gives users and iOS developers some extra space to play around
  • 8MP Camera with backside illumination, in-built panorama mode and smart noise filtering
  • Three in-built microphones for improved in-voice assistant Siri
  • Apple’s new A6 processor which is double fast than other processors
  • Long battery support; and it can stand more than 8 hours of 4G browsing
  • New dock connector called “Lightning” and designer earpods

After looking over these features, you can say that they are evolutionary, but you surely would be looking for a WOW factor which lacks in iPhone 5. Most of these technologies or features are somehow available with Android or other smartphones.

Apple has launched the iPhone 5 to give over the edge competition to companies like Samsung, and other seller in market. The new iPhone 5 will be on sale in nine countries from 21 September onwards. It will be reaching to 240 countries by this year end.

During the event some other Apple products like redesigned iTunes library & new iPod ranges are shown. With various product ranges and more than 7,00,000 apps in the iTunes library, Apple plays a key competitor in the smartphone market.

Andolasoft, one of the pioneers of iPhone application development has also opened its toolbox to explore on iPhone 5 and iOS 6. We’ve expert developers who work closely with you in an agile and innovative environment.