How To Create A Gridview With ‘UICollectionView’ In IOS6 & Above

What Is ‘UICollectionView’?

‘UICollectionView’ is a class introduced in iOS 6 SDK. It helps developers in creating grid view to handle ordered collection of data items using customizable layouts. ‘Collection view’, available in this class is like ‘UItableview’ which supports multiple column layouts.

Getting Started:

Create new ‘.h‘ and ‘.m‘ files to display the images.

In ‘ShowImagesViewController.h

#import <UIKit/UIKit.h>
@interface ShowImagesViewController :UICollectionViewController
{
NSArray *allImages;
}
@property (nonatomic, retain) NSArray *allImages;
@end

In ‘ShowImagesViewController.m

#import "ShowImagesViewController.h"
@implementation ShowImagesViewController
@synthesize allImages;
- (void)viewDidLoad
{
[superviewDidLoad];
allImages = [NSArrayarrayWithObjects:@"pizza.jpeg",
@"sides_img.png", @"sandwich_img.png", @"pizza_img.png",
@"pasta_img.png", @"drinks_img.png", @"pizza.jpeg",
@"sides_img.png", @"sandwich_img.png", @"pizza_img.png",
@"pasta_img.png", @"drinks_img.png", nil];
}
 
- (void)didReceiveMemoryWarning
{
[superdidReceiveMemoryWarning];
// Dispose of any resources that can be recreated.
}
- (BOOL)shouldAutorotateToInterfaceOrientation:
(UIInterfaceOrientation)interfaceOrientation
{
return YES;
}
- (NSInteger)collectionView:(UICollectionView *)collectionViewnumberOfItemsInSection:(NSInteger)section
{
returnrecipeImages.count;
}
- (UICollectionViewCell *)collectionView:(UICollectionView *)collectionViewcellForItemAtIndexPath:(NSIndexPath *)indexPath
{
staticNSString *identifier = @"Cell";
UICollectionViewCell *cell = [collectionView
dequeueReusableCellWithReuseIdentifier:identifier
forIndexPath:indexPath];
 
UIImageView *allImageView = (UIImageView *)[cell viewWithTag:100];
allImageView.image = [UIImageimageNamed:[allImagesobjectAtIndex:indexPath.row]];
return cell;
}
- (void)collectionView:(UICollectionView *)collectionViewdidSelectItemAtIndexPath:(NSIndexPath *)indexPath{
}
@end

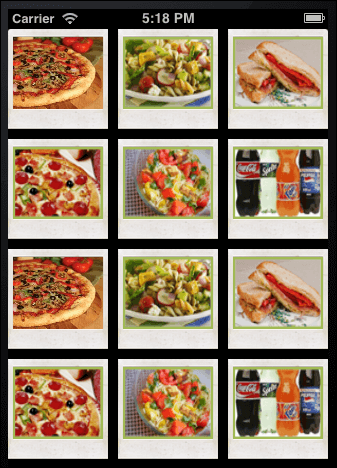
Example of Grid layout using ‘UICollectionViewController

uicollectionview

Conclusion:

‘UICollectionViewController’ creates ‘Grid’/’Tile’ layout much faster and offers intuitive user interface in iOS 6 devices.

How We Turned A Great Idea Into IOS App – The Inside Story

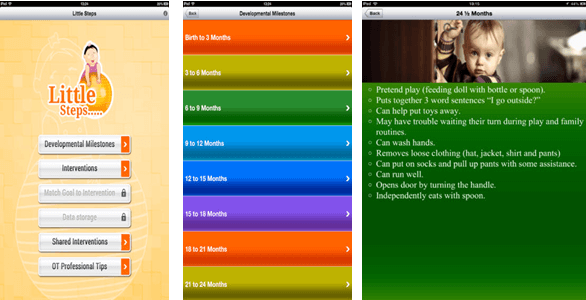
Sandra M, an Occupational Therapist (OT) in the USA, came-up with the original idea and approached us to put it into iPhone app development as well as iPad app development. Here, the therapists share their expertise through the app thereby mentoring new parents through shared interventions.

The ‘LittleSteps’ iOS app is now in App Store. In a short span of time, hundreds of downloads have been done across the USA, Germany, Australia, India, Philippines, UK, China, Ireland, Portugal, Greece, Israel, South Africa, New Zealand, Chile, Egypt, Germany and Canada.

icon_lS

The ‘LittleSteps’ App is aimed to collaborate and share OT interventions to address developmental delay in the areas of fine motor, gross motor, feeding, sensory integration, visual motor, behavior, language development and social skills for children below 3 yrs. With the free version a user can share interventions applied to other users. However, the paid version allows OT to store customer data in the device itself.

For Occupation Therapists, it provides a platform to share knowledge and take care of certain condition during baby’s growth. For parents, it acts as a companion that makes them knowledgeable on baby care.

Being one of the best iPhone App Development Companies, we came-up with the right solutions that turned Sandra’s idea into a working iOS app. We included numerous functionalities and integrations that made it engaging and simple for the users. We used Orangescrum, the project collaboration tool to keep-up with the development process.

See What Users Are Saying About The App?

  • “Very informative! Great app to download!”
  • “OMG, this is an exceptionally amazing app that has transformed the way we approach raising our babies. A must for all parents”

Here’s What We Did:

  • Designed the application logo, the user interfaces (UI/UX)
  • Developed the app in native language i.e. Objective-C and Cocoa Touch framework
  • Devised the application process and flow from navigation to monetization
  • Introduced the feature of In-app purchase for premium users
  • Introduced push notification feature to share texts instantly
  • Tested the app’s performance with AppFlight SDK
  • Deployed the app to Apple App Store within 9 weeks since the initiation of project

In addition to above mentioned functionalities, we have introduced numerous other features that make it a state-of-the-art application.

So, go ahead; download the app and see how ‘LittleSteps’ can help you and your baby. Feel free to write reviews in iTunes.

ios_mobile


LS_screenshot

How To Use “UIActionSheet” As A Pop-over View In Your IOS Apps

iOS-destructive_button

What is UIActionSheet

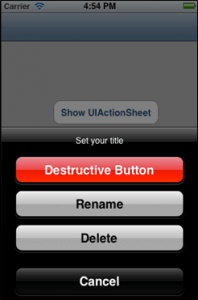
The action sheet in iOS contains a title and one or more buttons. Each of the buttons is associated with separate actions. It can be presented from a toolbar; tab bar, button bar item or from a view, however the title can be optional.

Why use UIActionSheet?

UIActionSheet is used in the following cases:

  • To show an option for a given task
  • To prompt the user to confirm an action
  • To get user input

Action sheet is dismissed by touching anywhere outside the pop-over.

How to use it?

  • Extend the UIActionSheetDeleagte in the .h header file of the ViewController
  • Then add a method named as”showActionSheet”

Example

[sourcecode]@interface MyViewController : UIViewController {

}

-(IBAction)showActionSheet:(id)sender;
@end[/sourcecode]

Initializing the UIActionSheet takes 5 following parameters

  •  initWithTitle
  • delegate
  • cancelButtonTitle
  • destructiveButtonTitle
  • otherButtonTitles

Add the following code in the .m file of viewcontroller.

Example

[sourcecode]-(IBAction)showActionSheet:(id)sender {
UIActionSheet *popupQuery = [[UIActionSheet alloc] initWithTitle:@"Set your title" delegate:self cancelButtonTitle:@"Cancel" destructiveButtonTitle:@"Destructive Button" otherButtonTitles:@"Rename",@"Delete", nil];

popupQuery.actionSheetStyle = UIActionSheetStyleBlackOpaque;
[popupQuery showInView:self.view];
[popupQuery release];
}[/sourcecode]

How to know which button was clicked by user?

There is a delegate method named as “actionSheet clickedButtonAtIndex” in which you can get the action.

[sourcecode]-(void)actionSheet:(UIActionSheet *)actionSheet clickedButtonAtIndex:(NSInteger)buttonIndex {

switch (buttonIndex) {
case 0:
NSLog(@”%@”,Destructive Button Clicked);
break;
case 1:
NSLog(@”%@”,Rename Button Clicked);
break;
case 2:
NSLog(@”%@”,Delete Button Clicked);
break;
case 3:
NSLog(@”%@”,Cancel Button Clicked);
break;
}
}[/sourcecode]

Conclusion:

UIActionSheet gives additional choices to the users for a particular action & gives a cleaner look to the app.

Guide To Display Images In Grid View On IPhone

In some iOS apps, displaying images in a single view would make the UI lose its uniformity. It would be difficult to manage images of different resolution and impossible to keep track of thousand of images without using Grid View in iPhone.

This is just like a “Grid View” application. Here we will explore how to display images, programmatically in “Grid view” on an iPhone.

Here We Go…

Step 1:

  • Open Xcode
  • Create a View base applicationGridview-123
  • Give the application name “ImageGrid”.

Step 2:

The directory structure is automatically created by the Xcode which also adds up essential frameworks to it. Now, explore the directory structure to check out the contents of the directory.

Step 3:

Here you need to add one ‘NSObject’ class to the project.

  • Select  project -> New File -> Cocoa Touch -> Objective-C class
  • Give the class name “Images”.

Step 4:

Then add an image to the project and give the image name “icon.png”.

Step 5:

  • Open “ImageGridViewController” file and add ‘UITableViewDelegate’ and ‘UITableViewDataSource’
  • Define ‘UITableView’ and ‘NSMutableArray’ classes as well as the buttonPressed: method
  • Import the ‘Image.h’ class and make the following changes.

[sourcecode]#import &lt;UIKit/UIKit.h&gt;
#import "Image.h"
@interface ImageGridViewController:UIViewController &lt;UITableViewDelegate, UITableViewDataSource&gt; {
IBOutlet UITableView *tableView;
NSMutableArray&nbsp; *sections;
}
@property (nonatomic, retain) UITableView *tableView;
@property (nonatomic, retain) NSMutableArray *sections;
-(IBAction)buttonPressed:(id)sender;
@end[/sourcecode]

Step 6:

  • Double click the ‘ImageGridViewController.xib’ file and open it in the Interface Builder.
  • First drag the ‘TableView’ from the library and place it in the view window.
  • Select ‘tableview’ from the view window and bring up connection inspector and connect ‘dataSource’ to the ‘File’s Owner’ and delegate to the ‘File’s Owner’ icon.
  • Now save the .xib file and go back to Xcode.

Step 7:

In the ‘ImageGridViewController.m’ file, make the following changes:

[sourcecode]#import "ImageGridViewController.h"
#import "Item.h" @implementation ImageGridViewController
@synthesize tableView,sections;

-(void)loadView{

[super loadView];
sections = [[NSMutableArray alloc] init];

for(int s=0;s&lt;1;s++) { // 4 sections
NSMutableArray *section = [[NSMutableArray alloc] init];

for(int i=0;i&lt;12;i++) {// 12 items in each section
Image *item = [[ Image alloc] init];
item.link=@"New Screen";
item.title=[NSString stringWithFormat:@"Item %d", i];
item.image=@"icon2.png";

[section addObject:item];
}
[sections addObject:section];
}
}

– (NSInteger)numberOfSectionsInTableView:(UITableView *)tableView {
return [sections count];
}

– (NSInteger)tableView:(UITableView *)tableView numberOfRowsInSection:(NSInteger)section {
return 1;
}

– (CGFloat)tableView:(UITableView *)tableView heightForRowAtIndexPath:(NSIndexPath*)indexPath {
NSMutableArray *sectionItems = [sections objectAtIndex:indexPath.section];
int numRows = [sectionItems count]/4;
return numRows * 80.0;
}

-(NSString *)tableView:(UITableView *)tableView titleForHeaderInSection:(NSInteger)section {

NSString *sectionTitle = [NSString stringWithFormat:@"Section&nbsp; %d", section];
return sectionTitle;
}

– (UITableViewCell *)tableView:(UITableView *)tableView cellForRowAtIndexPath:(NSIndexPath *)indexPath {

static&nbsp;&nbsp; &nbsp;NSString *hlCellID = @"hlCellID";

UITableViewCell *hlcell = [tableView dequeueReusableCellWithIdentifier:hlCellID];
if(hlcell == nil) {
hlcell = [[[UITableViewCell alloc]
initWithStyle:UITableViewCellStyleDefault reuseIdentifier:hlCellID] autorelease];
hlcell.accessoryType = UITableViewCellAccessoryNone;
hlcell.selectionStyle = UITableViewCellSelectionStyleNone;
}

int section = indexPath.section;
NSMutableArray *sectionItems = [sections objectAtIndex:section];

int n = [sectionItems count];
int i=0,i1=0;

while(i&lt;n){
int yy = 4 +i1*74;
int j=0;
for(j=0; j&lt;4;j++){

if (i&gt;=n) break;
Image *item = [sectionItems objectAtIndex:i];
CGRect rect&nbsp; = CGRectMake(18+80*j, yy, 40, 40);
UIButton *buttonImage=[[UIButton alloc] initWithFrame:rect];
[buttonImage setFrame:rect];
UIImage *buttonImageNormal=[UIImage imageNamed:item.image];
[buttonImage setBackgroundImage:buttonImageNormal forState:UIControlStateNormal];
[buttonImage setContentMode:UIViewContentModeCenter];
NSString *tagValue = [NSString stringWithFormat:@"%d%d", indexPath.section+1, i];
buttonImage.tag = [tagValue intValue];
//NSLog(@tag….%d", button.tag);
[buttonImage addTarget:self
action:@selector(buttonPressed:)forControlEvents:UIControlEventTouchUpInside];
hlcell.contentView addSubview:buttonImage];
[buttonImage release];

UILabel *label = [[[UILabel alloc]initWithFrame:CGRectMake((80*j)-4, &nbsp;&nbsp; &nbsp;&nbsp;&nbsp; &nbsp;&nbsp;&nbsp; &nbsp;&nbsp;&nbsp; &nbsp;yy+44, 80, 12)] autorelease];
label.text = item.title;
label.textColor = [UIColor blackColor];
label.backgroundColor = [UIColor clearColor];
label.textAlignment = UITextAlignmentCenter;
label.font = [UIFont fontWithName:@"ArialMT" size:12];
[hlcell.contentView addSubview:label];
i++;
}
i1 = i1+1;
}
return hlcell;
}
-(IBAction)buttonPressed:(id)sender {
int tagId = [sender tag];
int divNum = 0;
if(tagId&lt;100)
divNum=10;
else
divNum=100;
int section = [sender tag]/divNum;
section -=1;// we had incremented at tag assigning time
int itemId = [sender tag]%divNum;
NSLog(@"…section = %d, item = %d", section, itemId);
NSMutableArray*sectionItems = [sections objectAtIndex:section];
Image&nbsp;&nbsp; &nbsp;*item&nbsp;&nbsp; &nbsp;=&nbsp;&nbsp; &nbsp;[sectionItems objectAtIndex:itemId];
NSLog(@"Image selected…..%@, %@", item.title, item.link);

}

-(void)viewDidLoad{
[super viewDidLoad];
}

-(void)didReceiveMemoryWarning{
[super didReceiveMemoryWarning];
}

-(void)viewDidUnload{
// Release any retained subviews of the main view.
// e.g. self.myOutlet = nil;
}

-(void)dealloc{
[super dealloc];
}
@end[/sourcecode]

Step 8:

Open the ‘Image.h’ file and make the following changes:

[sourcecode]#import &lt;Foundation/Foundation.h&gt;
@interface Image:NSObject{
NSString*title;
NSString*link;
NSString*image;
}
@property(nonatomic, copy)NSString*title;
@property(nonatomic, copy)NSString*link;
@property(nonatomic, copy)NSString*image;
@end[/sourcecode]

Step 9:

Make the changes in the ‘Item.m’ file:

[sourcecode]#import "Image.h"
@implementation Item
@synthesize title, link, image;
@end[/sourcecode]

Step 10:

Now save it and compile it in the Simulator.

It would be smart to use Grid View to display a number of images in a single view because it enables to manage multiple images efficiently. Users are also facilitated to keep track of their images. It becomes eye soothing and looks great on the iPhone mobile devices.

Keep visiting regularly to Andolasoft blog to know our upcoming article about the process to show your android Smartphone captured images dynamically in “Grid View” Layout.

How To Draw Smooth Lines In IOS Apps?

One of the most common issues in drawing apps is that the polylines appears jagged when drawn quickly. Such flaws create unfavorable impact on the application as well developers. Apps developed for IPhone, which is one of the premium devices in the world; must encompass all the development aspects, may it be a major bug as in Apple Map or as simple as jagged polylines in drawing apps.

Drawing lines are one of the most common features in iOS apps. It can be used for numerous purposes such as putting a signature in PDFs and images, drawing line graphs, preparing presentations with sketches and many more. Most of the iOS applications generate jaggy lines when drawn quickly. On the other hand, smooth lines facilitate uses with the convenience to draw quickly and without affecting the practicality of the application.

Below are the steps to follow how to draw smooth lines in iOS apps.

1. Add UIImage View

First of all we need to add UIImageView to a UIView.

[sourcecode]SmoothLineViewController.h:
@property (nonatomic, readwrite, retain) IBOutlet UIImageView *imageView;
Then we’ll @synthesize this property in SmoothLineViewController.m:
@synthesize imageView=imageView_;
[/sourcecode]

Finally, we’ll use the Interface Builder to add the UIImageView component to SmoothLineViewControllerr.xib

2. Handling Touches

Now we are ready to write code for handle touches and draw polylines. We’ll need to declare the following member variables in the header:

[sourcecode]CGPoint previousPoint;
NSMutableArray *drawnPoints;
UIImage *cleanImage;
add the method to the class:
/** This method draws a line to an image and returns the resulting image */
– (UIImage *)drawLineFromPoint:(CGPoint)from_Point toPoint:(CGPoint)to_Point image:(UIImage *)image
{
CGSize sizeOf_Screen = self.view.frame.size;
UIGraphicsBeginImageContext(sizeOf_Screen);
CGContextRef current_Context = UIGraphicsGetCurrentContext();
[image drawInRect:CGRectMake(0, 0, sizeOf_Screen.width, sizeOf_Screen.height)];

CGContextSetLineCap(current_Context, kCGLineCapRound);
CGContextSetLineWidth(current_Context, 1.0);
CGContextSetRGBStrokeColor(current_Context, 1, 0, 0, 1);
CGContextBeginPath(current_Context);
CGContextMoveToPoint(current_Context, from_Point.x, from_Point.y);
CGContextAddLineToPoint(current_Context, to_Point.x, to_Point.y);
CGContextStrokePath(current_Context);

UIImage *rect = UIGraphicsGetImageFromCurrentImageContext();
UIGraphicsEndImageContext();
return rect;
}
drawLineFromPoint:to_Point:image is a simple utility method that draws a line over a UIImage and returns the resulting UIImage.
Now UIResponder‘s touch handling methods will be overridden:
– (void)touchesBegan:(NSSet *)_touches withEvent:(UIEvent *)_event
{
// retrieve the touch point
UITouch *_touch = [_touches anyObject];
CGPoint current_Point = [_touch locationInView:self.view];

// Its record the touch points to use as input to our line smoothing algorithm
drawn_Points = [[NSMutableArray arrayWithObject:[NSValue valueWithCGPoint:current_Point]] retain];

previous_Point = current_Point;

// we need to save the unmodified image to replace the jagged polylines with the smooth polylines
clean_Image = [imageView_.image retain];
}

– (void)touchesMoved:(NSSet *)_touches withEvent:(UIEvent *)_event
{

UITouch *_touch = [_touches anyObject];
CGPoint current_Point = [_touch locationInView:self.view];

[drawnPoints addObject:[NSValue valueWithCGPoint:current_Point]];

imageView_.image = [self drawLineFromPoint:previous_Point toPoint:current_Point image:imageView_.image];

previous_Point = current_Point;
}
[/sourcecode]

3. Simply Polyline

We need to find a similar polyline, but with fewer vertices. This is necessary because we cannot interpolate between vertices to generate a nice smooth polyline if they are placed too close to each other. I use the “Ramer–Douglas–Peucker” algorithm for this. Alternatively, Lang’s simplification algorithm or any other polyline simplification algorithms would work.
We’ll begin by adding the following utility method:

[sourcecode]/** Draws a path to an image and returns the resulting image */
– (UIImage *)drawPathWithPoints:(NSArray *)points image:(UIImage *)image
{
CGSize screenSize = self.view.frame.size;
UIGraphicsBeginImageContext(screenSize);
CGContextRef currentContext = UIGraphicsGetCurrentContext();
[image drawInRect:CGRectMake(0, 0, screenSize.width, screenSize.height)];

CGContextSetLineCap(currentContext, kCGLineCapRound);
CGContextSetLineWidth(currentContext, 1.0);
CGContextSetRGBStrokeColor(currentContext, 0, 0, 1, 1);
CGContextBeginPath(currentContext);

int count = [points count];
CGPoint point = [[points objectAtIndex:0] CGPointValue];
CGContextMoveToPoint(currentContext, point.x, point.y);
for(int i = 1; i &lt; count; i++) {
point = [[points objectAtIndex:i] CGPointValue];
CGContextAddLineToPoint(currentContext, point.x, point.y);
}
CGContextStrokePath(currentContext);

UIImage *ret = UIGraphicsGetImageFromCurrentImageContext();
UIGraphicsEndImageContext();
return ret;
}
[/sourcecode]

drawPathWithPoints:image is similar to our line drawing method above, except it draws a polyline, given an array of vertices.
We’ll also add an Objective-C implementation of Wikipedia’s pseudo code for the Ramer–Douglas–Peucker algorithm:

[sourcecode]- (NSArray *)douglasPeucker:(NSArray *)points epsilon:(float)epsilon
{
int count = [points count];
if(count &lt; 3) {
return points;
}

//Find the point with the maximum distance
float dmax = 0;
int index = 0;
for(int i = 1; i &lt; count – 1; i++) {
CGPoint point = [[points objectAtIndex:i] CGPointValue];
CGPoint lineA = [[points objectAtIndex:0] CGPointValue];
CGPoint lineB = [[points objectAtIndex:count – 1] CGPointValue];
float d = [self perpendicularDistance:point lineA:lineA lineB:lineB];
if(d &gt; dmax) {
index = i;
dmax = d;
}
}

//If max distance is greater than epsilon, recursively simplify
NSArray *resultList;
if(dmax &gt; epsilon) {
NSArray *recResults1 = [self douglasPeucker:[points subarrayWithRange:NSMakeRange(0, index + 1)] epsilon:epsilon];

NSArray *recResults2 = [self douglasPeucker:[points subarrayWithRange:NSMakeRange(index, count – index)] epsilon:epsilon];

NSMutableArray *tmpList = [NSMutableArray arrayWithArray:recResults1];
[tmpList removeLastObject];
[tmpList addObjectsFromArray:recResults2];
resultList = tmpList;
} else {
resultList = [NSArray arrayWithObjects:[points objectAtIndex:0],
[points objectAtIndex:count – 1],nil];
}

return resultList;
}

– (float)perpendicularDistance:(CGPoint)point lineA:(CGPoint)lineA lineB:(CGPoint)lineB
{
CGPoint v1 = CGPointMake(lineB.x – lineA.x, lineB.y – lineA.y);
CGPoint v2 = CGPointMake(point.x – lineA.x, point.y – lineA.y);
float lenV1 = sqrt(v1.x * v1.x + v1.y * v1.y);
float lenV2 = sqrt(v2.x * v2.x + v2.y * v2.y);
float angle = acos((v1.x * v2.x + v1.y * v2.y) / (lenV1 * lenV2));
return sin(angle) * lenV2;
}
[/sourcecode]

CGPoint v1 = CGPointMake(lineB.x – lineA.x, lineB.y – lineA.y);
If you have difficulty for understanding the code above, refer to Wikipedia’s explanation and pseudo code of the algorithm. Now we’ll also override UIResponder‘stouchesEnded:withEvent method to add post-processing instructions for our polyline:

[sourcecode]- (void)touchesEnded:(NSSet *)touches withEvent:(UIEvent *)event
{
NSArray *generalizedPoints = [self douglasPeucker:drawnPoints epsilon:2];
imageView_.image = [self drawPathWithPoints:generalizedPoints image:cleanImage];
[drawnPoints release];
[cleanImage release];
}
[/sourcecode]

The method computes a simplified polyline, using our recorded touch points, drawn Points, as the input to Ramer–Douglas–Peucker algorithm, and replaces the jaggy polyline with the simplified polyline.

Also Read; How To Use Service Oriented Architecture In IOS Swift

If you try running the app now, you would see your polylines being replaced by more jaggy polylines. That’s expected.

4. Smooth Polyline

Now that we have a simplified polyline, we are ready to interpolate the points between the vertices for a nice smooth curve. Add the following method to the class:

[sourcecode]- (NSArray *)catmullRomSpline:(NSArray *)points segments:(int)segments
{
int count = [points count];
if(count &lt; 4) {
return points;
}

float b[segments][4];
{
// precompute interpolation parameters
float t = 0.0f;
float dt = 1.0f/(float)segments;
for (int i = 0; i &lt; segments; i++, t+=dt) {
float tt = t*t;
float ttt = tt * t;
b[i][0] = 0.5f * (-ttt + 2.0f*tt – t);
b[i][1] = 0.5f * (3.0f*ttt -5.0f*tt +2.0f);
b[i][2] = 0.5f * (-3.0f*ttt + 4.0f*tt + t);
b[i][3] = 0.5f * (ttt – tt);
}
}

NSMutableArray *resultArray = [NSMutableArray array];

{
int i = 0; // first control point
[resultArray addObject:[points objectAtIndex:0]];
for (int j = 1; j &lt; segments; j++) {
CGPoint pointI = [[points objectAtIndex:i] CGPointValue];
CGPoint pointIp1 = [[points objectAtIndex:(i + 1)] CGPointValue];
CGPoint pointIp2 = [[points objectAtIndex:(i + 2)] CGPointValue];
float px = (b[j][0]+b[j][1])*pointI.x + b[j][2]*pointIp1.x + b[j][3]*pointIp2.x;
float py = (b[j][0]+b[j][1])*pointI.y + b[j][2]*pointIp1.y + b[j][3]*pointIp2.y;
[resultArray addObject:[NSValue valueWithCGPoint:CGPointMake(px, py)]];
}
}

for (int i = 1; i &lt; count-2; i++) {
// the first interpolated point is always the original control point
[resultArray addObject:[points objectAtIndex:i]];
for (int j = 1; j &lt; segments; j++) {
CGPoint pointIm1 = [[points objectAtIndex:(i – 1)] CGPointValue];
CGPoint pointI = [[points objectAtIndex:i] CGPointValue];
CGPoint pointIp1 = [[points objectAtIndex:(i + 1)] CGPointValue];
CGPoint pointIp2 = [[points objectAtIndex:(i + 2)] CGPointValue];
float px = b[j][0]*pointIm1.x + b[j][1]*pointI.x + b[j][2]*pointIp1.x + b[j][3]*pointIp2.x;
float py = b[j][0]*pointIm1.y + b[j][1]*pointI.y + b[j][2]*pointIp1.y + b[j][3]*pointIp2.y;
[resultArray addObject:[NSValue valueWithCGPoint:CGPointMake(px, py)]];
}
}

{
int i = count-2; // second to last control point
[resultArray addObject:[points objectAtIndex:i]];
for (int j = 1; j &lt; segments; j++) {
CGPoint pointIm1 = [[points objectAtIndex:(i – 1)] CGPointValue];
CGPoint pointI = [[points objectAtIndex:i] CGPointValue];
CGPoint pointIp1 = [[points objectAtIndex:(i + 1)] CGPointValue];
float px = b[j][0]*pointIm1.x + b[j][1]*pointI.x + (b[j][2]+b[j][3])*pointIp1.x;
float py = b[j][0]*pointIm1.y + b[j][1]*pointI.y + (b[j][2]+b[j][3])*pointIp1.y;
[resultArray addObject:[NSValue valueWithCGPoint:CGPointMake(px, py)]];
}
}
// the very last interpolated point is the last control point
[resultArray addObject:[points objectAtIndex:(count – 1)]];

return resultArray;
}
[/sourcecode]

All credits go to supersg559 for the implementation Catmull-Rom Spline algorithm above. I merely modified it to use NSArrays instead of C-arrays. A good explanation of the algorithm can be found on “The Code Project”.
Finally, modify touchesEnded:withEvent: to use this algorithm:

[sourcecode]- (void)touchesEnded:(NSSet *)touches withEvent:(UIEvent *)event
{
NSArray *generalizedPoints = [self douglasPeucker:drawnPoints epsilon:2];
NSArray *splinePoints = [self catmullRomSpline:generalizedPoints segments:4];
imageView_.image = [self drawPathWithPoints:splinePoints image:cleanImage];
[drawnPoints release];
[cleanImage release];
}
[/sourcecode]

That’s it. You’re done!

It would facilitate them to put fine-looking signatures, draw beautiful sketches and make impressive presentations.

Have something to add to this topic? Share it in the comments.

At Andolasoft we have a team dedicated iOS app developer who has long expertise in implementation of Service Oriented Architecture. Our developers can help you in all your mobile app development issues. So don’t hesitate to communicate with them. Book a free consultation to access them directly.

IBM AppScan is Secure For IPhone Developers Against Hackers

IBM has recently launched a new application to help developers secure their code and data in iOS applications. AppScan 8.7 searches through iOS application code and alerts developers when it finds any flaws. This software also analyses the apps that developers might want to use on Apple devices to check for vulnerabilities. Meanwhile it alerts the IT security personnel’s about the potential threats.

IBM said that over 45.6 billion siOS app were downloaded in 2012, which is why securing Smartphone and other iOS devices should be a top priority for organizations. IBM has developed AppScan Source application after analyzing over 40,000 mobile APIs by using Apple’s Software Development Kit (SDK). These API profiles were added to the IBM AppScan Source Security Knowledge-base and tied to the analysis engine.

Never miss an update from us. Join 10,000+ marketers and leaders.

IBM AppScan Source 8.7 for iOS is expected to hit the market on 25th of March. IBM claims that it will facilitate the users the ability to improve security quality without sacrificing the time to market of mobile application projects. It will also allow the FIs and others, to protect each mobile application release in the face of constant updates. The new security protocol is part of IBM’s over-arching Mobile First initiative.

In addition, IBM AppScan 8.7 can reduce the cost of developing secure applications by finding early security vulnerabilities in the development cycle. It provides developers with a view where flaws may surface in their applications, allowing potential security drawbacks to be handled at an early stage and avoiding further pitfalls in development process.

New Features in IBM AppScan 8.7 include:

Multiple Language Support:

The software also features language support for Objective-C, JavaScript, Java which includes the ability to call APIs and data flow analysis that would generate trace information. This new feature enables organizations to build secure enterprise mobile apps, regardless of technology, employees and partners.

US Government Regulation Compliance:

Provides compliance with two crucial standards – Federal Information Processing Standard (FIPS) Publication 140-2 and Internet Protocol version 6 (IPv6).

This project showcases IBM’s execution of its [Mobile First] strategy to help clients incorporate security into their infrastructure and solutions from the design, development and testing phases rather than leaving security to become an afterthought,” said Caleb Barlow, director of application, data and mobile security, IBM.

I’ve worked with the team at Andolasoft on multiple websites. They are professional, responsive, & easy to work with. I’ve had great experiences & would recommend their services to anyone.

Ruthie Miller, Sr. Mktg. Specialist

Salesforce, Houston, Texas

LEARN MORE

Most companies have stated that their customers are looking for ways to secure their apps and data. Hence secure mobile apps and auto security tests are a must to ensure their customers that their data are safe.

With respect to iphone development, Caleb Barlow also quoted “security into the infrastructure and solutions from the design, development and testing phases rather than leaving security to become an afterthought.” AppScan Source for iOS is said to be available from 25th of March. IBM started its AppScan range of products in 2008, and has previously launched a version that scans Android apps.