How To Increase Your Mobile App Downloads

You have finally built a mobile app of your own! You really love your app icon and design, and it works perfectly on all of the devices that you tested it on.  You found a competition-free and unexplored niche.

There is just one problem (and unfortunately, it’s a major one): your app isn’t being downloaded by anyone.

If this is the case, then you have encountered the same problem that numerous app developers encounter after their apps have been published.

Don’t get discouraged – if you would like the entire world to use your mobile app – you can make this happen.

You can start making some real money after you begin getting downloads.

It just takes the right knowledge and some effort in order to get attention for your app from the masses.  In order to learn all of the best ways for increasing mobile app downloads, first, you have to understand how people download apps.

Let’s discuss some essential mobile application development language.

Most likely you have a basic understanding of what search engine optimization (SEO) is.  But do you know about app store optimization (ASO)?

In terms of your app’s success, they are quite similar, but ASO has an even bigger impact on your app’s listing than SEO does for Google’s search results. In addition, ASO specifically increases your app’s visibility in the market.  The higher its rank is, the more people will be able to find your app when doing a search.

After your app has been found by a user, ASO helps to determine as well whether or not the person will download your app.  Your ASO is affected by a number of different factors:

Positive Reviews – A mobile app with more positive reviews will have a higher rating.  When an app is highly rated by users, it will be ranked highly also, which will increase the number of downloads the app gets.

App Downloads – The higher the number of downloads your app gets, the more it will receive.  To rank highly, the goal of an app published should be to get steady amounts of downloads.

Keyword Relevance – Apps that have popular keywords in the description and title will get more downloads.

Revenue – Apps that have a good revenue generation record will receive more visibility in the app store.

Country – Your ranking for a region might be influenced by regional success.  There can be a snowball effect when your rankings are boosted in multiple regions.

Back links – Your app rankings can be improved if you have back links points to numerous relevant pages.

Social Proof – The popularity of your app across various social media platforms may affect its rankings in the app store – particularly on Androids.  Google+ shares and +1’s can determine whether your app is ignored or noticed by users.

App Starts – How many times your app is actually opened by users can impact your ranking significantly.

Retention – Your rankings can be affected by how many people keep your app for 30 days vs. how many uninstall it.  Your app description should be catered heavily towards your target audience in order to ensure retention.

When all of the above is taken into account, it can change how the general public perceives your mobile app dramatically, and how the app store algorithms treat it.

Now that you better understand the fate of your app after it has been published, we can take a more detailed look at some of the best ways to increase downloads of your app.

Get an Enticing App Icon Created

The first thing that somebody will see inside of the app store is your app icon, so your chosen design is crucial to your success.  When users are scrolling through an app store, your icon should pop out and be recognizable and eye-catching.

Be sure that the design you use clearly represents your app.  It needs to provide a clear idea of what users will get after they have installed your app.

Your app icon should be straightforward and not be too flashy.  It is best to keep things simple – you don’t want it to be too confusing or look cluttered.

Social Media Outreach

Even before making decisions regarding which social networks you want to use for building the public persona of your app, you first must decide which angle to get started from.  That means that the social media voice that you use needs to match the personality of your app.

What does your app resemble?  If it was a human, what would it act and sound like?

Use that voice on a consistent basis whenever you are posting.  If you have a cool and edgy app, then don’t use bland business language and bore your fans.  However, if you have an app that is geared for young professionals, then that type of business language might be well-suited for your audience.

The social media platforms that provide the most attention for apps are:

  • Twitter
  • Facebook
  • Pinterest
  • YouTube
  • FourSquare
  • LinkedIn

Don’t just post promotions and information about your app on the social platforms.  Instead, engage and create conversations with fans. To increase engagement, respond to the comments in the voice of your app.  This type of relationship will help to increase the amount of positive word-of-mouth you get for being committed to your users, and as a result, will increase your downloads.

Effectively Market Your App

Don’t get too conservative with your marketing budget.

Marketing is typically used structured over several months or weeks.  However, if you would like your app to see a sharp spike in the number of downloads quickly then, concentrate your marketing spend all within a short time frame.

In order to roll out a comprehensive marketing campaign at the same time does take dedication and courage, but you can see some outstanding returns when it is done successfully.

Depending on how much your total budget is, you should spend your money within a couple of days or at most a week.  Your advertising should be spread across the most popular channels that your target audiences use, and may include the following:

  • Social media
  • Websites like Digg and Reddit
  • Relevant magazines and blogs
  • App directory sites
  • Content marketing
  • SMS marketing
  • Email marketing

You will receive many of your downloads from organic searches, however, you will also get a lot of downloads from the landing page on your website.   That is why you need to have a webpage created that is dedicated to your new app and has a clear call-to-action that tells users to download the app.

Request Reviews

If you are able to get positive reviews from your app’s fans, it will result in an exponential increase in your downloads.

Reviews declaring that your app is valuable or that state that it provides an excellent user experience are great testimonials that tell other users that it is worth it to download your app.

You may be tempted to buy fake reviews to increase how much attention your app gets overall. However, if the app store discovers you have used that tactic, your app may be suspended.

Organic reviews coming from real individuals are much more valuable for your app compared to ones that are fabricated since you can learn from them also.  They will not only provide other users with feedback and a better understanding of the app, but they can also tell you what things need to be changed or fixed.

Request reviews from various individuals who have real influence.  Critics from major tech websites and popular You Tubers with big audiences are some excellent targets to send requests to.

Mention in your press release that you want to get feedback on your app.  The media outlets in some cases will have somebody on their staffs already who reviews apps.

Since you alerted them to something that relates to your product, they might return the favor and give you a positive review. After a publication has reviewed you, then contact all the smaller outlets you reached out to previously.  Tell them about the new article.  It may cause them to write their own review.

In the end…some closing points

It isn’t always easy to achieve getting more downloads of your app.

However, if you follow best practices and use the tips above, you will see a significant increase in your app store rankings and downloads.

Always keep in mind what your target audience’s preference is when trying these strategies out.   What works the best with general consumers may not work the same for your audience, so keep their best interests in mind when using these tips.

Are you looking to Increase Your Mobile App Downloads! Consult now

We featured on Top Python Mobile App Development Agencies at App Developer Listing! From the last 13+ years, Andolasoft is serving customers as a globally respected web and mobile application development company.

Strategy That Makes Enterprise Mobile App Development Easy

Both mobile app and mobile app development is growing like wildfire, huge business and personal requirements are looking forward to the strategy that makes Enterprise Mobile Application easy.

By using enterprise apps by your employee, you can get  an extra 240 hours of work each year.

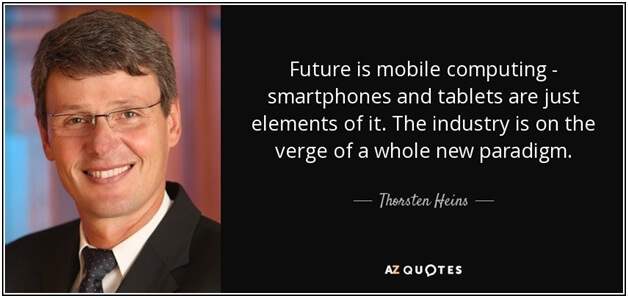
Thorsten Heins

Smartphones and Mobile systems are important in the postmodern era. It is a small yet potent device that is omnipresent with almost all spheres in the daily routines. Whether for grocery shopping, searching for a food outlet or getting the right birthday present. 

Never miss an update from us. Join 10,000+ marketers and leaders.

With the present day apps which were known until a few years ago, it has become a necessity more than a choice. So much that you can observe a visible synergy between people’s behavior and with the capabilities of their mobiles. The increasing use of smartphones with portable devices has completely changed the way of communication with enterprise software solutions.

The opportunity level is much higher and you would be able to reach your target audience. Both startups and enterprises are rushing to mobile app development to reach to their segment of users.

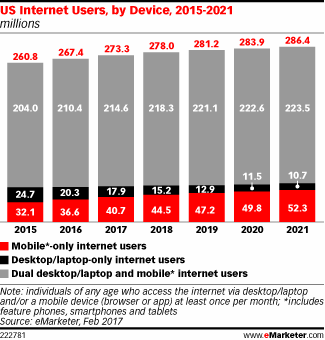
According to a report by Statista, in 2021 there were 276.8 million people in the U.S who accessed the internet by using mobile devices. Whereas in 2023, it is expected to reach 287 million mobile internet users. At present more than 83% of the U.S populations are mobile internet users.

US Internet User by Device

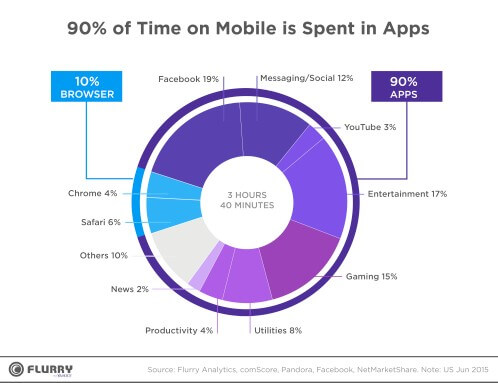
Users are spending 90% of their time in Mobile Apps alone.

User Time Spent on Mobile Apps

Both play store and app store are loaded with millions of amazingly featured mobile apps. You can find more than 2.8 million apps in the play store and 2.2 million apps in the App store.

Smartphone Users

(Source Statista and TUNE)

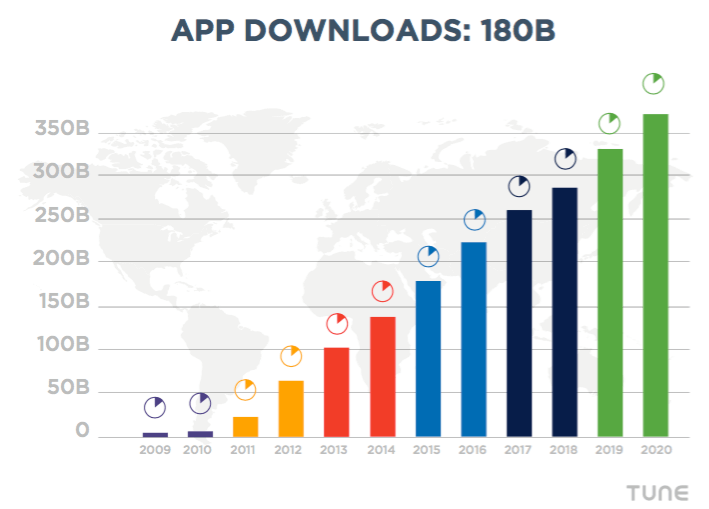
App Downloads

(Source Statista and TUNE)

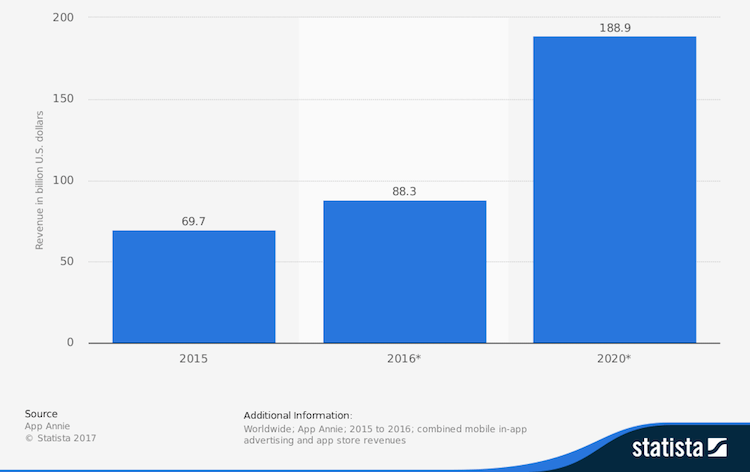
With the growth of mobile use and app downloads, mobile app revenue has also grown up.

Even in the black Fridays mobile apps are generating revenues, In 2015 – global mobile app revenue was about $70 billion; in 2016 this number reached $88 billion and 2020 the expected mobile app revenue is expected to cross $180+ billion. That’s big.

Let’s have a look

Global Mobile App Revenue

(Source: businessofapps.com/data/app-revenues)

“Mobile apps are becoming the primary way that users across all demographics access and activate content, services, commerce, and critical business applications. This turns up the pressure on organizations to anchor business applications on mobile platforms. It’s clear that enterprises no longer consider mobility the laPeggy Annest step toward implementing a business application.”
Peggy Anne Salz, Lead Analyst, MobileGroove


Mobile App must be formulated, well thought over and built to reach a wider customer base and should be friendlier in mobility.

Because users are not always the same and they do not always stick to using the same device and same connection.

Mobility applications with Mobile Enterprise Application Platform (MEAP) development cycle can solve the enterprise level problems.

So now a question might come to your mind –“Is your developer adopting the MEAP rules with mobility technology to develop your enterprise mobile app?”

Here are the basic rules;

  • Must be compatible with different mobile applications
  • Must be compatible with different mobile operating systems
  • Compatible to integrate with different back-end data sources

Enterprise mobile app helps you to be connected and updated with your team or working networks. Data can be accessed anytime through your mobile device and allow your team or employees to access date through their personal devices instead of providing them company smart phone.

Personal devices can safely and easily manage enterprise mobile apps and this is cost effective for companies and not to invest more in smartphones, laptops etc.

So, are you looking to develop enterprise mobile app for your business?

The idea is not bad to go for an enterprise mobile app but you need to adopt the right strategy to get the things done in the right way. You need experienced team or dedicated developers with high level of security for development.

At Andolasoft we have delivered some of the most awesome mobile apps by utilizing our experience and knowledge with most comprehensive enterprise mobile app strategy to simplify your entire business process.

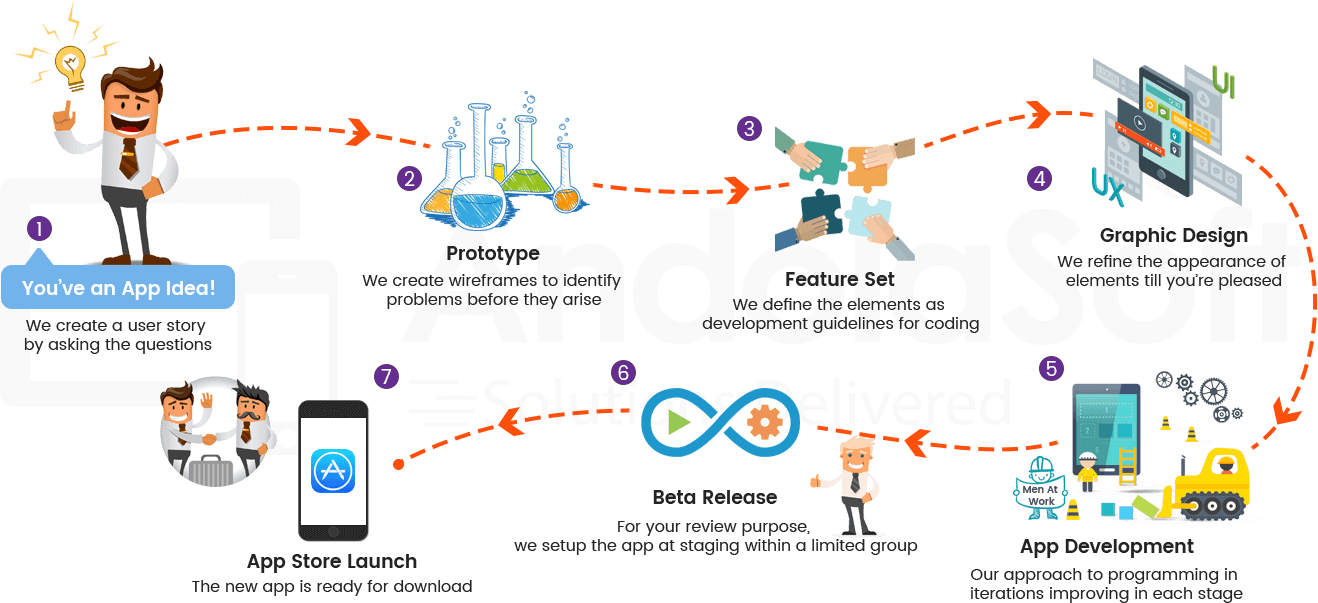
Andolasoft Mobile App Devlopment Process

Our objective is to provide mobility solutions which not only save your money but also save your time.

Let’s have a look at the – Strategies for enterprise mobile app development

1. Annalise Your Product Or Service Matrices:

Before taking any decision, you need to analyze your user and customer behavior towards your product and how they are responding to it.

You need to deep-dive with your mobile users and if you are a SaaS application development company, analyse how your product is used by various devices, operating system and the usage part, and from where users are churning out.

2. Develop A Baseline Standard

Once you have a mindset for the development after knowing the necessity of an app, you need to prepare a standard baseline against your planning. This will tell you the future of your app development process.

You don’t know what is hot in the market right now and what will be in the next future. So, time to do some research on how the industry is moving.

I am sure; this will surely help you to prepare a standard baseline for your app.

3. Prepare Complete Road-map

Roadmap gives you a clear vision with various steps and processes to reach your goal. Technologies are changing day by day and people prefer to get acquainted with smart features.

Your present app features may not come to picture in next two years or the features might have become obsolete.

This also helps your mobile app developer to make sure plan-out and put algorithms that are flexible enough and can quickly adapt to new features in new devices.

Roadmap can also show you the approximate resources, their skill you need and the development time that would be required at the very said time.

4. Collect Feedback

Gathering feedback from users and your customer about your product, always helps to develop a better app according to the need.

The smart way of gathering feedback is, inviting your existing customer to use your product at each step of your development process. They will love to use it and will let you know there feedback on your product.

5. Start Communication To Build Foundation

Mobile trends are changing each week.

You need to very closely monitor your user’s activity and all your matrices. This creates opportunity for a direct communication with your users. To keep connected them with your app, ask their problems, what their difficulties are, what they are thinking about your app and what new feature will help them to manage their jobs etc., better.

Collecting info in regular basis can deploy your flexible code to latest features helping you to scale.

6. Employee On-boarding

With an enterprise application development enhances the on-boarding process. The app mange all the information regarding staff certification, and saves time and efforts.

7. Supply Chain Control

The Mobile applications for companies deal with many supply chains that deal with many features for accurate planning, managing transportation and courier’s work.

I’ve worked with the team at Andolasoft on multiple websites. They are professional, responsive, & easy to work with. I’ve had great experiences & would recommend their services to anyone.

Ruthie Miller, Sr. Mktg. Specialist

Salesforce, Houston, Texas

LEARN MORE

With the business enterprise applications you can optimize the supply chain management and save lots of money.

Conclusion

Development of enterprise mobile apps is not easy for everyone.

It needs solid experience and knowledge to catch ‘n’ understands the exact requirement and guide the app development according to it.

It’s not very easy to gather information or feedback for newly launched products.

The enterprise mobile app graph is reaching new heights. Looking for help!  Consult With Us Now.

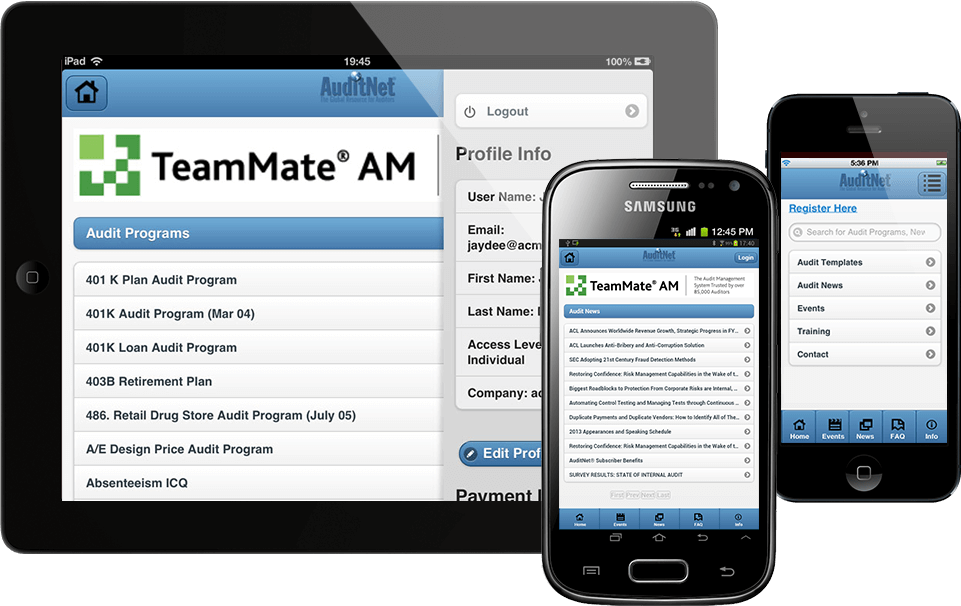
Auditnet® Is Now Available On Mobile (iPhone/iPad/Android)

We are delighted to announce that AuditNet® is now available on Mobile both iPhone/iPad and Android. With this app, now the existing users can enjoy browsing and downloading the same rich content what they see on web app, also a new user will be able to register to the site. Now advertisers will get traffic from both web and mobile application.  For last 12 weeks a dedicated team from Andolasoft (Mobile App Developers, UI Developers, Ruby On Rails developers and QA team) worked diligently to make it available on the app stores right on time. AndolaSoft team worked on UX/UI design, app development, testing, and deployment of app to the respective apps store.

Looking into current surge of iPhone, iPad and Android devices worldwide, AuditNet® started looking for a way to provide access to the audit templates to its mobile users to target rise in subscriptions. Hence, Andolasoft proposed a cost effective solution by developing a mobile app using Cross Platform technology – PhoneGap, on top of Ruby on Rails framework, enabling to run on both iOS and Android platform. The back-end uses RESTful API hosted on AWS for smoother performance.


Auditnet_mobile_image

Auditnet_appstore1Auditnet_googleplay


About Auditnet:

AuditNet® serves the global audit community as the primary communication resource with an online digital network where auditors share resources, tools, and experience including audit work programs and other audit documentation. In 2009 AuditNet® launched Web-based training for fraud detection and prevention, IT audit, data analysis, audit software tools and techniques, enabling auditors to learn essential skills anywhere at any time. As a NASBA approved CPE sponsor AuditNet® now offers low-cost high-quality training for auditors and financial professionals, providing convenience while eliminating the need for travel.

Visit www.auditnet.org to know more.

About AndolaSoft:

Based in Silicon Valley, Andolasoft is a Web and Mobile app Development Company. Here, we do web applications using Ruby on Rails, PHP and CakePHP. We’ve expertize on Mobile App Development involving as iPhone, iPad, Android, PhoneGap andSencha.
With a team of 200+ expert developers, we deliver cutting-edge solutions within budget and on schedule. We have happy customers from across the USA, UK, Australia, Canada, Singapore, Switzerland and Brazil.

Visit andolasoft.com to know more

How to show Captured Images dynamically in “GridView” Layout

There are numerous camera apps in the market which displays shopping items (i.e. image view). In these camera apps we need to arrange each photo items in a list view, basically a ‘Grid View’.

In such cases, ‘table layout’ would be easier to use; but it is difficult to arrange large number of items in

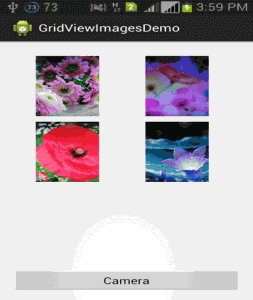
gridview_sample-253x300

side scroll view. As ‘table view’ is just a layout manager, it doesn’t allow direct interaction with each item to the users.

In order to tackle such development issues, it would be smart to implement ‘Grid View’ Layout.

What is “Grid View” Layout?

Grid View (android.widget.Grid View) is a layout that is implemented to show two-dimensional view with scrollable structure.

With the help of ‘List’ adapter, we can add images dynamically to a ‘Grid View’ layout by customizing the number of columns.

Let me tell you the process to show your Android Smartphone captured images dynamically in “Grid View” layout with some example.

Example of Layout xml

[sourcecode]<RelativeLayout xmlns:android="http://schemas.android.com/apk/res/android"
xmlns:tools="http://schemas.android.com/tools"
android:layout_width="match_parent"
android:layout_height="match_parent"
android:paddingBottom="@dimen/activity_vertical_margin"
android:paddingLeft="@dimen/activity_horizontal_margin"
android:paddingRight="@dimen/activity_horizontal_margin"
android:paddingTop="@dimen/activity_vertical_margin"
tools:context=".MainActivity" >

<RelativeLayout
android:id="@+id/RelativeGridLayout"
android:layout_width="wrap_content"
android:layout_height="fill_parent" >

<GridView
android:id="@+id/gridviewimg"
android:layout_width="wrap_content"
android:layout_height="fill_parent"
android:gravity="center"
android:numColumns="2"
android:scrollbarStyle="outsideInset"
android:smoothScrollbar="true"
android:verticalSpacing="10dp"
android:paddingBottom="50dp"
android:paddingTop="10dp"
/>
</RelativeLayout>

<RelativeLayout
android:id="@+id/RelativeLayout01"
android:layout_width="fill_parent"
android:layout_height="40dp"
android:layout_alignBottom="@+id/RelativeGridLayout"
>

<Button
android:id="@+id/capture_btn1"
android:layout_width="fill_parent"
android:layout_height="wrap_content"
android:layout_alignParentTop="true"
android:layout_centerHorizontal="true"
android:text="Camera" />
</RelativeLayout>

</RelativeLayout>[/sourcecode]

Example of Main form Activity class

1.MainActivity.java

[sourcecode]package com.example.gridviewimagesdemo;

import java.io.File;
import java.io.FileInputStream;
import java.io.FileNotFoundException;
import java.io.FileOutputStream;
import java.io.IOException;
import java.text.DateFormat;
import java.text.SimpleDateFormat;
import java.util.ArrayList;
import java.util.Arrays;
import java.util.Date;
import java.util.List;

import android.net.Uri;
import android.os.Bundle;
import android.os.Environment;
import android.provider.MediaStore;
import android.app.Activity;
import android.content.ActivityNotFoundException;
import android.content.Context;
import android.content.Intent;
import android.graphics.Bitmap;
import android.graphics.BitmapFactory;
import android.util.Log;
import android.view.Menu;
import android.view.View;
import android.view.ViewGroup;
import android.view.View.OnClickListener;
import android.widget.BaseAdapter;
import android.widget.Button;
import android.widget.GridView;
import android.widget.ImageView;
import android.widget.Toast;

public class MainActivity extends Activity implements OnClickListener {

Button captureBtn = null;
final int CAMERA_CAPTURE = 1;
private Uri picUri;
private DateFormat dateFormat = new SimpleDateFormat("yyyy-MM-dd HH:mm:ss");
private GridView grid;
private  List<String> listOfImagesPath;

public static final String GridViewDemo_ImagePath = Environment.getExternalStorageDirectory().getAbsolutePath() + "/GridViewDemo/";

@Override
protected void onCreate(Bundle savedInstanceState) {
super.onCreate(savedInstanceState);
setContentView(R.layout.activity_main);

captureBtn = (Button)findViewById(R.id.capture_btn1);
captureBtn.setOnClickListener(this);
grid = ( GridView) findViewById(R.id.gridviewimg);

listOfImagesPath = null;
listOfImagesPath = RetriveCapturedImagePath();
if(listOfImagesPath!=null){
grid.setAdapter(new ImageListAdapter(this,listOfImagesPath));
}
}

@Override
public boolean onCreateOptionsMenu(Menu menu) {
// Inflate the menu; this adds items to the action bar if it is present.
getMenuInflater().inflate(R.menu.main, menu);
return true;
}

@Override
public void onClick(View arg0) {
// TODO Auto-generated method stub
if (arg0.getId() == R.id.capture_btn1) {

try {
//use standard intent to capture an image
Intent captureIntent = new Intent(MediaStore.ACTION_IMAGE_CAPTURE);
//we will handle the returned data in onActivityResult
startActivityForResult(captureIntent, CAMERA_CAPTURE);
} catch(ActivityNotFoundException anfe){
//display an error message
String errorMessage = "Whoops – your device doesn’t support capturing images!";
Toast toast = Toast.makeText(this, errorMessage, Toast.LENGTH_SHORT);
toast.show();
}
}

}

protected void onActivityResult(int requestCode, int resultCode, Intent data) {
if (resultCode == RESULT_OK) {
//user is returning from capturing an image using the camera
if(requestCode == CAMERA_CAPTURE){
Bundle extras = data.getExtras();
Bitmap thePic = extras.getParcelable("data");
String imgcurTime = dateFormat.format(new Date());
File imageDirectory = new File(GridViewDemo_ImagePath);
imageDirectory.mkdirs();
String _path = GridViewDemo_ImagePath + imgcurTime+".jpg";
try {
FileOutputStream out = new FileOutputStream(_path);
thePic.compress(Bitmap.CompressFormat.JPEG, 90, out);
out.close();
} catch (FileNotFoundException e) {
e.getMessage();
} catch (IOException e) {
e.printStackTrace();
}
listOfImagesPath = null;
listOfImagesPath = RetriveCapturedImagePath();
if(listOfImagesPath!=null){
grid.setAdapter(new ImageListAdapter(this,listOfImagesPath));
}
}
}
}

private List<String> RetriveCapturedImagePath() {
List<String> tFileList = new ArrayList<String>();
File f = new File(GridViewDemo_ImagePath);
if (f.exists()) {
File[] files=f.listFiles();
Arrays.sort(files);

for(int i=0; i<files.length; i++){
File file = files[i];
if(file.isDirectory())
continue;
tFileList.add(file.getPath());
}
}
return tFileList;
}

public class ImageListAdapter extends BaseAdapter
{
private Context context;
private List<String> imgPic;
public ImageListAdapter(Context c, List<String> thePic)
{
context = c;
imgPic = thePic;
}
public int getCount() {
if(imgPic != null)
return imgPic.size();
else
return 0;
}

//—returns the ID of an item—
public Object getItem(int position) {
return position;
}

public long getItemId(int position) {
return position;
}

//—returns an ImageView view—
public View getView(int position, View convertView, ViewGroup parent)
{
ImageView imageView;
BitmapFactory.Options bfOptions=new BitmapFactory.Options();
bfOptions.inDither=false;                     //Disable Dithering mode
bfOptions.inPurgeable=true;                   //Tell to gc that whether it needs free memory, the Bitmap can be cleared
bfOptions.inInputShareable=true;              //Which kind of reference will be used to recover the Bitmap data after being clear, when it will be used in the future
bfOptions.inTempStorage=new byte[32 * 1024];
if (convertView == null) {
imageView = new ImageView(context);
imageView.setLayoutParams(new GridView.LayoutParams(ViewGroup.LayoutParams.MATCH_PARENT, ViewGroup.LayoutParams.MATCH_PARENT));
imageView.setPadding(0, 0, 0, 0);
} else {
imageView = (ImageView) convertView;
}
FileInputStream fs = null;
Bitmap bm;
try {
fs = new FileInputStream(new File(imgPic.get(position).toString()));

if(fs!=null) {
bm=BitmapFactory.decodeFileDescriptor(fs.getFD(), null, bfOptions);
imageView.setImageBitmap(bm);
imageView.setId(position);
imageView.setLayoutParams(new GridView.LayoutParams(200, 160));
}
} catch (IOException e) {
e.printStackTrace();
} finally{
if(fs!=null) {
try {
fs.close();
} catch (IOException e) {
e.printStackTrace();
}
}
}
return imageView;
}
}
}[/sourcecode]

Example of Manifest.xml file content:

Example of AndroidManifest.xml

[sourcecode]<?xml version="1.0" encoding="utf-8"?>
<manifest xmlns:android="http://schemas.android.com/apk/res/android"
package="com.example.gridviewimagesdemo"
android:versionCode="1"
android:versionName="1.0" >

<uses-sdk
android:minSdkVersion="8"
android:targetSdkVersion="17" />

<uses-permission android:name="android.permission.WRITE_EXTERNAL_STORAGE" />

<application
android:allowBackup="true"
android:icon="@drawable/ic_launcher"
android:label="@string/app_name"
android:theme="@style/AppTheme" >
<activity
android:name="com.example.gridviewimagesdemo.MainActivity"
android:label="@string/app_name" >
<intent-filter>
<action android:name="android.intent.action.MAIN" />

<category android:name="android.intent.category.LAUNCHER" />
</intent-filter>
</activity>
</application>

</manifest>[/sourcecode]

Conclusion:

So, a ‘Grid view’ implementation would result in following features and benefits:

  • In ‘GridView’ layout items would be listed in a static grid, defined in layout xml file.
  • ‘Gridview’ extends android.widget.Adapter, so it could be used where large amount of data is managed in a single page frame.
  • Enhanced data source binding capabilities (Direct interaction with SQLite Data Source)
  • Built-in support for sorting and paging mechanism
  • Additional Column types (ImageField)

I would like to recommend you to go through my previous article on where I have clearly narrate the process to display your iPhone captured images in Grid View layout.

I hope you find this useful. If you want to develop android or iPhone mobile app for you or for your organization, then you can hire single or group of developers from the pool of skilled and accomplished android specialists. Drop me a line below with your thoughts, thanks.

How To Draw Smooth Lines In IOS Apps?

One of the most common issues in drawing apps is that the polylines appears jagged when drawn quickly. Such flaws create unfavorable impact on the application as well developers. Apps developed for IPhone, which is one of the premium devices in the world; must encompass all the development aspects, may it be a major bug as in Apple Map or as simple as jagged polylines in drawing apps.

Drawing lines are one of the most common features in iOS apps. It can be used for numerous purposes such as putting a signature in PDFs and images, drawing line graphs, preparing presentations with sketches and many more. Most of the iOS applications generate jaggy lines when drawn quickly. On the other hand, smooth lines facilitate uses with the convenience to draw quickly and without affecting the practicality of the application.

Below are the steps to follow how to draw smooth lines in iOS apps.

1. Add UIImage View

First of all we need to add UIImageView to a UIView.

[sourcecode]SmoothLineViewController.h:
@property (nonatomic, readwrite, retain) IBOutlet UIImageView *imageView;
Then we’ll @synthesize this property in SmoothLineViewController.m:
@synthesize imageView=imageView_;
[/sourcecode]

Finally, we’ll use the Interface Builder to add the UIImageView component to SmoothLineViewControllerr.xib

2. Handling Touches

Now we are ready to write code for handle touches and draw polylines. We’ll need to declare the following member variables in the header:

[sourcecode]CGPoint previousPoint;
NSMutableArray *drawnPoints;
UIImage *cleanImage;
add the method to the class:
/** This method draws a line to an image and returns the resulting image */
– (UIImage *)drawLineFromPoint:(CGPoint)from_Point toPoint:(CGPoint)to_Point image:(UIImage *)image
{
CGSize sizeOf_Screen = self.view.frame.size;
UIGraphicsBeginImageContext(sizeOf_Screen);
CGContextRef current_Context = UIGraphicsGetCurrentContext();
[image drawInRect:CGRectMake(0, 0, sizeOf_Screen.width, sizeOf_Screen.height)];

CGContextSetLineCap(current_Context, kCGLineCapRound);
CGContextSetLineWidth(current_Context, 1.0);
CGContextSetRGBStrokeColor(current_Context, 1, 0, 0, 1);
CGContextBeginPath(current_Context);
CGContextMoveToPoint(current_Context, from_Point.x, from_Point.y);
CGContextAddLineToPoint(current_Context, to_Point.x, to_Point.y);
CGContextStrokePath(current_Context);

UIImage *rect = UIGraphicsGetImageFromCurrentImageContext();
UIGraphicsEndImageContext();
return rect;
}
drawLineFromPoint:to_Point:image is a simple utility method that draws a line over a UIImage and returns the resulting UIImage.
Now UIResponder‘s touch handling methods will be overridden:
– (void)touchesBegan:(NSSet *)_touches withEvent:(UIEvent *)_event
{
// retrieve the touch point
UITouch *_touch = [_touches anyObject];
CGPoint current_Point = [_touch locationInView:self.view];

// Its record the touch points to use as input to our line smoothing algorithm
drawn_Points = [[NSMutableArray arrayWithObject:[NSValue valueWithCGPoint:current_Point]] retain];

previous_Point = current_Point;

// we need to save the unmodified image to replace the jagged polylines with the smooth polylines
clean_Image = [imageView_.image retain];
}

– (void)touchesMoved:(NSSet *)_touches withEvent:(UIEvent *)_event
{

UITouch *_touch = [_touches anyObject];
CGPoint current_Point = [_touch locationInView:self.view];

[drawnPoints addObject:[NSValue valueWithCGPoint:current_Point]];

imageView_.image = [self drawLineFromPoint:previous_Point toPoint:current_Point image:imageView_.image];

previous_Point = current_Point;
}
[/sourcecode]

3. Simply Polyline

We need to find a similar polyline, but with fewer vertices. This is necessary because we cannot interpolate between vertices to generate a nice smooth polyline if they are placed too close to each other. I use the “Ramer–Douglas–Peucker” algorithm for this. Alternatively, Lang’s simplification algorithm or any other polyline simplification algorithms would work.
We’ll begin by adding the following utility method:

[sourcecode]/** Draws a path to an image and returns the resulting image */
– (UIImage *)drawPathWithPoints:(NSArray *)points image:(UIImage *)image
{
CGSize screenSize = self.view.frame.size;
UIGraphicsBeginImageContext(screenSize);
CGContextRef currentContext = UIGraphicsGetCurrentContext();
[image drawInRect:CGRectMake(0, 0, screenSize.width, screenSize.height)];

CGContextSetLineCap(currentContext, kCGLineCapRound);
CGContextSetLineWidth(currentContext, 1.0);
CGContextSetRGBStrokeColor(currentContext, 0, 0, 1, 1);
CGContextBeginPath(currentContext);

int count = [points count];
CGPoint point = [[points objectAtIndex:0] CGPointValue];
CGContextMoveToPoint(currentContext, point.x, point.y);
for(int i = 1; i &lt; count; i++) {
point = [[points objectAtIndex:i] CGPointValue];
CGContextAddLineToPoint(currentContext, point.x, point.y);
}
CGContextStrokePath(currentContext);

UIImage *ret = UIGraphicsGetImageFromCurrentImageContext();
UIGraphicsEndImageContext();
return ret;
}
[/sourcecode]

drawPathWithPoints:image is similar to our line drawing method above, except it draws a polyline, given an array of vertices.
We’ll also add an Objective-C implementation of Wikipedia’s pseudo code for the Ramer–Douglas–Peucker algorithm:

[sourcecode]- (NSArray *)douglasPeucker:(NSArray *)points epsilon:(float)epsilon
{
int count = [points count];
if(count &lt; 3) {
return points;
}

//Find the point with the maximum distance
float dmax = 0;
int index = 0;
for(int i = 1; i &lt; count – 1; i++) {
CGPoint point = [[points objectAtIndex:i] CGPointValue];
CGPoint lineA = [[points objectAtIndex:0] CGPointValue];
CGPoint lineB = [[points objectAtIndex:count – 1] CGPointValue];
float d = [self perpendicularDistance:point lineA:lineA lineB:lineB];
if(d &gt; dmax) {
index = i;
dmax = d;
}
}

//If max distance is greater than epsilon, recursively simplify
NSArray *resultList;
if(dmax &gt; epsilon) {
NSArray *recResults1 = [self douglasPeucker:[points subarrayWithRange:NSMakeRange(0, index + 1)] epsilon:epsilon];

NSArray *recResults2 = [self douglasPeucker:[points subarrayWithRange:NSMakeRange(index, count – index)] epsilon:epsilon];

NSMutableArray *tmpList = [NSMutableArray arrayWithArray:recResults1];
[tmpList removeLastObject];
[tmpList addObjectsFromArray:recResults2];
resultList = tmpList;
} else {
resultList = [NSArray arrayWithObjects:[points objectAtIndex:0],
[points objectAtIndex:count – 1],nil];
}

return resultList;
}

– (float)perpendicularDistance:(CGPoint)point lineA:(CGPoint)lineA lineB:(CGPoint)lineB
{
CGPoint v1 = CGPointMake(lineB.x – lineA.x, lineB.y – lineA.y);
CGPoint v2 = CGPointMake(point.x – lineA.x, point.y – lineA.y);
float lenV1 = sqrt(v1.x * v1.x + v1.y * v1.y);
float lenV2 = sqrt(v2.x * v2.x + v2.y * v2.y);
float angle = acos((v1.x * v2.x + v1.y * v2.y) / (lenV1 * lenV2));
return sin(angle) * lenV2;
}
[/sourcecode]

CGPoint v1 = CGPointMake(lineB.x – lineA.x, lineB.y – lineA.y);
If you have difficulty for understanding the code above, refer to Wikipedia’s explanation and pseudo code of the algorithm. Now we’ll also override UIResponder‘stouchesEnded:withEvent method to add post-processing instructions for our polyline:

[sourcecode]- (void)touchesEnded:(NSSet *)touches withEvent:(UIEvent *)event
{
NSArray *generalizedPoints = [self douglasPeucker:drawnPoints epsilon:2];
imageView_.image = [self drawPathWithPoints:generalizedPoints image:cleanImage];
[drawnPoints release];
[cleanImage release];
}
[/sourcecode]

The method computes a simplified polyline, using our recorded touch points, drawn Points, as the input to Ramer–Douglas–Peucker algorithm, and replaces the jaggy polyline with the simplified polyline.

Also Read; How To Use Service Oriented Architecture In IOS Swift

If you try running the app now, you would see your polylines being replaced by more jaggy polylines. That’s expected.

4. Smooth Polyline

Now that we have a simplified polyline, we are ready to interpolate the points between the vertices for a nice smooth curve. Add the following method to the class:

[sourcecode]- (NSArray *)catmullRomSpline:(NSArray *)points segments:(int)segments
{
int count = [points count];
if(count &lt; 4) {
return points;
}

float b[segments][4];
{
// precompute interpolation parameters
float t = 0.0f;
float dt = 1.0f/(float)segments;
for (int i = 0; i &lt; segments; i++, t+=dt) {
float tt = t*t;
float ttt = tt * t;
b[i][0] = 0.5f * (-ttt + 2.0f*tt – t);
b[i][1] = 0.5f * (3.0f*ttt -5.0f*tt +2.0f);
b[i][2] = 0.5f * (-3.0f*ttt + 4.0f*tt + t);
b[i][3] = 0.5f * (ttt – tt);
}
}

NSMutableArray *resultArray = [NSMutableArray array];

{
int i = 0; // first control point
[resultArray addObject:[points objectAtIndex:0]];
for (int j = 1; j &lt; segments; j++) {
CGPoint pointI = [[points objectAtIndex:i] CGPointValue];
CGPoint pointIp1 = [[points objectAtIndex:(i + 1)] CGPointValue];
CGPoint pointIp2 = [[points objectAtIndex:(i + 2)] CGPointValue];
float px = (b[j][0]+b[j][1])*pointI.x + b[j][2]*pointIp1.x + b[j][3]*pointIp2.x;
float py = (b[j][0]+b[j][1])*pointI.y + b[j][2]*pointIp1.y + b[j][3]*pointIp2.y;
[resultArray addObject:[NSValue valueWithCGPoint:CGPointMake(px, py)]];
}
}

for (int i = 1; i &lt; count-2; i++) {
// the first interpolated point is always the original control point
[resultArray addObject:[points objectAtIndex:i]];
for (int j = 1; j &lt; segments; j++) {
CGPoint pointIm1 = [[points objectAtIndex:(i – 1)] CGPointValue];
CGPoint pointI = [[points objectAtIndex:i] CGPointValue];
CGPoint pointIp1 = [[points objectAtIndex:(i + 1)] CGPointValue];
CGPoint pointIp2 = [[points objectAtIndex:(i + 2)] CGPointValue];
float px = b[j][0]*pointIm1.x + b[j][1]*pointI.x + b[j][2]*pointIp1.x + b[j][3]*pointIp2.x;
float py = b[j][0]*pointIm1.y + b[j][1]*pointI.y + b[j][2]*pointIp1.y + b[j][3]*pointIp2.y;
[resultArray addObject:[NSValue valueWithCGPoint:CGPointMake(px, py)]];
}
}

{
int i = count-2; // second to last control point
[resultArray addObject:[points objectAtIndex:i]];
for (int j = 1; j &lt; segments; j++) {
CGPoint pointIm1 = [[points objectAtIndex:(i – 1)] CGPointValue];
CGPoint pointI = [[points objectAtIndex:i] CGPointValue];
CGPoint pointIp1 = [[points objectAtIndex:(i + 1)] CGPointValue];
float px = b[j][0]*pointIm1.x + b[j][1]*pointI.x + (b[j][2]+b[j][3])*pointIp1.x;
float py = b[j][0]*pointIm1.y + b[j][1]*pointI.y + (b[j][2]+b[j][3])*pointIp1.y;
[resultArray addObject:[NSValue valueWithCGPoint:CGPointMake(px, py)]];
}
}
// the very last interpolated point is the last control point
[resultArray addObject:[points objectAtIndex:(count – 1)]];

return resultArray;
}
[/sourcecode]

All credits go to supersg559 for the implementation Catmull-Rom Spline algorithm above. I merely modified it to use NSArrays instead of C-arrays. A good explanation of the algorithm can be found on “The Code Project”.
Finally, modify touchesEnded:withEvent: to use this algorithm:

[sourcecode]- (void)touchesEnded:(NSSet *)touches withEvent:(UIEvent *)event
{
NSArray *generalizedPoints = [self douglasPeucker:drawnPoints epsilon:2];
NSArray *splinePoints = [self catmullRomSpline:generalizedPoints segments:4];
imageView_.image = [self drawPathWithPoints:splinePoints image:cleanImage];
[drawnPoints release];
[cleanImage release];
}
[/sourcecode]

That’s it. You’re done!

It would facilitate them to put fine-looking signatures, draw beautiful sketches and make impressive presentations.

Have something to add to this topic? Share it in the comments.

At Andolasoft we have a team dedicated iOS app developer who has long expertise in implementation of Service Oriented Architecture. Our developers can help you in all your mobile app development issues. So don’t hesitate to communicate with them. Book a free consultation to access them directly.

What Is The Key Points For Successful iOS Development?

After the introduction of iOS platform and the application development possibilities, it has paved new business opportunities for the IT industries as well as individual developers.

With the rapidly growing app industry it has become demanding to keep track of changing technology.

Here we have come up with some major key points which should be kept in mind by the developer at the time of iOS application development.

Never miss an update from us. Join 10,000+ marketers and leaders.

    1. Drive revenue for your business by integrating  ‘Geo-Targeted push Notification’, ‘Geo-Targeted Advertising’
    2. Integrate NFC (near field communication) system to your application.
    3. Use App analytics to monitor the app’s influence on the market. Target your audience and bring market specific features to you app.
    4. Avoid these flaws in your mobile app development
    5. Irrelevant push notification in the app
    6. Sending unnecessary “Rate my app” request to users
    7. Integrating Facebook and other social networking sites unnecessarily
    8. Avoid using full screen ads. Users hate this.
    9. Try to prefer building Native Apps for iPhones to web apps, because some web technologies are still not compatible with the iOS platform.
    10. Design intriguing UI to compel the user to use your app. Take inspiration from other successful Mobile application to generate similar experience for the users.
    11. iOS development supports numerous programming languages other than Objective-C, such as Ruby, JavaScript, Node.js etc. Choose the language you are comfortable with.
    12. Design your app so that it uses minimal battery power. Users are more concerned about the phone battery rather than the app itself.
    13. Develop cross-platform apps, so that it can be released for other mobile operating systems.
    14. Never build iPhone app that mimics the look and feel of other operating system.
    15. Never overdo the application animations and graphics.

I’ve worked with the team at Andolasoft on multiple websites. They are professional, responsive, & easy to work with. I’ve had great experiences & would recommend their services to anyone.

Ruthie Miller, Sr. Mktg. Specialist

Salesforce, Houston, Texas

LEARN MORE

iOS applications are the fastest evolving apps in the app industry.

That’s why at Andolasoft, our iPhone application developers keep their skills updated with the latest technology and latest iOS releases to match the competitive market.

Here we develop engaging iPhone application to meet our customer’s business requirements.