Supercharge your Rails app development with “Metric_fu”

Why we need Metric_fu?

Sometimes we are unaware of unknown complexities in our rails code and it gets messy. Moreover, it reduces application performance, scalability and maintainability.

What is Metric_fu?

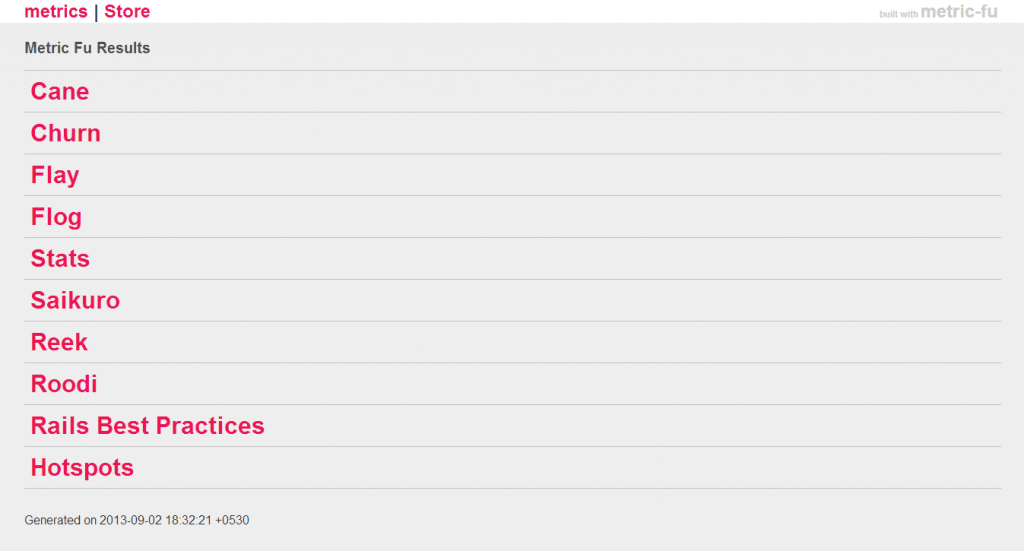
Metric_fu is a set of rake tasks and compilation of several different tools that provides reports. This show which parts of your rails code might need extra work. It uses the following built-in tasks to create a series of reports.

  • Rcov – Measures test coverage
  • Flog – Measures code complexity
  • Saikuro – Measures cyclomatic complexity
  • Flay – Finds duplication (both copy/paste and structural)
  • Reek – Spots code smells
  • Roodi – Finds lots of general problems
  • Churn – Identifies files that changes too often
  • Rails best practices – code matric tool
  • Cane -code quality threshold violations
  • HotSpot– Meta analysis of your metrics to find hotspots in the code

Benefits of Metric_fu

  • You can measure the complexity of rails code
  • Creates a “hit list” of most complex methods
  • Reveals hidden issues like bugs and other complexities
  • Examine worst offenders
  • Refactoring complex methods
  • Creates smaller, easier to understand methods

Step#1

  • Add ‘metric_fu’ gem to your gem file
gem "metric_fu"
  • Run “bundle install”

Metric_fu will install several other dependencies unless they are already present.
These include Flay, Flog, Rcov, Reek, Facets and Roodi.

  • Run following command to generate the metrics
rake metrics:all

It will generate a metric of your code in the temp/matric_fu repository,
it uses a number of other open source project to generate the metric.
metrics_home_page-1024x551

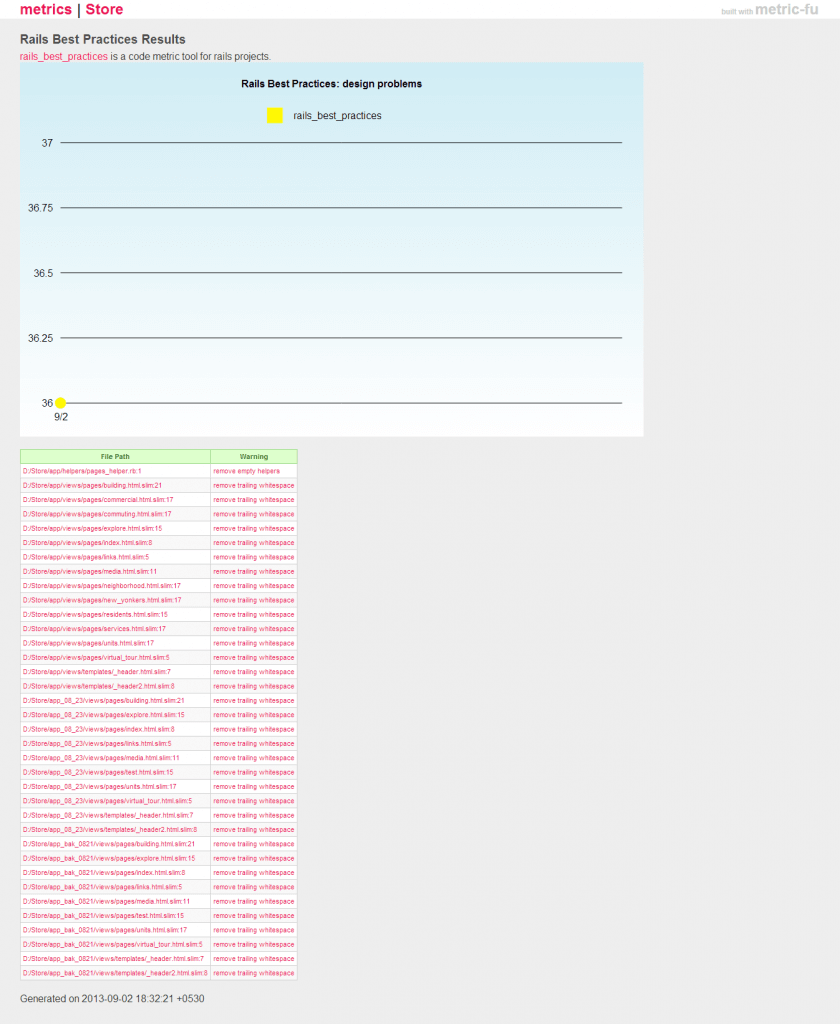
Rails_best_pratices_metrics-840x1024

Code analysis isn’t an exact science and none of the tools shown are perfect in themselves.
So they should all be used as an aid to help you find complex areas of your code and supercharge Rails app development.

4 Simple Steps To Implement “Delayed Job” In Rails

Here in this article, I going to tell you the best way to implement “delayed job” in rails

“delayed_job” is a ruby gem used to execute tasks as a background process in Rails environment, increasing page rendering speed.

Delayed::Job (or DJ) allows you to move jobs into the background for asynchronous processing.

Why you need a background process and is it really that important!

Let’s consider a scenario where a mailing application needs to send emails to a huge list of recipients. In such cases it is obvious that the processing time is too long, annoying the users.

Here are some of key points to consider:

  • Incredibly quick & easy to get rolling
  • No addition to your “stack”, runs just fine with Active Record
  • Good choice for beginners while migrating code from foreground to the background

Hence, it’s only wise to move the long running tasks as a background process by using “delayed_job” gem.

Detailed steps to integrate delayed job in a Rails application

Step# 1

  • Add gem to the Gemfile
  • “delayed_job” supports multiple back-ends for storing the job queue
  • To use “delayed_job” with Active Record, use gem ‘delayed_job_active_record’
  • To use “delayed_job” with Mongoid, use gem ‘delayed_job_mongoid’

Example

/Gemfile.rb

  • gem ‘delayed_job_active_record’, ‘4.0.3’
  • Run “bundle install” to install the “delayed_job” gem

Step# 2

  • Generate the related file for the Job run
  • Generate related files required to run the background job by running the following command
    • rails g delayed_job:active_record

It adds following files to the application

  • A Script named “delayed_job” inside “/bin” folder to run the jobs which are in queue.
  • Migration file to create a table to store the job with other information such as priority, attempts, handler, last_error, run_at, locked_at, failed_at, locked_by, queue.

Run the migration file by using the following command

  • rails db:migrate

Set the queue_adapter in config/application.rb

  • config.active_job.queue_adapter = :delayed_job

If you are using the protected_attributes gem, it must appear before delayed_job in your gemfile. If your jobs are failing with:

  • Setup Delayed::Job config in an initializer (config/initializers/delayed_job_config.rb)
    • Delayed::Worker.destroy_failed_jobs = false
    • Delayed::Worker.sleep_delay = 60
    • Delayed::Worker.max_attempts = 3
    • Delayed::Worker.max_run_time = 5.minutes
    • Delayed::Worker.read_ahead = 10
    • Delayed::Worker.default_queue_name = ‘default’
    • Delayed::Worker.delay_jobs = !Rails.env.test?
    • Delayed::Worker.raise_signal_exceptions = :term
    • Delayed::Worker.logger = Logger.new(File.join(Rails.root, ‘log’, ‘delayed_job.log’))

Step# 3

  • Replace script/delayed_job with bin/delayed_job
  • Start up the jobs process

There are two ways to do this.

  • If application is in development mode, we would use the below rake task instead.
    • rake jobs:work
  • If application is in production mode, then it is preferred to use the “delayed_job” script. This demonizes the job process and allows multiple background processes to be spawned.

To use this, pursue the following steps

  • Add gem “daemons” to your Gemfile
  • Run bundle install
  • Make sure you’ve run rails generate delayed_job
  • If you want to just run all available jobs and exit you can use rake jobs:workoff
  • Work off queues by setting the QUEUE or QUEUES environment variable.
    • QUEUE=tracking rake jobs:work
    • QUEUES=mailers,tasks rake jobs:work

Step# 4

  • Add task to run in background
  • In Controller just call .delay.method(params) on any object and it will be processed in the background.

Example:

UsersController before adding to background job

[code language=”html”]
class UsersController < ApplicationController
def send_email
User.find_each(is_subscribed: true) do |user|
NewsMailer.newsletter_mail(user).deliver
flash[:notice] = "Mail delivered"
redirect_to root_path
end
end
end
[/code]

 
UsersController after adding to background job

[code language=”html”]
class UsersController < ApplicationController
def send_email
User.find_each(is_subscribed: true) do |user|
# add .delay method to add it to background process. In case of mail sending remove the .deliver method to make it work.
NewsMailer.delay.newsletter_mail(user)
flash[:notice] = "Mail delivered"
redirect_to root_path
end
end
end
[/code]

Advantages of implementing above steps:

  • No more waiting for a response, after clicking a link to do a big stuff.
  • Just call .delay.method(params) on any object and it processes in the background.
  • Job objects are serialized to yaml and stored in the delayed_jobs table, so they can be restored by the job runner later.
  • It automatically retries on failure. If a method throws an exception it’s caught and the method reruns later. The method retries up to 25 times at increasingly longer intervals until it passes.
  • “delayed_job” gem maintains log by creating a log file “/log/delayed_job.log”

I am sure this article will give you a clear idea about the way to implement “delayed job” in rails. You can share your thoughts with comments if I have missed anything or if you want to know more.

Do you work on or use Ruby on Rails? Let’s Discuss!

Watch out for the latest Security Patch to deal authentication bypass for RoR

ror41Ruby on Rails framework developers have been continuously releasing security updates since the last two weeks. Its recent updates like 3.0.20 and 2.3.16 versions were to address the remote code execution vulnerability. This was the third security patch released this month. The developers have mentioned that the updates released are extremely important, and have advised the users of 3.0.x and 2.3.x rails framework to update as soon as possible.

The security update will fix the vulnerability in the Rails JSON code. That allowed the hackers to bypass authentication system and inject random SQL into the application database. It occasionally performed denial-of-service attack too. The rails developers have also pointed out that currently it supports only the 2.3.x, 3.1.x, and 3.2.x versions and might release an update for 3.0.x version.

Most recent vulnerability was identified as CVE-2013-0333, which was patched in the framework on 8th of Jan. The Ruby on Rails developers using Rails 2.3 and 3.0 are also advisable to install the new fixes even if they have installed the fix for CVE-2013-0156 earlier.


Brief Summery

  • Affected Versions are: 2.3.x, 3.0.x
  • Unaffected Versions are: 3.1.x, 3.2.x, and applications using yajl gem
  • Fixed Versions are: 3.0.20, 2.3.16

How to do tagging in Rails with gem ‘Acts_as_taggable_on’

ror41Tagging is a way to give a keyword and search by that particular keyword. In Rails “acts-as-taggable-on” is one of the popular gem for tagging. With ‘acts_as_taggable_on’, you can tag a single model on several contexts, such as skills, interests, and awards

Below is an example to describe how to implement it in a Rails application:

    Step#1

  • Add the gem to your Gemfile:
  • gem ‘acts-as-taggable-on'
  • Then run the bundle
  • bundle install

    Step#2

  • Run the generator command
  • rails g acts_as_taggable_on:migration
  • Run the migration file
  • rake db:migrate

    This migration will create two tables in the database: tags and taggings.
    Step#3
    Now you have to modify your model where you want to implement tagging.
    For example, we like to implement the tagging on Post model.

  • Add the following codes to the “Post” model to have acts_as_taggable and also add a “tag_list” field to the attr_accessible list.
  • attr_accessible :content, :name, :tag_list
    acts_as_taggable

    Step#4

  • Add a new field to your post form.
  • <%= f.label :tag_list, "Tags (separated by commas)" %>
    <%= f.text_field :tag_list %>

    Step#5

  • Add the following codes, if you want to show the tags for the tagged posts in the listing page:
  • <% @posts.each do |post| %>
    <h2><%= link_to post.name, post %></h2>
    <%= simple_format post.content %>
    <p>
    Tags: <%= raw post.tag_list.map { |t| link_to t, tag_path(t) }.join(', ') %>
    </p>
    <% end %>

    Step#6

  • Modify your route file to get the tags
  • get 'tags/:tag', to: 'posts#index', as: :tag

    Step#7

  • Modify your controller:
  • class PostsController < ApplicationController
    def index
    if params[:tag]
    @posts = Post.tagged_with(params[:tag])
    else
    @posts = Post.all
    end
    end
    end
    

Voila! You have done it.

Validating RSS Feeds in Rails

Rails1FeedValidator is a gem which validates the RSS feeds through SOAP protocol of the W3C Feed Validation service. It helps to find out errors in RSS or ATOM feeds. In Rails app we can do the feed validation by installing the gem.

    Step#1

  • Install the FeedValidator as a gem:
  • gem feedvalidator

    Run the bundler to install the gem
    Step#2

  • Include the require ‘feed_validator’ into your controller
  • Step#3

  • Generate a migration file and edit the file to add the following fields
  • class CreateFeeds < ActiveRecord::Migration
    def self.up
    create_table :feeds do |t|
    t.string :title
    t.timestamps
    end
    end
    def self.down
    drop_table :feeds
    end
    end
    

    Step#4

  • Validate your feed URL in your controller
  • def create
    site_url = params[:feed][:title].sub(/(\/)+$/,'')
    begin
    v = W3C::FeedValidator.new
    if v.validate_url(site_url) && v.valid?
    @feed = Feed.new(:title => site_url)
    @feed.save
    end
    rescue
    # Do nothing
    end
    redirect_to request.referrer
    end

File Uploading Through Paperclip in Rails 3.x

Rails3Paperclip is an easy file attachment library for Rails Applications. Attached files are saved to the file system, database or cloud and referenced in the browser by an easily understandable specification.

Here is an example to explain the image attachment for a user profile in an application. This example narrates about saving the image in the file system. However, the images can be saved in S3 bucket [Amazon Simple Storage Service, S3] or database.

Step#1

ImageMagick must be installed in the system and Paperclip must have access to it. ImageMagick is a software suite to create, edit, compose, or convert bitmap images. It can read and write images in a variety of formats. You can download it by visiting the following URL:

http://www.imagemagick.org/script/index.php

Step#2
Include the paperclip gem in your Gemfile

gem "paperclip"

Then run the bundler to install the gem

bundle install

Step#3
Add the fields for the image processing as below in your migration file

class CreateUsers < ActiveRecord::Migration
def change
create_table :users do |t|
t.string :name
t.string :photo_file_name
t.string :photo_content_type
t.string :photo_file_size
t.timestamps
end
end
end

Then run your migration files

rake db:migrate

Step#4

Modify the user model for cropping and save image in your system folder

has_attached_file :photo, :styles => { :small => "150x150>" },
:url => "/system/:attachment/:id/:style/:basename.:extension",
:path => ":rails_root/public/system/:attachment/:id/:style/:basename.:ex

Here you can specify the file path and the image size as per the requirement.

Step#5
Modify your view file to upload an image

<pre class="plain plain">&lt;%= form_for :user,:url =&gt; {:action =&gt; "create"}, :html =&gt; { :multipart =&gt; true } do |f| %&gt;
&lt;%= f.file_field :photo %&gt;
&lt;% end %&gt;</pre>

Step#6
Write the following code to display the image of a user

<%= image_tag @user.photo.url (:small)%>

Please stay connected with us by subscribing our email.
Also feel free to share your opinions in the comments section below: